The Tables plugin is a standalone extension to the priint:comet Illustrator plugins. It can either be used without comet functionality (standalone mode) or in conjunction with the priint:comet Plugins to extend and interoperate with the existing toolset (extension mode).
The plugin Tables only provides the user interface and is optional when running in extension mode - in this case tables can still be accessed using cScript and Python. When used in standalone mode it is neccesary.
The Tables plugin provides the ability to create, modify and introspect table-like object structures inside an Illustrator document. It closely mimics how tables work in InDesign, using native Illustrator document objects like text frames, rectangles and groups. Interactive tools and script commands (in extension mode) are provided to enable artists and developers alike.
There are two modes in which the table module can operate:
Standalone mode
In this mode the table module is running without priint:comet functionality like placeholders, layout rules, etc...
This mode provides interactive UI tools and panels to manually create tables inside your Illustrator documents and style them according to your needs.
This mode requires the tables license
Extension mode
This mode contains all functionality of the standalone mode, plus additional functionality provided by priint:comet like a library of cScript commands to automatically create and modify tables, e.g. from external sources like Excel files
This mode requires the priint:comet basic license
For both modes you will need to have the CoreService and Tables plugins installed.
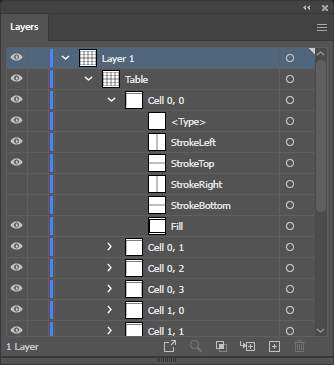
Since tables are built using native Illustrator art objects, there is a fixed structure in which they are created and managed.
This structure must never be changed manually, else all table tools will cease to function!
A table is an Illustrator group containing groups for each cell which in turn contain objects for strokes, fill and the actual content.
Even though some objects inside may be hidden, they are still needed and the visibility of these objects is managed by the tables module itself.
There are several ways to create a table:
Interactive creation is accessed either through the menu command Object->priint:comet->Tables->Create or through the tables panel, using the Create button. In both cases a dialog prompts the designated table dimensions and table style:

When this dialog is accepted, an interactive creation tool is activated, enabling the creation of a table in the document by dragging the size directly onto the artboard.
The font setting of the last text selection is used as the font for the cells of the table:
The tables plugin provides functionality for importing tables and content directly from a CSV file.
Using the Import from CSV file button on the tables panel opens a file selection dialog, prompting the user to select an input file.
After selecting a file, a variety of import options is offered using a dialog.
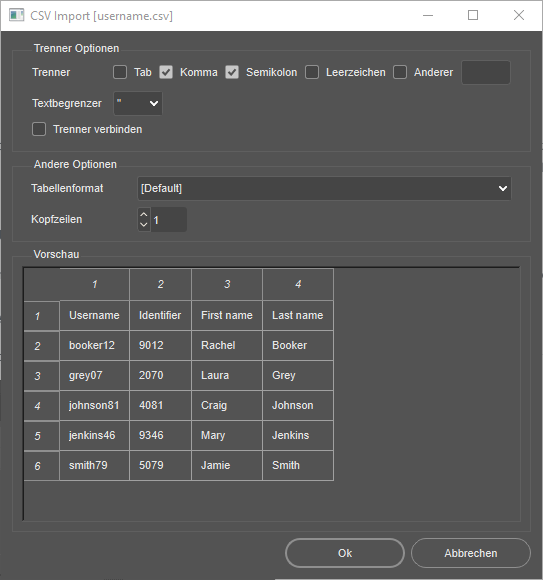
The following import options are available:
Separator characters used for delimiting cell data. Even though CSV stands for Comma separated value, often other delimiters like semicolons etc. are used. Here you can select which characters to interpret as delimiters. You can also select multiple characters.
To enable using separator characters in cell content they have to be placed in quotes. Here you can select which type of quote to use.
When this option is active, multiple consecutive separators are interpreted as one instead of delimiters for empty content.
The selected cell format is directly applied to the created table.
Here you can configure how many header rows the created table should have. Header rows are relevant for table styles that apply different formats to header rows.
This dialog area provides an interactive preview of the table dimensons and cell content. When the separator options are changed, this preview is updated aswell.
When the dialog is accepted the table can be created using the now activated interactive tool. Because a CSV file contains no information about cell size, the size used from the interactive creation is distributed evenly among all cells.
The tables plugin provides functionality for for importing tables and content directly from a Microsoft Excel file.
Using the Import from Excel file button on the tables panel opens a file selection dialog, prompting the user to select an input file.
After selecting a file, a variety of import options is offered using a dialog.
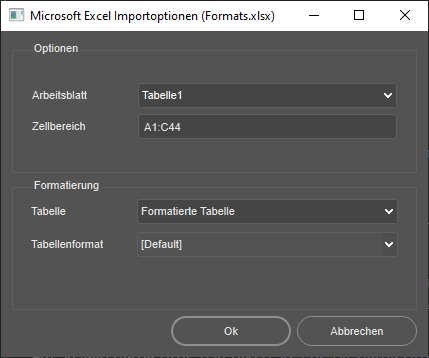
The following import options are available:
Since an Excel file can contain multiple 'Tables' in sheets, the sheet to import is selected here.
Use this option to limit the cell area to import.
The must be provided in the form Cell left top:Cell bottom right in Excel column and row notation.
e.g. B3:C14
When the dialog is first opened or the sheet is changed, this cell area is initialized to the actually filled cells from that sheet.
This option configures wether the imported table should be formatted like the Excel table.
The following options are available:
This option creates a table which closely resembles the Excel input table in regards to cell background colors, cell strokes and cell insets.
The following limitations apply:
This options only applies the selected table format and does no further formatting.
When the format mode 'Unformatted table' is selected, this format is applied to the table.
When the dialog is accepted, an interactive tool is activated to place the table. Since the size of the table is determined by the Excel file, the user can only select the placement of the table.
Here are some general hints in regards to cell content:
| Description | Example |
| general format | |
| general number | 1000 |
| number with decimal point | 1000,00 |
| number with thousands separator | 100.000 |
| number with decimal point and thousands separator | 100.000,00 |
| monetary value, negative in brackets | (1000 €) |
| monetary value, negative is red in brackets | (1000 €) |
| monetary value with decimal point, negative in brackets | (1000,00 €) |
| monetary value with decimal point, negative is red in brackets | (1000,00€) |
| percent value, multiply the cell value by 100 | 75% |
| percent value with decimal point, multiply the cell value by 100 | 75,00% |
| scientific value with E character and decimal point | 1,00E+1 |
| fraction value, one digit | 10 1/2 |
| fraction value, two digits | 10 23/95 |
| All date values | 11.3.2009 11. Mär. 09Mär. 09... |
| number with thousands separator, negative in brackets | (4.000) |
| number with thousands separator, negative is red in brackets | (4.000) |
| number with thousands separator and decimal point, negative in brackets | (4.000,00) |
| number with thousands separator and decimal point, negative is red in brackets | (4.000,00) |
| account value | 5.000 € |
| account value with currency symbol | 5000 € |
| account value with decimal point | 5.000,00 € |
| account value with currency symbol and decimal point | 5.000,00 € |
| custom time value | 30:55 |
| custom time value | 20:30:55 |
| custom time value | 30:55.0 |
| text value | any text |
In extension mode tables can be created and modified using cScript or Python commands, enabling procedural generation through external means, e.g. an Excel file etc..
A table is considered selected when the table group itself is directly selected and not only indirectly by selecting any child object underneath:

For some functionality it is required to properly select the table.
A cell is considered selected when either the cell group itself is directly selected, or any child object underneath. In the picture below, both cells 0,0 and 0,1 are considered selected:
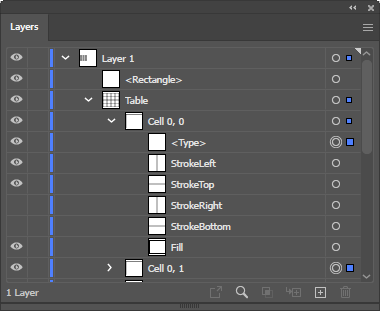
For some functionality it is required to properly select the cells you wish to operate on.
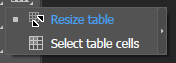
It can sometimes be cumbersome to properly select a cell using tools on the artboard, especially when the table intersects other elements on the artboard. For this reason we provide a selection tool found in the same tool group as the table resize tool which can only be used to select table cells.
To use this tool follow these steps:
A line (row or column) is considered selected, when a cell on that line is selected.
Since tables are created using native Illustrator objects, they can be modified as such.
However, it is important to follow certain rules to retain the functionality provided by the Tables plugin! Not following these rules will invalidate any Tables functionality!
There are three ways to move a table inside the Illustrator document:
Default selection tool

Inputting position coordinates into the Illustrator control bar

For this, the table group needs to be selected.
Scripting (extension mode)
Use the function frame::moveto or CPageItem.moveTo
The table size, aswell as row, column, stroke and content sizes may only be modified using the provided tools
There are two ways to modify the size of a table:
Resize table tool
For changing sizes of a table, aswell as row heights and column widths, the interactive Resize Table tool is provided.

It can only be activated when a table (and only a table) is selected.
When activating the tool, the mouse cursor changes depending on where it hovers over the table. Dragging at certain positions will resize the table or its rows and columns individually.
Dragging at one of the eight anchor points (Top Left, Top Center, Top Right, etc...) will resize the table uniformly while the opposite point is fixed in place.
Dragging at a delimiting line of a row or column will resize the line accordingly.
cScript (extension mode)
Use the functions table::resize_rows and table::resize_cols
There are two ways to rotating a table:
Rotate tool
In the UI, table rotation may only ever be changed using Illustrator's rotate tool:

While it is possible to rotate any object in Illustrator by using the selection tool and dragging along the corner points of an object's bounding box, this actually does reset any stored rotation values to 0, making it impossible to determine the rotational values afterwards.
Scripting (extension mode)
Use the functions frame::rotate with the table group as the frameRef parameter or CPageItem.setRotation on the table group.
Changing dimensions (row or column count) is done through the tables panel or menu commands found at Object->priint:comet->Tables->Insert/Remove.
When using the tables panel to add lines to the table, the lines are always added behind the last one.
When adding lines to the table through the menu command, the currently selected lines are respected and a dialog prompts how many lines to add and where to add them (before/after) relative to the currently selected lines.
The font settings of the new cells are determined in the same way as when creating a new table, see here. The following steps are necessary for this:
When using the tables panel to remove lines from the table, the lines are always removed at the end.
When removing lines to the table through the menu command, the currently selected lines are respected and removed.
There are two possible types of cells:
Text
Uses a text frame to place the content. Applies text-cell specific attributes from cell styles and overrides.
Graphic
Places a graphic item as the content. Applies graphic-cell specific attributes from cell styles and overrides.
The default cell type when creating a table is always Text.
To convert a cell to a different type, select the cell you wish to convert and use the Tables panel and the buttons underneath the Cell types category to convert the cell type.
When converting to a graphic cell you are immediately prompted to select a file to use as the graphic source. This is because there cannot be empty graphic frames in Illustrator.
The Tables plugin supports merged cells - cells that span more than one row, column or both.
There are three ways to merge multiple cells to one. For each a continuous area of cells (without holes inbetween) has to be selected:
When merging cells, the top left cell is the target cell which determines which overrides are retained and which cell type the result will have. When multiple text cells are merged to a single text cell, all text content is (paragraph delimited) into the result cell content.
The Tables plugin provides four ways to modify the look of a cell: Table styles, table overrides, cell styles and cell overrides.
Table styles, cell styles etc... can set the same attribute (e.g. the cell fill color) which seemingly conflicts. For this reason the following attribute resolution order is applied:
Cell override > Cell style (unless default) > Table override > Table style (unless default) > Default
Example for determining a cell fill color:
Cell overrides apply fill color?
True: Apply, done!
False:
Cell style explicitly applies fill color in inheritance chain?
True: Apply, done!
False:
Table overrides apply fill color through a pattern?
True: Apply, done!
False:
Table style applies fill color in inheritance chain through a pattern?
True: Apply, done!
False: Use default.
Table styles configure the overall look of a table and can also apply individual attributes to a cell. Table styles are applied directly to a table and changing the style itself changes all tables it is applied to.
Table styles are stored per document and are managed using the table styles panel. A double click on an entry in the table styles panel opens the Table Style Setup dialog.
Apply a table style by selecting a table you wish to change and then select the table style you wish to apply in the table styles panel.
Table styles can be inherited and only store the attributes which they override from their inherited style.
Table overrides configure deviations from the applied table style on a per-table basis
Table overrides can be configured using the Table Setup dialog, which is opened using the menu command Object->priint:comet->Tables->Table Setup or using the Tables panel and the Table Setup button. For both methods a single table must be selected.
Cell styles provide advanced options for determining the look of a cell. Cell styles can either be applied through table styles or by directly applying a cell style to a cell.
Cell styles are stored per document and are managed using the cell styles panel. A double click on an entry in the cell styles panel opens the Cell Style Setup dialog.
Apply a cell style by selecting the cells you wish to change and then select the cell style you wish to apply in the cell styles panel.
Cell overrides configure deviations from the applied table and cell style on a per-cell basis
Cell overrides can be configured using the Cell Setup dialog, which is opened using the menu command Object->priint:comet->Tables->Cell Setup or using the Tables panel and the Cell Setup button. For both methods a any number of cells can be selected, but all cells must belong to the same table.
When used in extension mode, the priint:comet plugins can create and modify tables using cScript or Python. While the scripting implementation closely follows the InDesign implementation, there are a few differences to consider:
When creating and modifying a table, performance may start to degrade depending on the type and count of operations performed.
Here are some strategies to help prevent the performance degradation when using scripting to alter your tables: