The document describes technical details about how to configure the Comet panel Table composition and the TaggedText extensions invoked by this module. At the beginning of the document you will find a short introduction into table compositions.
The document is NOT A MANUAL of the panel Table composition and on how to use it in detail!
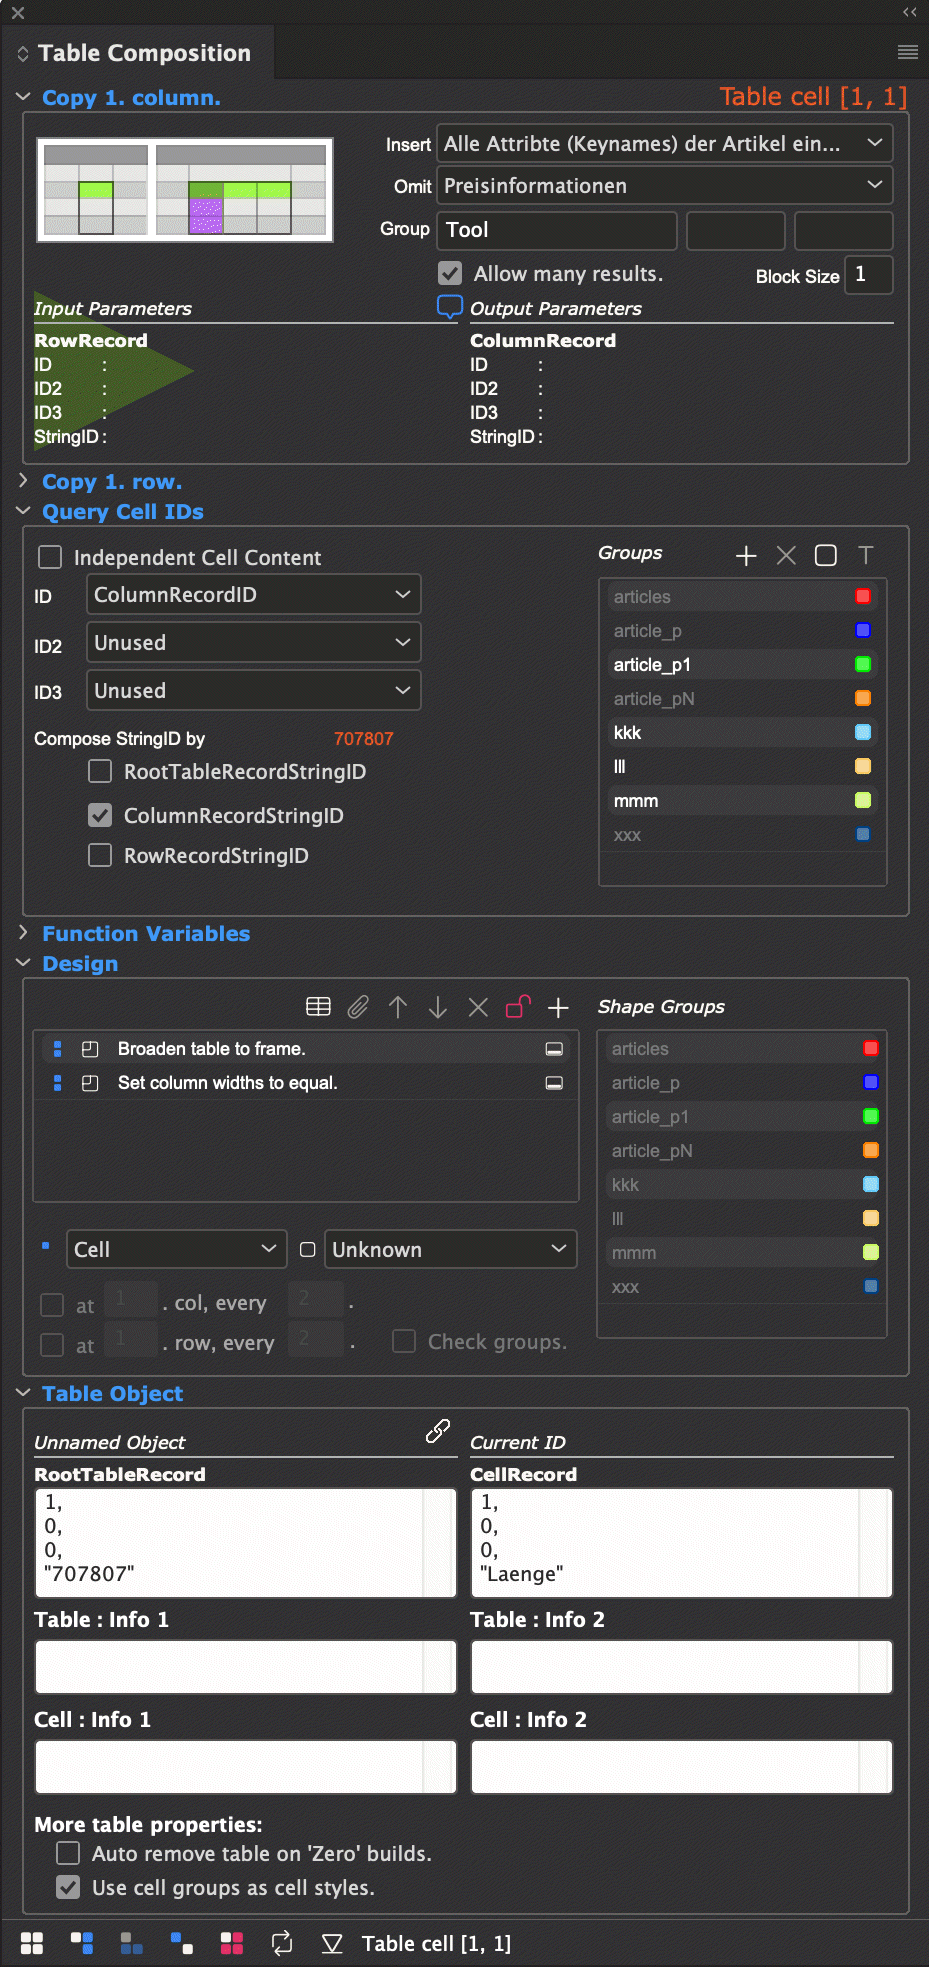
Here's a screen shot of the panel:

The table composition is used to show products, or more generally, of objects with variants and/or different numbers of characteristics in tables. If the table is composed once, it can be used for all objects with similar structure.
From a more technical state of view, table composition is used to show Cartesian products of variants and characteristics in tables.
Here you can see two products, shown (in German) by the same base table. The first products has five variants and two characteristics, the second one eight variants and four characteristics:

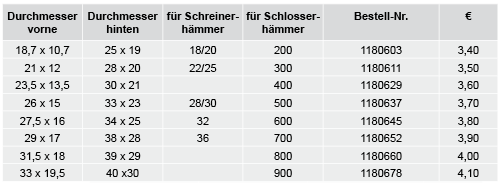
In the example, the Cartesian product is applied only on first level, but you may configure your tables to diving deeper than one level: Imagine, that the first characteristic Durchmesser (diameter) 18,7 x 10,7 is used for more than one hammer - in this case the table composition can create a sub block for this diameter
Hint 1 : In the following discussion the WERK II Industry Showcase is used to explain things. Contact the WERK II Support please to get a MySQL version of this showcase.
Hint 2 : The table template of the products show above is hidden a little bit:
Template Standard Produkt Montage (ID 74) is used here and frame B will hold the table after inserting a product:

Inserting the table into frame B (see the red corner of the frames) is done by the following steps:
- Placeholder of frame B inserts a w2 tag using frame::replace.
- This placeholder retreives the ID of the table template (Artikeltabelle Standard with ID 58).
- Duplicate the first table from the first frame of the table template into B.
- Build table
Of course, you can insert tables directly and build them up.
Attention : Although the showcase contains German texts for the tools only in the current version, the placeholders
are configured in such a way that you can also output other language versions.
The language is given in the name of the current document layer.
The current document level must therefore have the name of a valid language abbreviation.
For German, this is 'de'
Set the name of the current layer to the name de.
In the following screen shots you can see the base table and the ready built table of a tool (Spenglerrundzangen from Industry -> Hauptkatalog 2012 -> Montagematerial of panel Product Pool).


Both are looking quite different. How could this happen? Lets have a closer look to the small table therefor.
First step would be to link the table with a product.
This is the so called RootTableRecordID. Normally this ID is set by the Comet plugins automatically.
To manually link the table against a product, follow this three steps:
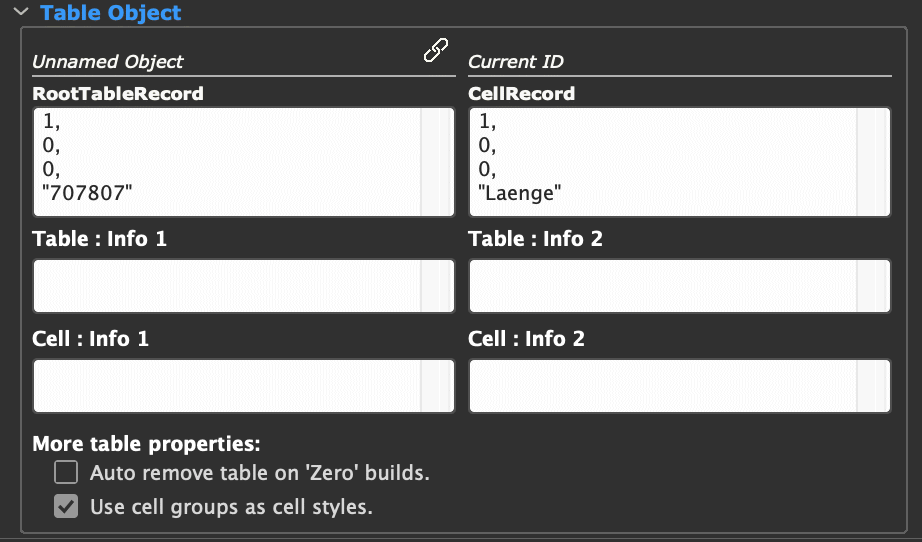
 in the area Table object of panel Table Compositon.
Using the Spenglerrundzangen I've got this RootTableRecordID (Cell-ID has no meaning for now):
In fact, I have no idea, what a Spenglerrundzangen can be, but here's a picture of it:

The controls showing the IDs are editable.
Table shall sho two things:
We are looking for the characteristics at first. We will need N columns here. One we have - so we have to duplicate this column N-1 times!
Duplicating rows and columns is done exactly like the standard menu
Table -> Insert -> Selected rows/columns with content
will do this job.
To duplicte the Attribut column, just click the cell with the word Attribut. Then choose "Alle Attribte (Keynames) der Artikel eines Produktes" (all attributes (keynames) of articles of one product) of popup Insert of the area Copy column.

Behind this popup there is a statement looking for all characteristics of a tool in the database. How this statement must look like and from where it comes we will learn later.
The current tool (the Spenglerrundzangen) has two characteristics. So, the Attribut column is duplicated one time and the table now looks like this:

Variants shall appear as rows below the characteristics. Analogous to the characteristics, select the cell right below the cell Attribut. and choose Alle Artikel eines Produktes (all articles of a product) of the Insert popup of area Copy Rows. The statement behind this popup entry will find five results and the second row of the table is duplicated four times. The table now look like this:
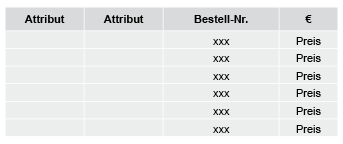
Even not really better, but the numbers of rows and columns are correct now after all.
It is certainly obvious, that the cell content contains Comet placeholders, and so it is. Here's a closer look to the table showing the placeholders inside the table:

It is definitely not necessary, to placeholder all content of all cells. Static things are allowed here of course.
But from where we get the IDs of the placeholders? Obviously, the RootTableRecordID can not be the solution - in this case, a lot of cells will get the same content.
Every cell of the table has three IDs:
Attention : The words Column- und RowRecordID are a litlle bit misleading:
The ID of the cell (the so called CellRcordID) is a composition of this three IDs. And the CellIDs are the IDs to load the placeholders of the cells. There ar at least two ways to compose the cell record ID:
The composition of the CellRecordID has to be done in EVERY cell with placeholders of the small table - not only in th hot spot cell that creates the cells!
The composition of the CellRecordID is done in the area Query cell IDs.
For the characteristics of our Spenglerrundzangen (the columns of the table) we can use the first (and simple) method. Only the StringID of the column is used to find out a characteristic name.
Placeholders are not loaded if the have an ID1 of 0. Therefore we set it to any value unequal 0 (for instance the ID 1 of the ColumnRecordID)
Please select the cell [Row 1, Column 1] of the table and compose the column record id:
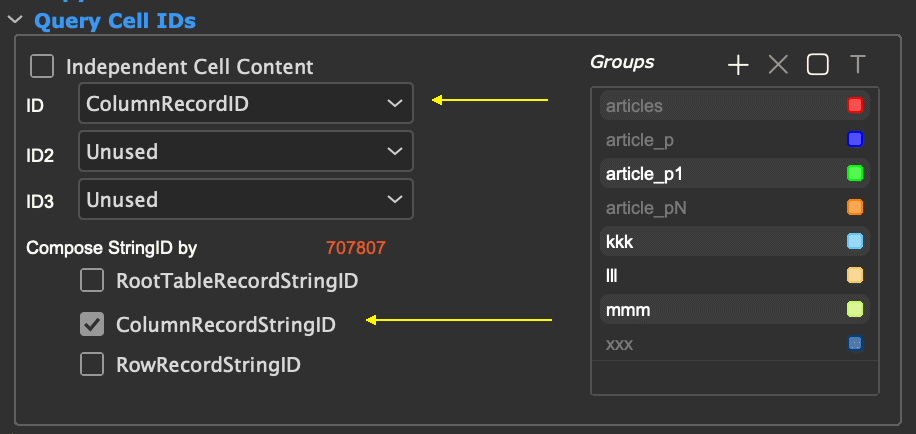
The values of the variants are shown in the rows of a table. They are a little bit more complicated in this case. We implemented a own statement for this task. Please activate Independent cell content in the area Query cell IDs and select the entry *Ermittle Attribut-id ... (Ascertain attribute id ...) of the popup menu:
Please select the cell [Row 2, Column 1] of the table and compose the column record id:

How this statement must look like and from where it comes we will learn later.
And finally the inner cells : These are simple features of the variants. But the variants are already defined in the rows. The placeholders will need a ID1 and a string ID.
Compose the cell IDs of the cells [Row 2, Column 2] und [Row 2, Column 3] as shown here:
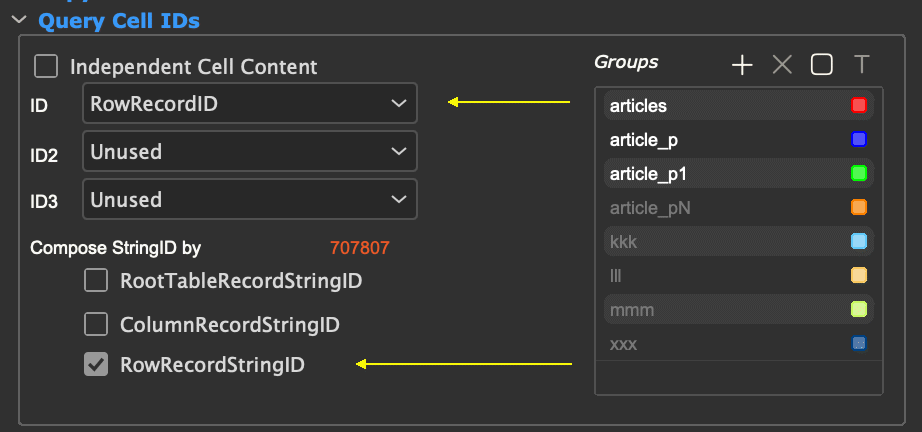
At least we have to compose the CellRecordIDs for the Bestell-Nr. (order number) and for €. This values are easy to get, we simply need the StringID of the RowRecordID and you can set it analogous to the attributes.
The table now look like this:
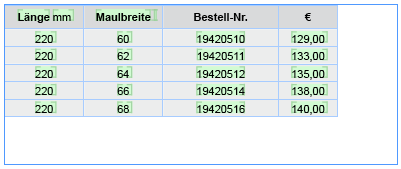
We are nearly finished. What we have to do is bringing the table to the same size like its frame and to equalize all columns with characteristics. This task are supported by built-in table layout rules.
You may implement you own rules as well. See here to learn more about own table layout rules.
The configuration of the table layout is to be done in the area Design.
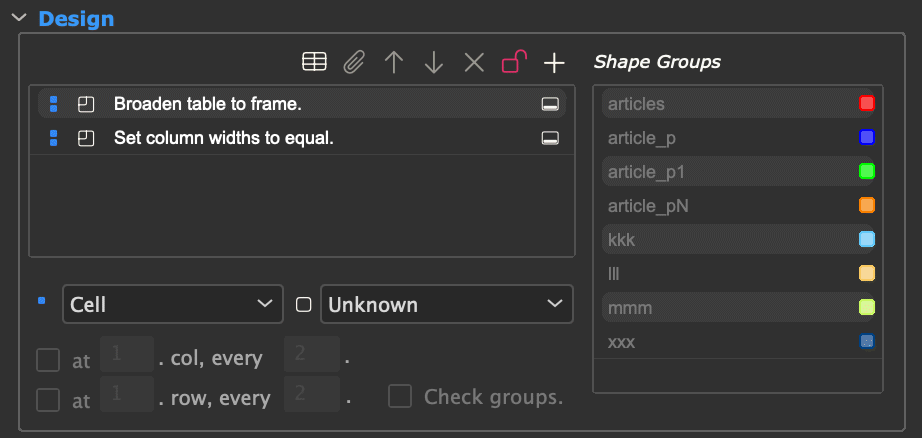
The table is now ready and looks like the table from the beginning of this document:

With table layout rules you can finish the design of the table.
Rules are restricted to areas of tables. This areas are calculated every time a rule is executed
| ID | Key | Icon | Area | Remarks |
| 7 | table |  |
Complete table |
Rule is execute once for the table. |
| 8 | cells |  |
All cells of table |
Rule is execute for every cell of the table. |
| 2 | self |  |
Cell | |
| 3 | col |  |
Column (from cell) | |
| 4 | row |  |
Row (from cell) | |
| 1 | left |  |
Left neighbor | |
| 0 | above |  |
Above neighbor | |
| 5 | block |  |
Complete block |
Blocks are the range of columns or rows, created by a hot spot cell. B locks beginning at the hot spot cell and ending at the end of the table. Using the buttons |
| 6 | children |  |
All cells of the block |
To give users an idea of what a rule will do, they are displayed together with one of the following icons:
| ID | Icon | Intention |
| 0 |  |
Unknown |
| 1 |  |
Script |
| 2 |  |
Contours |
| 3 |  |
Fill |
| 4 |  |
Text |
| 5 |  |
Geometry |
| 6 |  |
Split, Unmerge |
| 7 |  |
Merge |
| 8 |  |
Insert |
| 9 |  |
Calculation |
| 10 |  |
Message |
| 11 |  |
Save |
Intention is a matter of display only and will not change a rules operation.
Table composition comes with a small set of built-in table layout rules:
| Name | Intention |
 Merge similar rows Merge similar rows |
In sub blocks of a table, the hot spot cell may have the same content always. Shall I merge this cells into one single cell? |
 Merge similar columns Merge similar columns |
|
 Broaden table to frame Broaden table to frame |
Resize one or all columns so that the table gets the same witdh like its frame. If the table has more than one frame, the first frame is taken as reference.
|
 Equal column width Equal column width |
Equalize column widths without changing the width of the table.
|
 Fit column Fit column |
Fit columns to remove oversets from all cells of the column.
|
 Merge equal cells Merge equal cells |
Merge cells with equal contents.
[ since v4.1.6 R25001] Text contents can be compared in four different ways:
The settings correspond to the compareFunction parameter of the table::merge_equal function. In addition to the text content, the inlines in the text are also checked. It applies:
|
 Unmerge cell Unmerge cell |
|
Table layout rules may be implemented in a way that they take care on group memberships of cells. Cells may have any number of group memberships.
There are three ways to add a cell to a group:
In the Copy rows/columns areas of the panel you can define group names for the filled or created rows and columns:

Imagine, that the above statement Alle Artikel eines Produktes (All articles of a product) returns four record IDs. The twelve rows (=4 RecordIDs * 3 (Bóck size)) will then get the following groups:
Rows 1-3 : article_p, article_p_1
Rows 4-9 : article_p
Rows 10-12 : article_p, article_p_N
The statements for duplicating rows and columns (see here) may contain any number of additional groups. Every cell filled or created by a statement will get a member of all groups given by the statement.
Using the list Groups of cells in the area Query cell IDs you may add as much groups to any cell as you want.
Adding new groups are done by clicking the small +. New groups are assigned to colors automatically. To add or remove a group membership, simply select the table cell and click the group name. Memberships are toggeling - black means "member", gray means "Not a member".
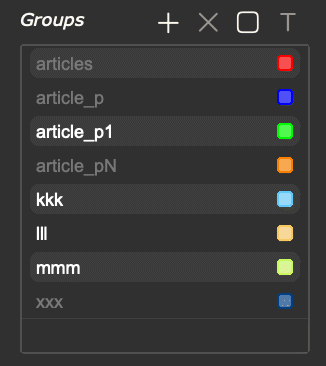
Clicking the color button of a group will set the background color of all cells inside this group to the group color. To hide this colors, click the color button again.
It would be really nicer to have a cell adornment for group memberships but the InDesign® API is not prepared to implement such things.
Using the buttons - and A you may rename and remove groups.
Attention : Mouse clicks are used to toggle group member ships. To select an entry here please use right mouse clicks!
Thats all about table modules cell groups.
Statements for retreiving record IDs are used at different places of the panel:
All popups are filled with the same entries.
The actions behind this entries are defined (as usually) in the table or XML file actions and are marked with type/typeid 23.
Attention : Do not use the ClassID here!
The statements must return five result rows always:
| Name | Type | Description |
| ID | int | Comet record ID |
| ID2 | ||
| ID3 | ||
| StringID | string | |
| Groups | string |
Add all cells filled/created by the statement to all of this groups, see here for more information. The string may contain any number of blank delimited group names. Group names with blanks are enclosed in "s. If used as Independent cell content statement, group names are ignored. |
In addition to the global defined tags the following tags (enclosed in <>) are defined here:
| Name | Typ | Beschreibung |
| RootTableRecordID | int | Current record ID of table |
| RootTableRecordID2 | ||
| RootTableRecordID3 | ||
| RootTableRecordStringID | char* | |
| ColumnRecordID | int | Current ID of column |
| ColumnRecordID2 | ||
| ColumnRecordID3 | ||
| ColumnRecordStringID | char* | |
| RowRecordID | int | ICurrent ID of row |
| RowRecordID2 | ||
| RowRecordID3 | ||
| RowRecordStringID | char* | |
| CellRecordID | int | [since v3.3.1 R3387] Record ID of cell |
| CellRecordID2 | ||
| CellRecordID3 | ||
| CellRecordStringID | char* | |
| RowParent. | - | [since v3.3.1 R3387] Find the parent ID of the cell. Using multiple Parent nodes you may walk backward through the table. If there is no more grandsire, 0 or "" is returned.
Examples |
| ColParent. | ||
|
PubServer specific tags |
See here for more information. The values are taken from the string IDs and valid only in PUBSERVER connections. |
|
This is the select from the example shown above:
select distinct 1,0,0,i.id,'articles'
from comet_infoobject i
where
i.infoobject_id = <RootTableRecordStringID> and i.keyname = 'Artikel' order by i.id
Statements may be implemented as cScripts as well. To return the requested record IDs and group names, the script must fill in the global lists. It is allowed to return an empty gMoreGroups list, but if it is filled, it must have the same size as gProducts. The following variables are defined in the scripts:
| Name | Type | Description |
| gTable | ItemRef |
Table to build. |
| gRow | int | Calling cell (0-based) |
| gColumn | ||
| gProducts | IDTypeList |
Products to build by the calling hot spot cell. Use calls like idtypelist::append (gProducts, 1, 0, 0, "");.to fill in the list. |
| gMoreGroups | StringList | Additional groups of created cells.
Example:
Don't forget to escape quotes by using \! |
| gRootTableRecordID | int | Current record ID of table |
| gRootTableRecordID2 | ||
| gRootTableRecordID3 | ||
| gRootTableRecordStringID | char* | |
| gColumnRecordID | int | Current record ID of column |
| gColumnRecordID2 | ||
| gColumnRecordID3 | ||
| gColumnRecordStringID | char* | |
| gRowRecordID | int | Current record ID of row |
| gRowRecordID2 | ||
| gRowRecordID3 | ||
| gRowRecordStringID | char* | |
| gCellRecordID | int | [seit v3.3.1 R3387] Current record ID of cell |
| gCellRecordID2 | ||
| gCellRecordID3 | ||
| gCellRecordStringID | char* | |
|
PubServer specific variables |
See here for more information. The values are taken from the string IDs and valid only in PUBSERVER connections. |
|
Here'a a very simple simple script:
#include "internal/text.h"
#include "internal/products.h"

int main ()
{
	char 	mg[1000];

	idtypelist::append (gProducts, 1, 0, 0, "aaa");
	stringlist::append (gMoreGroups,
	sprintf (mg, "\"Gruppe %d\"", idtypelist::length (gProducts)));

	idtypelist::append (gProducts, 2, 0, 0, "aaa");
	stringlist::append (gMoreGroups,
	sprintf (mg, "\"Gruppe %d\"", idtypelist::length (gProducts)));

	idtypelist::append (gProducts, 3, 0, 0, "aaa");
	stringlist::append (gMoreGroups,
	sprintf (mg, "\"Gruppe %d\"", idtypelist::length (gProducts)));

	return 0;
}
The function variables allow individualizing actions per cell. These variables are stored on a per-cell basis. More under Function variables.
ALT-Clicking the + button above the Methods list of the area Design, the following dialog will appear:

Attention : New rules created her are directly saved into youre data pool. There is no possibility to remove this rules from your InDesign®.
You can choose one of the following rule types:If you own a Partner license, you can edit this rules like every other script by ALT-clicking it.
Supported since CC 2014.
If you choose this option, the standard Cell Options dialog will appear and all contour resp. fill settings made here are inserted into the new script.
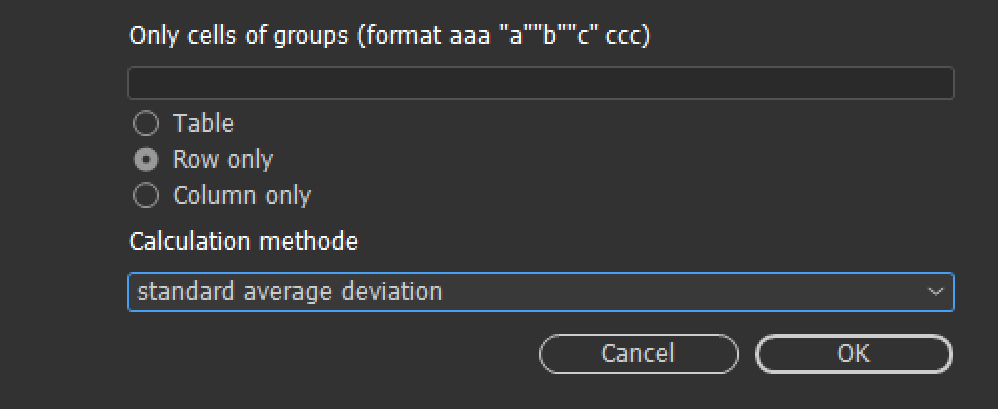
Following calculations are supported:
Please remember: This is NOT Excel!
As base set for calculations you can choose choose whether the column or row or the complete table. The cell itself of course is not used for the calculation. To exclude more cells from calculations, group member ships can be used:
Create a table layout rule to write a log message (good for debugging).
Create a basic skeleton of a table layout rule.
If you own a Partner lincense, you can edit this rules like every other script by ALT-clicking it.
The table layout ruless are defined (as usually) in the table or XML file actions and are marked with type/typeid 24 and must have IDs > 0.
Attention : Do not use the ClassID here!
To create an table layout rule skeleton see here.
The following variables are defined in table layout rules:
| Name | Type | Description |
| gTable | ItemRef |
Calling table |
| gAreaLeft | int |
Table area to work on (0-based) gAreaRight is the first column outside this area. |
| gAreaTop | ||
| gAreaRight | ||
| gAreaBottom | ||
| gGroups | char* |
Complete list of groups to work on resp. to exclude. Strings are empty, if Check groups is disabled for this the method. |
| gNotInGroups | ||
| gAlternatingColumnsOn | int | Apply rule alternating? |
| gAlternatingRowsOn | ||
| gAlternatingColumnsStart | int | First row/column to work on on alternating rules. |
| gAlternatingRowsStart | ||
| gAlternatingColumnsStep | int | Step size for alternatings. |
| gAlternatingRowsStep |
Here'a an example for simple table layout rule:
//***************************************************************************

#include "internal/types.h"
#include "internal/text.h"
#include "internal/table.h"

//***************************************************************************

int stError			= 0;

//***************************************************************************

int Process (Table T, int l, int t, int r, int b)
{
	float		f 		= table::average(T, "", -1, l, gAreaTop, gAreaLeft);
	char		str 	[512];

	sprintf (str, "%F", f);
	table::set_text (T, l, t, str);

	return 0;
}

//***************************************************************************

int ProcessCells (Table T, int l, int t, int r, int b)
{
	int		x, y;

	for (y = t; y<b; y++)
	{
		for (x=l; x<r; x++)
		{
			stError = Process (T, x, y, x+1, y+1);
			if (stError) return stError;
		}
	}
	return 0;
}

//***************************************************************************

int main ()
{
	stError = Process (gTable, gAreaLeft, gAreaTop, gAreaRight, gAreaBottom);

	return stError;
}
Configuration of table layout methods can be done in the attribute inputdocumentation of actions. The following format is supported:
Rule configuration is optional.
The rules intention is given by an icon ID in the first part of the inputdocumentation. Here you can find a complete list of intentions and their icons.
The allowed rules destination areas can be given in the second hash tag as list of key names. If a key is given in the list, the according entry of the destinations popup of table layout rules is activated. Of no key is given, all entries of this popup are activated. For valid keys see here. Keys may given in any order and delimited (or not) by any letters.
A rule for cell contours allowed for complete table, all cells, and all children
2##table cell children
Infomartion needed by table compositions are completely supported by TaggedText. For more information see here.
To enable the export of table composition data into TaggedText, please activate the menu
Plug-Ins -> Comet -> Write placeholders to TaggedText
Turning off this behavior is usefull if the export is used in InDesign® without Comet plug-ins.
Due to technical details, it is not possible, to remove the table composition tags completely from the export. We have to write something here. Thats why we write the unused empty tag <dps:> instead of our tags if the export of table composition data is suppressed.
Import of table composition data is always activated.
Table composition data are made in two TaggedText tags:
The information in the tags are quite extensive and are not described here in detail. A complete definition you can create easily by exporting a table as TaggedText. Missing values inside the tags are ignored and filled with default values (0 or ""). Attribute names within the tags are case sensitive.
The w2table must be located inside the <TableStart:...> tag:
<TableStyle:\[Basic Table\]><TableStart:4,4:0:0<tCellDefaultCellType:Text><w2Table: .... >>
The Groups attribute contains all group names used in cells and design rules of the table. Group names are separated by spaces. Group names with spaces must be enclosed in quotes.
Here is an example of a valid group definition within the w2table tag:
Groups='bbb "Hallo Paul"'
The Postprocess attribute contains all table layout rules and their parameters that are to be executed after the table was built.These rules will also be executed if the table is inserted with one of the CScript functions frame::replace, textmodel::replace, .... .
Here's the syntax needed for a valid Postprocess:
| Index | Description | Values | ||||||||||||||||||||||||||||||||||||
| 1 |
ID of table layout rule |
-100 : Merge similar rows -101 : Merge similar columns -102 : Broaden table to frame -103 : Equal column width -104 : Fit column -105 : Merge equal cells Otherwise : Valid ID of actions |
||||||||||||||||||||||||||||||||||||
| 2 |
Intention |
Valid icon ID of intention | ||||||||||||||||||||||||||||||||||||
| 3 | Wirkungsbereich | Valid ID of destination area | ||||||||||||||||||||||||||||||||||||
| 4 | Unused | 0 | ||||||||||||||||||||||||||||||||||||
| 5 | ||||||||||||||||||||||||||||||||||||||
| 6 | ||||||||||||||||||||||||||||||||||||||
| 7 | Use alternating columns? | 0 : No 1 : Yes |
||||||||||||||||||||||||||||||||||||
| 8 | First alternating column | 0-based number of column | ||||||||||||||||||||||||||||||||||||
| 9 | Step size for alternating columns | > 0 | ||||||||||||||||||||||||||||||||||||
| 10 | Use alternating rows? | 0 : No 1 : Yes |
||||||||||||||||||||||||||||||||||||
| 11 | First alternating row | 0-based number of row | ||||||||||||||||||||||||||||||||||||
| 12 | Step size for alternating rows | >0 | ||||||||||||||||||||||||||||||||||||
| 13 | Check grous? | 0 : No 1 : Yes |
||||||||||||||||||||||||||||||||||||
| 14 | Groups and parameters |
Blank-delimited list of group names. Group names with blanks must be encloded by double quotas. In case of rule IDs -104 (Fit column) and -105 (Merge equal cells) the keyword --PNC-- and the rule parameters must follow the groups.
|
||||||||||||||||||||||||||||||||||||
| 15 | Forbidden Groups | Blank-delimited list of group names. Group names with blanks must be encloded by double quotas.
Rule will exclude all cells that are members of one of the given groups. Index 13 must set to 1 in this case. |
Here's a valid Postprocess definition for fitting columns:
Postprocess='-104 5 7 0 0 0 0 1 2 0 0 2 0 "G1 G2 --PNC-- 0 0" "" '
The w2cell must be located inside the <CellStart:...> tag:
<CellStart:1,1<w2Cell: ...>>
Group memberships of cell are given as a blank-delimited list of group names. Group names with blanks must be encloded by double quotas.
Valid group memberships for a table cell:
Groups='bbb "Hallo Paul"'