The priint:comet plugins by WERK II allow you to do database supported publishing and building documents automatically. With these plugins you can equip texts and images of a document with so-called placeholders. The placeholders will allow the linked document sections to be loaded from the database, checked and written back.
The actions for loading, checking and writing placeholders are defined in the datapool and are not part of priint:comet.
This document and all links describe the basic functionality of the priint.comet Plugins and technical details about their configuration. This document is not an user manual.
The contents of text placeholders are commonly imported into the document in a abbreviated TaggedText format called %!TT-Format. To prevent paragraph and character styles, ... in the document from being overwritten, all style information is removed from the import. In the default configuration, InDesign® will show an error message for such imports saying that style information is missing. This error message has to be suppressed for an uninterrupted workflow. To do so, follow these steps:
This plugin is responsible for connecting to the data pool.
There are multiple variations of this plugin available. However, only one of the CoreService/CoreServlett Plugins may be installed at time. If multiple versions are detected, an error message will be shown when starting up InDesign®, saying that a conflict occured during plugin load. In that case, remove the unnecessary plug-in variants and restart InDesign®.
Using menu Plug-Ins -> Logfile -> Write... you can activate and deactivate the writing of log files. The setting is retained after restarting InDesign®. Please note that changes are only visible for all priint:comet plugins after restarting InDesign®. Log files are required for the WERK II support. Information about the workflow of the priint:comet plugins and all queries to the data pool are written to the log file. You can view log files with /ApplicationsUtilities/Console (Mac) or programs like mtail (Windows). Some of these programs (e.g. Console from Apple) have the advantage that they automatically show changes in the log file and you can "watch" the work of the priint:comet plugins.
If writing the log file is activated without any additional keys, the log file is stored in your local Documents folder. By holding down the ALT key you will be asked for the destination folder for the logfile. The name of the logfile is always idlog_csX.log with X as InDesign® version (17 for ID 2022, 18 for ID 2023, ...).
In Scripts, you can log messages with the functions wlog and wtlog.
Attention: Writing the standard log costs about 10-20% more time to execute. But in unfavorable constellations the processing can be slowed down much more. The following factors can influence the writing of the log files unfavorably:
Overall, we strongly recommend that you do not enable writing the default log in production mode. If you cannot do without your own logs, use the wlog and wtlog script functions and specify your own log file in the first parameter. These messages are written even if the standard log is deactivated.
Menu Plug-Ins -> Logfile -> Im Finder/Windows-Explorer zeigen will show the log file in your Finder resp. Windows-Explorer
Menu Plug-Ins -> Logfile ->Open File will open the log file using the default application for .log-files of your OS.
Menu Plug-Ins -> Logfile ->Clear the log file is emptied (but not deleted). The action cannot be undone.
Connections to XML Data Folders can be established in all variants. To do this, use the menu Plug-Ins -> Data Folder -> Select XML Data Folder... The set connection is automatically re-established after restarting InDesign® and after disconnecting Database or PubServer/SOAP connections. The command can be modified with the following additional keys:
Below the menu item Select XML Data Folder... the last ten connections are displayed and can be used directly from there. The following additional keys can be used to modify the menu items of the last connections used :
In versions prior to v4.2 R33270, the menu is simply Plug-Ins -> Datafolder... and has no submenus.
XML data folders must have a structure defined by WERK II and contain XML data to describe the configuration and content data used.
Basic versions of priint.comet XML folders are available from WERK II and its partners.
A complete XML data folder with examples can also be found in the Tutorial Page Building.
Please unzip the archive Tutorial pagebuilding.zip. The sub-folder
xmldata is a complete priint:comet XML data folder.
The plugin supports connections to SQL databases and to XML data pools. The database connections are made via ODBC.
Here is a schematic representation of database queries using ODBC:
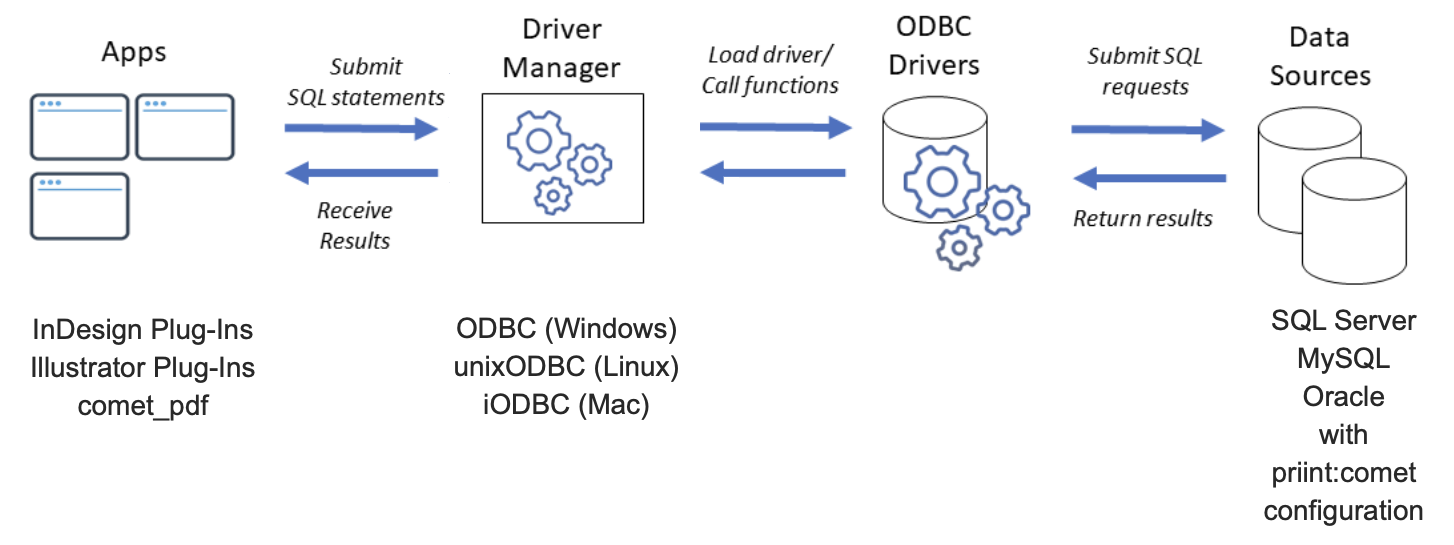
The following installations are necessary:
Driver Manager : The driver manager is loaded at startup time and without this installation the plugins and comet_pdf cannot be loaded! (And since our software cannot be started at all, we cannot show any corresponding error messages. In most cases the program start simply aborts).
sudo apt install -y libodbc1
sudo apt install -y tdsodbc
ODBC Drivers : To establish a concrete connection to a database, the installation and configuration of a corresponding so-called ODBC driver is required. ODBC drivers can be found, for example, at OpenLink or at Devart. Under Windows, the native driver from Microsoft can also be used for SQL Server. For Apple's M series, we were only able to successfully test the drivers from Devart.
Please note: ODBC drivers are usually not for free and must be licensed. These costs are not included in the cost of priint:comet plugins and of comet_pdf.
For information on installing and configuring the drivers, please contact the respective software providers. Additional notes on configuration can be found here.
We have tested the drivers of the mentioned vendors with basic priint:comet installations on SQL Server and mySQL.
Please understand that we cannot guarantee that all drivers used will work in the future exactly as they do today
and exclude any liability for this. WERK II GmbH hereby expressly reserves the right to make changes in the priint:comet database structure.
Furthermore, WERK II can explicitly not assume any responsibility for the functioning of SQL calls from third parties.
Especially documents (publications), templates and page templates can sometimes be quite large. We fetch this data in chunks as needed. For performance reasons, it is nevertheless recommended to (sensibly) increase this package size. The following setting in odbc.ini has proven to be useful:
FetchBufferSize=6000000
max_allowed_packet=6000000
Some ODBC drivers support so-called Multiple Active Result Sets (MARS). MARS are needed when SQL queries are nested, e.g. when the results of a query are used in sub-queries directly when fetching the single results.
Here is a simple example:
#include "internal/types.h"

Query	qu;

int load_action (int id)
{
	query::send (qu, "select name, statement from actions where ID = ?");
    query::input (qu, kInt, id);
    query::exec (qu);
    while (query::fetch (qu))
    {
    	// Do your work here
    }

	return 0;
}

main ()
{
	DBC		dbc	= sql::dbconnection ();
	int		id;

	qu	= sql::query (dbc);

	query::send (qu, "select ID from actions where ID > 0");
    query::exec (qu);
   	query::output (qu, kInt, &id);
    while (query::fetch (qu))
    {
    	load_action (id);
    }

	query::close (qu);

	return 0;
}
In ODBC drivers MARS is normally disabled by default and we recommend not to enable MARS. In our software we have completely omitted the use of MARS.
In the above example, the MARS resolution is simple (select ID, name, statement from actions where ID > 0). In more complex queries, the results of the outer call must be collected in a suitable intermediate list. Once all results are collected, the subqueries are made using this list. Alternatively (but a bit slower) you can also open a new query in the subfunction and run the subqueries using this inner query. (Do not forget to close the inner queries again at the end of the subfunction!)
#include "internal/types.h"

int load_action (int id)
{
	DBC		dbc	= sql::dbconnection ();
	Query	qu	= sql::query (dbc);
	char 	name[1024];

	query::send (qu, "select name from actions where ID = ?");
    query::input (qu, kInt, id);
    query::output (qu, kString, name);
    query::exec (qu);
    while (query::fetch (qu))
    {
    	// Do your work here
    	wlog ("", "%d	: %s\n", id, name);
    }

	query::close (qu);
	return 0;
}

main ()
{
	DBC		dbc	= sql::dbconnection ();
	Query	qu	= sql::query (dbc);
	int		id;

	query::send (qu, "select ID from actions where ID > 0");
   	query::output (qu, kInt, &id);
    query::exec (qu);
    while (query::fetch (qu))
    {
    	load_action (id);
    }
	query::close (qu);

	return 0;
}
The mySQL driver from Devart apparently contains a small error: If the database used is not already specified in the ODBC configuration (e.g. with Database=%your_dbname%) but is only specified in the login dialog, then the database is only specified correctly in the first opened query. If you open further queries in parallel, they will generate the following error:
# [Devart](ODBC][MySQL]#3D000No database selected, SOLSTATE-HY000
This situation also occurs in the plugins and in comet_pdf. To work around the problem, it is essential that the Data Source Name (DSN) in odbc.ini contains the two (case-insensitive written) words Devart and MySQL. The DSN is specified as Service in the login dialog. Here is an example:
[Generic_DEVART_MYSQL]
Driver=Devart ODBC Driver for MySQL
Port=3306
:
:
The uniqueidentifier data type is often used like a string in SQL queries. This works in most ODBC drivers. Devart's drivers are a bit more precise at this point and generate typecast errors in calls like this, there d.id is of type uniqueidentifier:
d.id =<STRINGID>
It's hopefully clear that this statement is extremely dangerous. The passed StringID can be anything but a valid (and unique) identifier. The error message is therefore completely correct! Correct would be a statement like
d.id = CONVERT (uniqueidentifier, <STRINGID>)
# or possibly
convert(varchar(38), d.id) = <STRINGID>
(which can still set a wrong identifier, but then at least you thought about it :-))
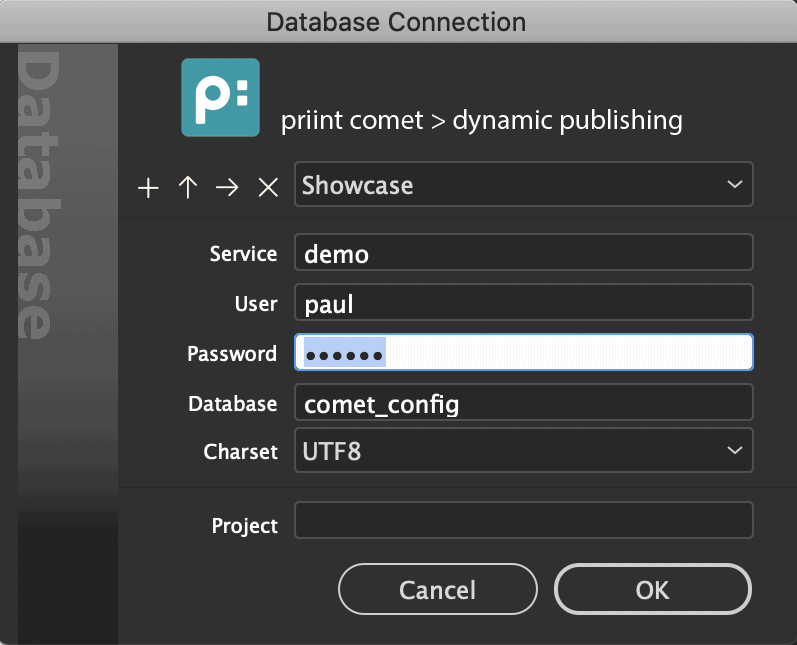
After successful ODBC installation, a connection to your database can be established with the help of the Plug-Ins -> Login... menu. In the appearing dialog, enter your login information. After a successful login the name of the menu changes to Logout and you can now disconnect from there. If an XML folder is configured, a connection to that datapool is established automatically again.
With the buttons  ,
you can save the current dialog settings for later reuse.
,
you can save the current dialog settings for later reuse.
The following Panel Actions (panelstaements) are executed (if they are defined and not empty):
Equivalent to CoreService [Database], except it uses OCI instead of ODBC. Only Oracle databases can be used as targets with this plugin.
The plugin is available for MacOSX only. In order for the plugin to run, the software for OCI 12.2 must be installed on your computer and the tnsnames.ora file used by OCI must contain the correct connection descriptions.
How to install OCI 12.1
Here is an example of a tnsnames.ora entry:
DEMO=(DESCRIPTION=
(ADDRESS_LIST=
(ADDRESS=
(PROTOCOL=TCP)
(HOST=192.168.2.33)
(PORT=1521) ) )
(CONNECT_DATA= (SID=orcl) ) )
If you have things like ./MacOSX/environment.plist, and /etc/launchd.conf in mind from previous installations - these settings and reboots are no longer necessary with the OCI-Libs used from CC2014 onwards.
The ociflags.ini file can be used to customize the connection. The file is optional, but if it is to be used, it must be in the same folder as the priint.comet plug-ins. You can find an example here.
The plugin supports the following data connections
The connection to the services is established via the menu Plug-Ins -> Connect with Publication Server.... Enter your login data in the appearing dialog. After successful login the name of the menu changes to Disconnect from Publication Server and you can terminate the connection here. If an XML folder is set, the connection to this folder is automatically re-established after disconnecting.
SOAP and PubServer connections are made using gSoap and are based on a structure defined by WERK II (wsdl). No additional installations on your computer are necessary. For installation and configuration of the data pool please contact our support.
The priint_comet plug-ins support Single Sign On (SSO) as a login method for priint:comet PubServer connections. Use menu Plug-Ins -> Connect with Publishing Server (SSO)... to connect.
General information on logging in to priint:comet PubServer can be found here. Please note: You need a registered login for this page, which you can obtain from our support team at support@priint.com.
A few HTML pages are required for an SSO login. These files are included in a Standard Version in the priint:comet plug-ins. Here are the standard versions of the browser files used.
You can also install a Local Version for each of these files in the login folder of the priint:comet plug-ins folder ($COMET/login). To customize the SSO login pages to your needs, proceed as follows:
In addition, a number of keywords are available for configuring your localized SSO login pages. These keyword are automatically replaced/applied before accessing the local pages. You can find more information here.
The following table describes the browser files used:
| File | Description |
| landing.html | Called first. Purpose is to redirect to the authentication service. This file should contain the "meta http-equiv" header and / or initiate javascript redirection. Also a 'cancel' button is nice to have, in case the user entered an invalid address and doesn't want to wait until connection times out. |
| accept.html | Called, when the authentication service accepts login. There are no special requirements for this page. You should avoid referring to further resources (css files, images etc.) in this file,. because immediately after delivering this file, the local webservice is shut down, i.e.: no further requests will be served. |
| denied.html | Called, when the authentication service denies login. There are no special requirements for this page. You should avoid referring to further resources (css files, images etc.) in this file,. because immediately after delivering this file, the local webservice is shut down, i.e.: no further requests will be served. |
| cancel.html | Called, when the user cancels authentication. There are no special requirements for this page. You should avoid referring to further resources (css files, images etc.) in this file,. because immediately after delivering this file, the local webservice is shut down, i.e.: no further requests will be served. |
| test.html | This page is shown, when you enter 'test' in the Server input field in the login dialog. Purpose is to test the SSO Plug-In implementation. The values usually provided by the authentication service can here just be entered manually |
| 400.html, 404.html, index.html | Error pages for Bad Request resp. Not Found and general fallback page. |
| details.html | Not mandatory. This file shows some request / response details and is included by all default (built-in) pages. |
| css/main.css | Various style definitions used in the HTML files |
Required files from server such as templates and page templates, are automatically downloaded from the server and stored in the so-called XCache folder before they are used.
The folder $DOCUMENTS/XCache/ID_NN.0 is used as the target of the local storage. With the help of the menu Plug-Ins -> Internal File Cache ... you can select any other folder you like. But still take care a little bit: You need full read and write permissions to the selected folder. And, for performance reasons, you should not use a network folder and certainly not a folder in a so-called cloud. The subfolders XCache and XCache/ID_NN.0 are automatically created in this folder.The setting is restored when InDesign® is restarted.
If you are already connected to a PubServer or SOAP service, the XCache can no longer be changed for obvious reasons and the menu Plug-Ins -> Internal File Cache . is deactivated therfor.
As an alternative to a manual setting the XCache can also be set automatically since v4.1.8 R28150. To do this, create the file prefs.xml with the following content in the folder $PREFS/werkii:
<?xml version="1.0" encoding="utf-8"?>
<prefs>
    <pref plugin="CoreService" setting="xcache">
        <value>$DESKTOP/hahaha</value>
    </pref>
</prefs>
Enter the desired path (as always without XCache/ID_NN.0) into the element value. Each time InDesign® is started now, the XCache is set to the path you have specified. However, please note the following:
With InDesign® Server, the XCache is usually defined with the help of the -cometcache programme option. Make sure that each server instance uses a unique XCache path!
With comet_pdf the folder XCache/pid_of_process is automatically used as XCache. Information on configuring the XCache of comet_pdf can be found here.
SOAP connections supporting SSL. Since v4.1 R23456 TLSv1.2 is supported in addition. Please note the following restrictions for TLS:
TLSv1.2 on Mac OS X can only be supported since InDesign® CC2017 and at least Mac OS X 10.11 Yosemite. For TLSv1.2 the CoreServie plug-in requires the two system libraries /usr/lib/libssl.35.dylib and /usr/lib/libcrypto.35.dylib, which are part of Mac OS X since Mac OS X 10.11.
For CC 2017 and Mac OS X 10.10, the libraries can be subsequently installed. The installation requires admin rights:
- Unzip libssl35.zip
- Execute in Terminal
cd Ausgepackter Ordner
sudo mv libssl.35.dylib /usr/lib
sudo mv libcrypto.35.dylib /usr/lib
Special properties of the SOAP connection can be stored in a configuration file called soapflags.ini , which has to be located in the installation directory of the priint:comet plug-ins respectively of comet_pdf. A commented example can be found here. This configuration file is usually not required to establish a connection with a SOAP Service, but they allow adjusting to the IT infrastructure or special SOAP implementations.
The following settings can be specified here:
| Group | Option | Values | Availability |
| Proxy | Options for connection via HTTP proxy | ||
| proxy_host | IP Adress or Name of the HTTP Proxy. If empty or undefined, no proxy will be used. | SOAP/PubServer | |
| proxy_user | User name for the proxy server. If empty or undefined, no credentials will be used when connecting to the proxy. | ||
| proxy_passwd | Password for the proxy server. If empty or undefined, no credentials will be used when connecting to the proxy. | ||
| SOAP | SOAP Version Support | ||
| soap-version | 1.1 or 1.2 (default) | SOAP/PubServer | |
| service-version |
0 (default), 1 or 2 The comet Plugins and PDF Renderer support 2 service versions: the elder ("Version 1") is based on SwA for binary data transmission, the newer ("Version 2") is based o MTOM. Usually, the supported service version is determined automatically, so this value should only be set, if using a certain service version must be forced. |
||
| keep-alive |
yes (default) or no [since v4.0.5 R19503] Attention : The value no use usefull in connections with very long transfer times and newer Windows OS on server side only. In this case, the internal TCP connection is re-established for every package to transfer. This leads to a more stable SOAP connection, but this connection is up to six times slower than a normal connection. Attention II : If connections are disconnected by server (e.g. after a certain time without further requests) the setting no is required for Mac OS Mojave and later too. The security checks of the Mac OS when reconnecting to the server unfortunately lead to an immediate end of the programme. |
||
| use-ie-options |
no (default) or yes [since v4.1 R23232] The setting is only meaningful under Windows and is ignored using Mac OS X or Linux. Here's the description from the author Robert van Engelen: The WinInet plugin for gSOAP enables client applications (not servers) to communicate through Microsoft's WinInet API on Windows. This offers all of the advantages of WinInet-managed internet access through the Internet Options control panel of Windows, such as HTTP (proxy) authentication, TLS/SSL, and HTTP compression. Therefore, "if IE works, gSOAP works. since these options are shared by IE". For more details see https://www.genivia.com/doc/wininet/html/index.html. |
||
| Timeouts | Connection and Request timeout | ||
| login-timeout |
SOAP/Pubserver Timeout for connection establishment and login in seconds, default 5 seconds HTTP und AEM Timeout for connection establishment, default 3 seconds The setting is also used for Web Images when a HTTP or AEM connection is active. If a different value was set with prefs::set_urllink_timeout, this time is used as a timeout for the connection setup. |
SOAP/PubServer HTTP AEM |
|
| request-timeout |
Request timeout in seconds, defaults to deactivated on Mac, to 3600 on Windoews. In Windows InDesign® Server environments, it may make sense to set a higher value, if very complicated generation schemes with runtime > 1h are used. It is not possible to completely deactivate request timeouts on Windows, which is why the default value is set so high. The setting is also used for Web Imahes when a HTTP or AEM connection is active. |
||
| Protocol | Data transfer protocol for CURL calls | ||
| ip-resolve |
Allows an application to select what kind of IP addresses to use when resolving host names. This is only interesting when using host names that resolve addresses using more than one version of IP. The allowed values are:
The setting is also used for Web Images when a HTTP or AEM connection is active and the address of the image (its URL) points to this data source. |
HHTP AEM |
|
| update-protocol |
Which protocol should be used for uploads? This specification replaces the protocol name of the URL for uploads, e.g. ftp://www.hi13.de/aaa.jpg instead of http://www.hi13.de/aaa.jpg. Valid values are:
|
HTTP | |
| Header | Fine control of SOAP headers (required for some .Net Service Implementations) | ||
| http-multipart-type |
SOAP 1.1: application/xop+xml; charset=utf-8 SOAP 1.2: application/soap+xml; charset=utf-8 |
SOAP/PubServer | |
| http-multipart-start-info |
SOAP 1.1: text/xml; charset=utf-8 SOAP 1.2: application/soap+xml; charset=utf-8 |
||
| soap-multipart-type |
SOAP 1.1: application/xop+xml; text/xml; charset=utf-8 SOAP 1.2: application/xop+xml; charset=utf-8; type="application/soap+xml" |
||
| http-type |
SOAP 1.1: text/xml; charset=utf-8 SOAP 1.2: application/soap+xml; charset=utf-8 |
||
| soap-type |
SOAP 1.1: text/xml; charset=utf-8 SOAP 1.2: application/soap+xml; charset=utf-8 |
||
| SSL | Settings for SSL connection validation | ||
| ca-file |
Path to a PEM encoded certificate file. Certificates imported into the system are not supported by the OpenSSL implementation integrated with our SOAP library, so some certificates can be imported with the ca-file option. If this option is empty or undefined, the server certificate is not verified. Certificates are commonly DER encoded, to convert, you can use the OpenSSL terminal, e.g. openssl x509 \ A certificate file may contain multiple certificates, where each one begins with -----BEGIN CERTIFICATE----- and ends with -----END CERTIFICATE-----. The path may use the placeholders defined for the file object ($DESKTOP, $PLUGINS etc.). Warning: the SSL environment is initialized once for each application, so you have to restart InDesign/InDesign Server after changing the ca-file specification. However, the certificates are read on each connection - every time. This means that changing the certificate file takes effect on reconnection, without restarting InDesign®. If no certificate file is specified, it is automatically attempted to load the werkii/certs.pem file of the current user's preferences folder ($PREFS). |
SOAP/PubServer | |
| Failover | Error Handling | ||
| failover-trap |
Implemented for services based on the 'newer' service specification (aka Version 2) only. With Usually you want to just repeat SOAP requests, when certain HTTP errors occur. Assuming, that errors on HTTP level refer to the communication / transport layer, we expect, that from the business logic or semantic point of view, the request is Ok and there is a good chance that just repeating it will succeed. The following routines are available:
General format of definitions is: Status Code(s) Rule(s)
failover-trap=[ ... ]:retry=3,sleep=500,logRepeat request up to 3 times, wait for 500 milliseconds before repeating and activate soap log for the failover attempts.
Full example:
failover-trap=500..599:retry=3,log Caution I: please use exactly the syntax as shown in the examples. Do not add any extra whitespace, punctuation or whatsoever. Incorrect syntax may lead to unexpected behaviour or even program crash. On the other hand, there is no guarantee, that behaviour achieved by illegal notations in the current version will lead to the same behaviour in later versions. Caution II: rules are executed in the order of definition. The following examples lead to slightly different behaviour: Hint: The following two definitions are equivalent: |
SOAP/PubServer | |
The entire data traffic of a SOAP connection can be recorded. See here for more information.
Connections to an Adobe Experience Manager (AEM) are identified by an trailing aem@ in front of the server address.
Here is an example of an AEM URL to login:
aem@https://192.168.0.206:4052
The connection to the AEM requires the installation of an offline XML folder in the the AEM. This folder can be located anywhere in the AEM and must be specified as a complete path in the Project of the login.
For example, suppose the priint configuration data is in the folder /priint/project_1 folder inside the AEM assets. Since the assets have the path /api/assets or /content/dam the project must be one of the following:
/contest/dam/priint/project_1
/api/assets/priint/project_1
The file alias name $COMETDATA at the beginning of file path points to the current XML folder, in AEM connections this is the URL of the AEM plus the internal asset path plus the Project specification of the login.
Using the above settings, $COMETDATA will have the following value
https://192.168.0.206:4052/api/assets/priint/project_1
Note: If your image placeholders only load images that are inside the XML folder and the image paths begin with $COMETDATA always, image placeholders can still be used from the AEM. Please note, however, that Web Images can only be loaded from the assets of the AEM. If your configuration is located elsewhere in the AEM, you should start image references with an , which you must define in the Settings panel.$ALIAS
As mentioned above, the AEM must have an XML folder with configuration data for priint: comet. This can be done using a standard offline XML folder.
Here you find a complete XML folder without any additional data. The folder is already configured so that asset images can be dragged and dropped into InDesign® documents (see here). It would be nice if you could drag this folder directly to the browser window of the AEM assets - but unfortunately the placement of entire folders is not supported by AEM so far - files and subfolders would have to be inserted or created manually. Not very tempting. Therefore, we have prepared an import file that automates the import:
Here is a detailed description of how Drag and Drop can be customized for image assets.
[Since v4.1.6 R26580] Access to priint:comet XML offline data folders can also be done online. To do this, place the data folder to any Internet location. The connection to the data folder is established by the following information in the login dialog:
| Value | Description | Example | |
| Service | xml@URL |
xml@ followed by the complete URL of the web site |
xml@http://www.hi13.de |
| User / Password |
Public websites can be used without login information. However, if you do not provide a user name and password, you only have read access, no data can be written. In these cases you cannot create or change templates or edit scripts. |
||
| Language | remains empty | ||
| Encoding | UTF8 | ||
| Project | path |
Complete path of the data folder below the URL |
/xmldata-tutorial |
Local references within the data folder are resolved relative to the specified project folder of the URL.
Note: Images from URLs usually require a file path of the target document. To load Web Images, the target document must therefore have been saved at least once. Here you will find notes on configuring the storage location of Web Images.
An example of a complete XML online folder can be found here. The XML folder is configured to store Web Images in the $DESKTOP/URL Images folder.
xml@http://www.hi13.de/xmldata-tutorial
XML online connections are configured in the soapflags.ini file in the same way as SOAP and PubServer connections. The following specifications are supported:
| Option | Vakue | |
| HTTP | Settings for XML online connections | |
| connect-timeout |
Timeout for establishing the connection in milliseconds Default: 1500 msec |
|
| request-timeout |
Timeout for data transfer in milliseconds Default : Unlimited |
|
| update-protocol |
Which protocol should be used for uploading data? The following specifications are supported:
Default : inherited |
|
This plugin supports all three connection types XML Offline, ODBC and Internet (SOAP, PubServer, AEM und XML Online).
[since v4.0.5 R16600, EXPERIMENTAL] The priint:comet plug-ins can record data reveived from external data sources like ODBC database or SOAP service. Also all instructions sent to the priint.comet Javascript interface (app.comet Scripting DOM) are logged too. Image files used via priint.comet functions (such as frame::image) are also backed up.
Thus the recorded data contains all the necessary data to perform the same steps as when recording even without a data source. For this you need a detailed description of the steps performed while recording data. Executed Javascript statements of the app.comet Scripting DOM are logged into synopsis.jsx. In the server case, it is usually sufficient to execute this file.
Please also note the informations for restrictions on data recording.
Recorded data may contain sensible data of customers! Take care of the customers data policy!
Please note: The playback feature is expressly not released for production systems. The data record is for development and troubleshooting purposes only. Please also note the restrictions described below.
In InDesign® Desktop, the playback mode is set in the login dialog. To do this, open the login dialog while holding down the SHIFT key. In the lower part of the dialog, the mode can then be selected in the Data Cache popup:
In playback mode (☀) no password is needed. The selected mode (☂ or ☀) is shown at the beginning of the connection name in the Comet panels.
Some panels have to execute statements when logging in already. Thus, for example, the pop-up of the available templates of the Product Pool is filled directly at login time. Therefore, differently opened panels during recording can lead to error messages during login. You usually can ignore these error messages.
As backup folder always a subfolder of the current data folder $XCACHE/ID_NN.M/XDATA is used. The name of these subfolder is automatically determined from the login data and corresponds to the connection name displayed in the Comet panels. Colons and slashes in the connection names are automatically replaced by _.
Here is an example of the path of a playback backup folder of InDesign® CC2018
/Users/paul/Documents/XCACHE/ID_13.0/XDATA/demo@Comic64_comet_config
In InDesign® Server and comet_pdf, the playback mode is set via program options:
In comet_pdf named program parameters are introduced by a double -. The options here must be completely --playback and --playbackpath.
Using InDesign® Server, the option record will backup all data regardless of which connection is currently in use. In general, it is better to set the mode to a specific connection instead, see Javascript for more informations.
In Javascript, the recording mode can be set in the options parameter of app.comet.use:
Here is an example of a direct connection setup with data logging:
var gOptions = app.comet.ping() + ";-1;";
app.comet.use (
"##server:demo;type:odbc_utf8;language:;db:comet_config;client:;",
"demo",
"***",
false,
gOptions+"playback:record;playback-path:/Users/paul/Desktop/abc2;");
The backup folder contains every query sent to the data source and its results including all used scripts and binary data such as templates and page templates.
ATTENTION! The structure of recorded is subject to change!
The so called Panel Actions like the After Login Script with the ID 92 are defined in the file panelstatements.xml. Please pay attention to correct XML when making changes in this file. For example, the characters < and > must be encoded with < and > respectively.
Actions of placeholders, layout rules, etc. can be changed directly in InDesign® after the connection is established. The changes are written back to the data folder. Alternatively, you can also edit the actions directly in the actions subfolder.
Templates can be changed directly in InDesign® after the connection is established. The changes are written back to the data folder. Alternatively, the template files can also be changed directly in the pageitems/data resp. pagetemplates/data subfolders.
Statements and their results are each stored in their own folders. The folders contain the complete statement in CMD.txt and for each result line of the call a numbered text file with the columns of the result:
The MD5 hash of the instruction is used as the folder name. See _recording.log for a complete list of all instructions and their MD5 hashes.
So, to specifically change the result of an instruction , say A, of an action (or from the log file), proceed as follows:
All Javascript commands of the priint:comet Scripting DOM executed by InDesign® are logged t into synopsis.jsx and can be re-executed from there. The file is located in the respective data folder of the recording session:
Using InDesign® Server through a Publishing Server, synopsis.jsx may contain a lot of calls like app.comet.ping and app.comet.getDocumentList. These requests are sent by the Publishing Server to get the current state of the application and can usually be removed from the file.
How to use Javascript files (jsx) together with InDesign® and InDesign® Server:
Please note the following restrictions:
[Since v4.3 R34920] Scripts (actions) that are stored in the PubServer cannot be changed via InDesign®. It is possible to make temporary changes via the panel Placeholder Options. However, these changes will of course be lost when you log out. For permanent changes, however, the scripts must be changed on the server side. To help you debugging your scripts, we have implemented a 'small' innovation for this:
First create the folder emergency (in exactly this notation) at your desktop.
Then, for every action you want to have locally, put in a file actionID.cpp. So for action 10 for example the file must be 10.cpp.
Includes can also be placed in the emergency folder: To do this, simply create the subfolder [pubserver] first. In this folder, create the path for the include and the include file itself (with the same name). So for example, for the #include [pubserver]/aaa/bbb/script.com the script file must be your_desktop/emergency/[pubserver]/aaa/bbb/script.com. Please not that currently only the prefix [pubserver] is supported.
Panelstatements can also be stored in emergency. To do that, simply create a file named ps_NNN.cpp in emergency, where NNN is the ID of the panelstatement.
Important note on our own behalf: We initially implemented this feature for our internal use only. When we publish it, we do it in the hope that it will also be helpful for others. The feature is not covered by WERK II support in any way and requests for it are treated as paid feature requests. We hope you will understand this.
CoreServlett is used in the Reader Version of priint.comet.
This plugin implements the scripting language cscript and provides the basic functionality to all other WERK II Plugins.
There are multiple variations of this plugin available. However, only one of the Comet Plugins may be installed at time. If multiple versions are detected, an error message will be shown when starting up InDesign®, saying that a conflict occured during plugin load. In that case, remove the excess plugin variations and restart InDesign®.
CometXML is the standard variation for desktop versions of InDesign®.
The name ending XML does not stand for the supported data connection, but special scripts that can run in the XML structure of the document. For more information see here.
The Plugin Comet++ offers batch processing of documents.
Because of Adobe's license terms, InDesign® Desktop is no longer allowed to do batch processing. This means you are only allowed to use this plugin on the server.
More information about this plugin can be found here.
Reader Version of the Comet Plugin. This plugin does not have its own panel or menues.
This plugin provides the panel Settings.
The panel offers the following options:
This plugin does not have its own user interface or menues. It provides important functionality for use by other priint:comet plugins and has to be installed.
With the Designate plugin you can limit the section of the document where placeholders may be edited. It adds a button to the InDesign® toolbox which you can use to set the desired limitations.
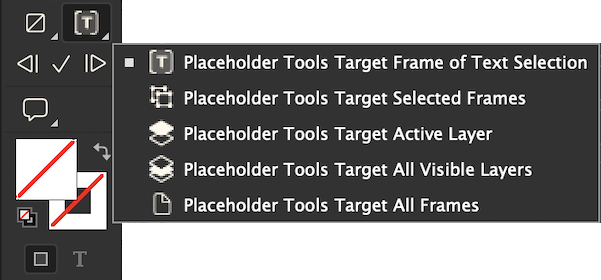
Below the button for the document section, three other buttons are provided:

These buttons run actions for modification management (in this order)
These actions can perform quite big modifications. Writing back fully configured data to the datapool especially can make many changes. Because of this, you are required to hold the Alt Key when triggering these actions.
Writing back into the datapool cannot be reverted by priint:comet plugins.
The actions can also be run from the placeholder and product pool panels. Corresponding entries can be found in the panel menues.
The plug-in provides some priint:comet-specific Copy/Paste enhancements for the InDesign® main menu Edit > priint.comet • Clipboard and the according context menus.
Special care should be taken with normal copy/paste of text placeholders: Because the placeholders of the clipboard are also taken over when pasting, the placeholder at the insertion point is divided into two parts:

The following table describes all additional menus:
|
Menue |
Description |
|
⇨ Placeholders |
|
| Paste Without Placeholder |
The text from the clipboard is pasted into the current text selection without any placeholders. |
| Paste into Placeholder |
Like Paste Without Placeholder, but the placeholder of the insertion point is also applied to the inserted text. |
| Paste Unformatted into Placeholder |
Like Paste into placeholder, but the formatting of the clipboard is ignored. |
|
⇨ priint:comet Functions |
|
| Paste Formatted Text (%!TT) |
Replace the current text selection with the text from the clipboard. The text may begin with one of the defined print:comet %!TT prefixes and can be TaggedText formatted. |
| Copy Text Selection as Formatted Text (%!TT) |
Copy the current text selection as TaggedText with the prefix %!TT to the clipboard. |
| Insert Image : Path |
All selected frames are linked to the clipboard image path. The file paths may begin with a defined $ alias. Existing images are replaced with the same geometry details. New images are placed in the middle of the frame and scaled down proportionally if required. Text frames are automatically converted to image frames and any text contained in these frames is removed. |
| Insert Web Image : URL |
Place the image of the URL from the clipboard into all frames. Existing images are replaced with the same geometry details. New images are placed in the middle of the frame and scaled down proportionally if required. Text frames are automatically converted to image frames and any text contained in these frames is removed. To insert Web Images, new documents must have been saved at least once! |
| Copy Image Path |
Copy the image path of the frame to the clipboard. If multiple frames are selected, the first path found is copied. |
| Copy Web-Image URL |
Copy the URL of the frames Web-Image to the clipboard. If multiple frames are selected, the first URL found is copied. |
|
⇨ Apply Script [since v5.0 R37060] |
|
| Apply Script to ... |
If the clipboard contains a script (cScript or Python), this script is applied to the current document selection. |
|
⇨ Paste Frames If the clipboard does not contain any frame, a new frame is created with the text of the clipboard. |
|
|
Paste as New Comet Group |
The frames of the clipboard are combined as a new Comet Group after insertion. Comet subgroups are dissolved in the process. |
|
Paste in Place as New Comet Group |
The frames of the clipboard are inserted at their original page positions and combined as a new Comet Group. Comet subgroups are dissolved in the process. The command is available from v4.1.8 R28925 of the plug-ins. If document frames from older plugin versions are not placed correctly, the frame position of the original frames must be changed once before copying. The easiest way to do this is to press the ▲ and ▼ keys once before copying into the clipboard. |
|
Paste with Analogous Comet Groups |
The frames of the clipboard are inserted and combined into new Comet Groups according to the original frames. |
|
Paste in Place with Analogous Comet Groups |
The frames of the clipboard are inserted at their original page positions and combined into new Comet Groups according to the original frames. The command is available from v4.1.8 R28925 of the plug-ins. If document frames from older plugin versions are not placed correctly, the frame position of the original frames must be changed once before copying. The easiest way to do this is to press the ▲ and ▼ keys once before copying into the clipboard. |
With the menu Edit -> Keyboard Shortcuts..., you can map the command to its own shortcut. You can find the command, like all other WERK II menu commands in the product section priint.comet.
This plugin provides the panel Comet Tests.

Comet Tests was designed to help ensure the functionality of arbitrary test cases when changing comet versions.
You can find out more about Comet Tests here.
For each new version of the priint:comet plug-ins, a 30-day Grace Period for a Basic License is granted. This gives you access to the full scope of the priint:comet plug-in functionalities during the trial period. Only the product build-uo is limited to a maximum of one double page. The grace period begins automatically when you first start the plug-ins and cannot be interrupted.
The Grace Period is only granted once per InDesign® and priint:comet plug-in version and cannot be reset even by our Help Desk.
When using a priint:comet functionality for the first time without a valid license or during the Grace Period, a priint.com watermark is display on all opened and all subsequently opened or new documents. After restarting InDesign®, the creation of watermarks is suspended again until the next time a priint:comet functionality is used.
The watermark also appears in the document previews and in the PDFs of the documents.
As soon as the priint:comet plug-ins are licensed (and after restarting InDesign® of course), the watermarks are automatically removed when the documents are opened again.
The following licenses are available for the prrint:comet InDesign plugins:

Please indicate a valid e-mail address for the return of the license. The Save button of the dialoge will not send the directly but creates an order file at the requested local place.
Please send the license order to license@priint.com. You will then receive the corresponding license as soon as possible.
Please note that unlimited licenses are usually LIMITED to 3 YEARS when ordering!
This limitation serves exclusively the quality assurance, which makes it possibly necessary to update software regularly.
The limitation does not reduce the validity period of purchased licenses in any way and you will receive new follow-up licenses at any time.
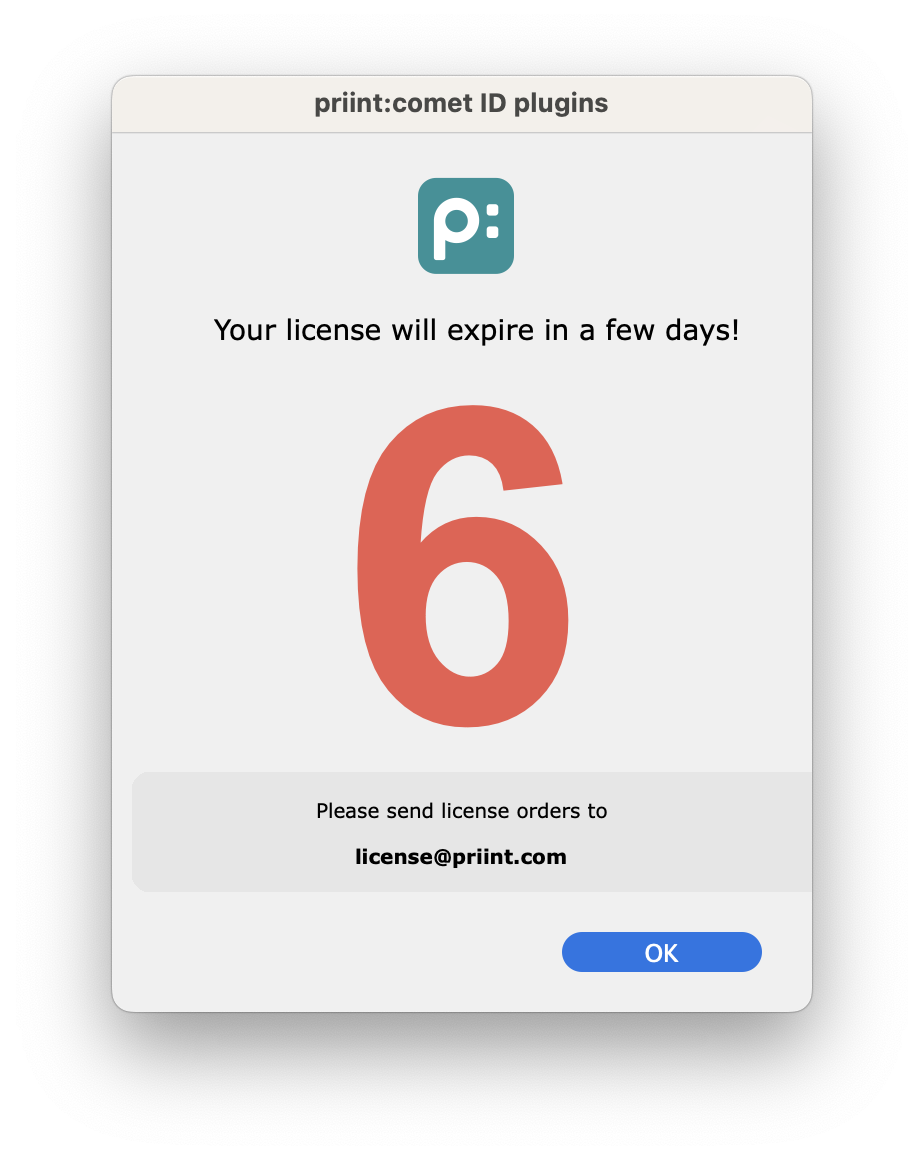
You will be warned automatically before a license expires.
In contrast to the first order of a license for the priint:comet, there is an additional step for the renewal of the license keys: When you send the new order file to license@priint.com, please attach the old license to the mail too. This file is needed for the creation of the new license keys. If the old license file is no longer available (e.g. due to a hardware crash), the new license can still be created. However, this will take a bit more time.
After receiving the license file, you can install the license with the following menu command:
License files for InDesign® Server you may put into the folder werkii/licenses/InDesign Server/vNN (with NN = version number of your InDesign® Server) of your user preferences ($PREFS). This installation must be done manually.
Licenses for the prrint:comet InDesign® Plugins are granted per computer, InDesign® version and Comet version. To make a license globally available for all users of the computer please install (copy) the license file to one of the following places (Admin rights are necessary to do that!)
You will be warned of the end of the trial period and of time-limited licenses when you launch InDesign® as follows:
| Days before expiration | Warning | Order dialog |
| 14 - 8 | Once | No |
| 7 - 3 | Once a day | Yes |
| 2 - 0 | Each InDesign start | Yes |
You can additionally find out the validity period of a license at any time via the About menus of the plugins:
Placeholders are the central base object in priint:comet plugins. They represent a bidirectional connection between a document and the datapool. Two basic placeholder types are differentiated, Text placeholders and Frame placeholders.
Placeholders can perform various actions:
Actions can be direct statements or cScript scripts.
Direct statements must be written in the language of the current data connection:
Scripts are written in cScript.
With a partner license, actions can be edited directly in InDesign®. To do this, use the Placeholder Options panel.
Some actions are special scripts e.g. for own layout rules. These scripts can also be edited using the Placeholder Options panel. In most cases, these scripts are shown in pop-up menus at the corresponding places and can also be edited from there by holding down the ALT key when selecting the menu item.
Scripts cannot be written back in PubServer connections. However, you can still edit the scripts - but the scripts are only changed locally in the current cache. In this way you can test changes locally. Local changes are lost when disconnecting!
In the database case (ODBC), scripts are saved in the table actions.
Using XML-Offline or SOAP actions are defined in the file actions.xml. The corresponding script code (or statement) itself are stored in the folder actions next to the actions.xml file in individual crpt files.
To execute the action of a placeholder in XML-Offline or SOAP, it is not necessary to define a corresponding entry in actions.xml: If the file actions/1401.crpt exists, action 1401 can also be executed.
To protect your scripts also in XML offline connections, the scripts are encrypted here (hence the extension crpt). The contents of the actions are therefore not directly readable here.
[ab v4.1.6 R25153] Using the hint
#pragma plain
at the very beginning of the action, you can specify that actions are not encrypted.
Please note:
The #pragma plain key may only be used in XML offline actions.
There must be exactly one blank between #pragma and plain.
To migrate an existing actions folder into unencrypted scripts you can use the bin/crpt program with the -plain option:
> crpt your_xmldata_folder/actions -plain
Attention: The option -plain overwrites your crpt files. Make a backup copy of the folder first!
This plugin provides the functionality for text placeholders and their representation in the document. It does not have its own user interface.
This plugin provides the functionality for frame placeholders and their representation in the document. It does not have its own user interface.
With the Placeholder panel, texts and images in a document can be equipped with placeholders, which will link these document elements with database supported actions. The placeholders contain the following information
Placeholder actions are implemented as simple instructions. For complex actions, the integrated scripting language cScript can be used. To maintain placeholder actions, use the application priint:workbench.
With a partner license, placeholder actions and other scripts can be edited directly from within InDesign®. Use the Placeholder Options panel for that.
Simple instruction for loading a product name
select value_string
from
comet_attribute
where
keyname = 'Name'
and infoobject_id = <StringID>
and lang = <layer>
and active = 1
A full description of values containing markings can be found in the documentation of the plugin Placeholder Options. Placeholder Options can also be modified with cScript, for more information about that, see the function placeholder::change_tags.
Linking texts and frames with database values always involves two steps:
These steps are automatically followed during automatic page build and when importing text with placeholders.
About the so-called individualization serial letters of documents can be created. The creation of serial letters of a document is started with the menu
Placeholder panel -> Fly out -> Individualization ...
Serializing documents is done in three steps
Data for serial letters must be stored in XML files. The XML format of the files is arbitrary, the only requirement is valid XML.
The first record of the file may contain information about the individual documents of the series and must then be called preferences. The preferences are optional, if they are missing, the serialized documents are placed next to the original and numbered by the index of data records. The following elements of the preferences element are evaluated (and must have direct content):
Here's an example of a serialization data file with preferences:
<?xml version="1.0" encoding="utf-8"?>
<persons>
	<!-- Generell Settings -->
	 <preferences>
		<destname>#1 #2 #3</destname>
	    <destpath>$DESKTOP/serials</destpath> <!-- DOCPATH, MYPATH, full path -->
	    <postaction>440000739</postaction>
	</preferences>
	<!-- Repeating Data Sets -->
	<person>
    	<id>1</id>
    	<title>Frau Dr.</title>
    	<firstname>Barbara</firstname>
    	<surname>Seidel</surname>
    	<email>paul@werk-ii.de</email>
    	<sessions>1 10 14 20 24</sessions>
	</person>
	<person>
    	<id>2</id>
    	<title>Herr</title>
    	<firstname>Paul</firstname>
    	<surname>Seidel</surname>
    	<email>paul@priint.com</email>
    	<sessions>3 8 17 26 31</sessions>
	</person>
</persons>
There are three special placeholders to support serialization. The determination of the placeholders type is made in the type attribute of the placeholder definition:
| Type | Icon | placeholder.xml | Table placeholder |
| Serial text | serialtext | 10 | |
| Serial fahmen | serialframe | 11 | |
| Serial template | serialpageitem | 12 |
Here is a screenshot of three different serialization placeholders:

The loading of the serial letter placeholders is tailored to the application serial letter and slightly different than in "normal" placeholders.
When loading a serial letter placeholder, you will receive one data file record each. In the Data Index field (where usually the ID of the load action is), enter the (1-based) number of a sub-element of this element. This element must have a direct value, so it must not have subelements.
In the above example, the ID 2 would be "Mrs. Dr." for the first data record, and "Mr" for the second record. ID 3 gives you "Barbara" resp. "Paul" etc..
For more complex XML queries or tasks that require more than just insert text, set the store ID to 0 and enter the ID of an action in the Data Script field (where the sync ID is normally located). This action must determine and use the current value. The current data file record is available as
XMLNode gData;
in these scripts.
Read the text of the element email from the example above and create a QR code in the serialized letter.
int main ()
{
	char 	to [4096];

	strcpy (to, xmlnode::content_of_child (gData, "email"));
	if (strlen (to)) image::barcode (gFrame, to, "qrcode", 72, 72, 10, 10);

	return 0;
}
In the second example, certain paragraphs of the serial letter are to be highlighted. For this, the data file contains the session element with the paragraph numbers.
int main ()
{
	int 	pos 		= textmodel::start ();
	int 	pstart 		= 0, plen = 0;
	int 	parnum 		= 0;
	int 	i;
	char	pn 			[50];
	char 	sessions 	[5000];

	while (pstart < pos)
	{
		pstart = textmodel::find_surrounding_paragraph (gFrame, pstart, &plen, 0);

		pstart = pstart + plen;
		parnum = parnum +1;
	}
	sprintf (pn, "%d", parnum);

	strcpy (sessions, xmlnode::content_of_child (gData, "sessions"));

	for (i = 0; i< strtokencount (sessions, ' '); i++)
	{
		if (strcmp (strtoken (sessions, ' ', i), pn) == 0)
		{
			textmodel::set_parastyle (gFrame, 0, 1, "SessionPlus");
			break;
		}
	}

	return 0;
}
Placeholders may be grouped at will and individually. Mark any number of placeholders with an eye and select the entry "New Group" in the popup menu "Secion". You will be asked for a name and a color for the group. for each group a placeholder belongs to, a small square will be shown in the panel :
![]()
When you select a group, all placeholders in the group (and no others) are marked with an eye.
Use the hints in the tooltip of the popup menu "Group" to maintain placeholder groups.
XML- and SOAP-Datapools have to contain / provide the file placeholdergroups.xml. The XML structure has to have at least one 0-element as described.
<?xml version="1.0" encoding="utf-8"?>
<placeholdergroups>
    <placeholdergroup>
        <ID>0</ID>
        <name></name>
        <user></user>
        <color></color>
        <placeholders>
            <placeholder>
                <ID>0</ID>
            </placeholder>
        </placeholders>
    </placeholdergroup>
</placeholdergroups>
The database has to contain the tables placeholdergroups and placeholdergroupsXplaceholders. The tables have to be defined as described:
| placeholdergroups | Type | Description |
| ID | int(11) | Primary Key |
| Name | varchar(255) | Name of the group |
| User | varchar(255) | For all users, or just one? |
| Color | int(11) | internal color ID |
| placeholdergroupsXplaceholders | Type | Description |
| GroupID | int(11) | |
| PlaceholderID | int(11) |
More notes about how to install placeholder groups can be found here.
[since v4.1 R24442] With generic placeholders, the same placeholder can display different data such as color, weight, size and price of a product: Which property the placeholder should display in the document is defined in the document, not in the data source. This drastically reduces the effort for programming and maintaining placeholders. On the other hand, you can no longer restrict the editing of placeholders in the document to a specific variant of a generic placeholder: If you update the price placeholders, the placeholders for color, weight, and size that are using the same generic placeholder are also loaded. This gap is closed by placeholder variants.
Placeholder variants can be made from any derivative of a generic placeholder and can be shown in the placeholder list. If the Eye Marker is set, only the derivatives of the generic placeholder that correspond exactly to the placeholder variant are processed when the document is edited.
To show the placeholder variants in the list, please activate the
 button at the upper left corner of the panel.
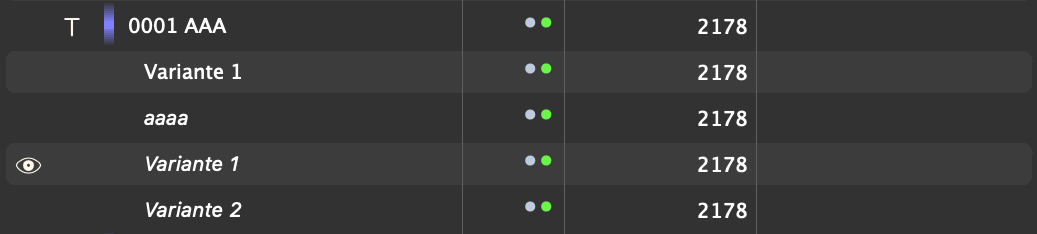
From a more technical point of view, the set eye of the above image mean: Variant 1 of placeholder 0001 AAA contains a list of name/value pairs and the processing of the document placeholders is restricted to the following placeholders:
Placeholder variants are added to the placeholder list if the checkbox Show Variants activated. You do not have to open the placeholder variant levels separately: If the variants are visible, all variants are always displayed. The variants are sorted as follows:
If a placeholder is selected in the document, the appropriate variant is selected in the list. If the list shows several variants with the same settings, the lowest entry is selected.
If you click the name part of a variant in the placeholder list, the document selection is linked with this placeholder. All settings of the variant are transferred to the document placeholder.
Using the button  you can create new variants by following these steps:
Attention: No variants can be created from unconfigured placeholders and placeholders without function variables. Unfortunately, it takes a lot of computational effort to recognize in the list whether a placeholder has function variables in one of its scripts - to do this, all placeholder scripts would have to be loaded and examined first. Therefore, there is no marker in the list whether a placeholder can have variants or not.
To change an existing variant, follow steps 1-6 of the above instructions and enter the name of the variant you want to overwrite as the new name. If you leave the description empty, the old description is retained.
You can use a trick to change the description of a variant. Put the variant anywhere in the document and then follow steps 3-6 of the above instructions. Enter the new description in the dialog and confirm the overwrite.
Wählen Sie gewünschten Varianten mit Klicks neben den (farbig hinterlegten) Namen der Listeneinträge aus und klicken Sie das Löschen-Button  der Palette.
No installations are required for XML and SOAP connections. The configuration file placeholder_variants.xml required for the placeholder variants is created automatically if it does not exist.
The only condition for SOAP and PubServer connections is that the server allows the upload of the new placeholder_variants.xml configuration file. If the creation of new files is not allowed, an empty placeholder_variants.xml must be created as described below in the priint:comet configuration of the server.
Here is the general syntax of a placeholder_variants.xml
<?xml version="1.0" encoding="utf-8"?>
<placeholder_variants>
	<placeholder_variant>
		<placeholderID>0</placeholderID>
		<name>0</name>
		<description></description>
		<user></user>
		<definitions></definitions>
	</placeholder_variant>
</placeholder_variants>
The database must contain the tables placeholder_variants and placeholder_variants_values. Here is the table description in mySQL-compatible syntax:
create table placeholder_variants
(
ID int(10),
placeholderID int(10),
name varchar(4000),
description varchar(4000),
use varchar(4000)
);
alter table placeholder_variants add primary key (ID);
create table placeholder_variants_values
(
placeholder_variants_ID int(10),
type int(10),
name varchar(4000),
value longtext
);
The plugin provides the panel Placeholder Options. The panel shows all information about the first placeholder of the current document selection. In the panel, local settings of the placeholder can be changed and the function variables of the placeholder can be configured. With a Partner License the placeholder scripts can be edited. In the lower part of the window, additional scripts such as Layout Rules and BuildSupport Scripts can be edited.
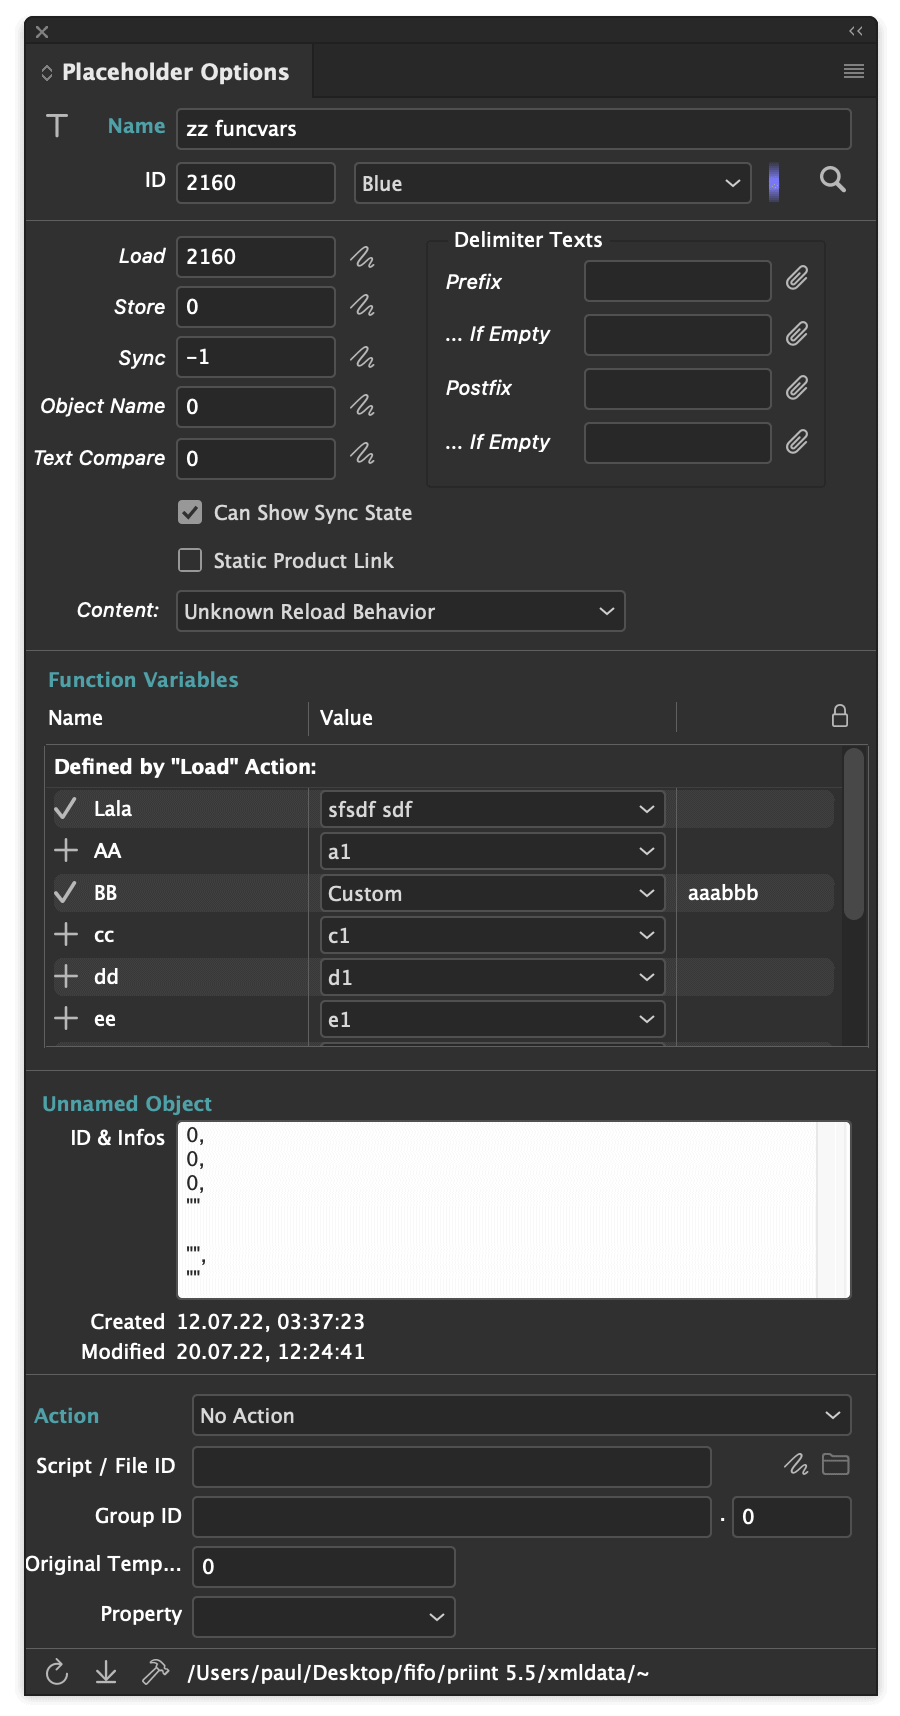
The values of all fields labeled in italics can be modified in the document. Use this option sparingly, and oly during development and testing. Click on ![]() to edit scripts.
to edit scripts.
The placeholders' values can also be changed with cScript, for more information about this option see the function placeholder::change_tags.
In the fourth panel section (labeled with "unbenanntes Objekt" here) you can see the ID of the object the placeholder is linked to. IDs always consist of three numbers and a string.
For development purposes, you can copy the ID into the clipboard here.
In the lower panel section, you can edit any action defined in your data pool. Select the action in the popup Action. The ID of the action appears in the field Script. With ![]() , you can edit the script. Of course, you can just enter an ID into the field yourself.
, you can edit the script. Of course, you can just enter an ID into the field yourself.
More information about this plugin can be found here.
Since v4.1
With the plugins, preflight rules can be created and applied fot testing placeholders in the document. The following plugins are required:
Warnign: The current Sync-Status is checked. Recalculating placeholder stati is not possible for performance reasons.
You can define preflight rules for placeholders in the flyout menu Edit Profiles of the Preflight panel. You can choose between checking frame placeholders, text placeholders, or both.
Placeholder with a status unequal 1 (meaning Not Okay), are added to the result list of the preflight. In the error information, you can find more details about the linked object and the placeholder.
Templates are the second central concept in priint:comet plugins. Templates are a collection of any number of document frames of any design. Frames and texts of the templates are usually equipped with placeholders that are linked to a product and loaded after insertion.
Warning: Templates depend on the InDesign® version used. Templates created with a newer version of InDesign® cannot be used in older versions. Conversely, older templates have to be converted before use with a newer version. For performance reasons, you should convert all templates as quickly as possible (after all work stations have been upgraded to the new InDesign® version).
In the Templates panel, templates of (grouped) document frames can be managed. The entries can be created from the panel, changed and inserted into the document. Templates are used in the following script commands, among others.
A detailed description of this plugin can be found here.
In the Template Behaviour panel, you can set frame specific properties of a template : the order in which placeholders of the frames should be loaded, whether frames should be used in the text flow, overwrite properties, etc...
More information about this can be found here.
The plugin provides the two panels Layout Rules und Build rules.
The panel build rules is no longer used in Comet 4. You can find out more about that here.
[since Comet 3.1] Layout rules are scripts linked with frames, which are can be executed in the following contexts:
Frames may have any number of layout rules. Each rule may use up to four additional parameters.

Template Behaviour and Layout Rules are two different things : Template behaviour allows you to control how a template treats a frame. Layout rules are used to change the look of the frame.
A detailed explanation of layout rules can be found here.

Page templates control the product build. After placeholders and templates, they are the third foundational concept of the priint:comet plugins.
The panels Page Templates and Page Elements help you manage and configure page templates. Here you can set, among other things, what a page template will be called and what successors it has. Thee pages' frames are considered to be elements of the page template (Page Elements). You can also specify whether a frame should be used to position one or multiple products, or whether the products should flow into the frame as text.
A description of this module can be found here.
Page adaption is the process of adjusting page content when changing page size. The adjustment can be manual, or executed with a control file.
Position changes and resizing of frames is controlled with magnets and nails: Nails freeze the distance to the page boundary, magnets control the distance between frames. Nails and magnets can be set with the toolbox:
![]()
Adapting frame content is controlled by rules assigned to the frame. Rules are implemented as cScripts.
A description of this module can be found here.
List allow access to specific database tables and offer the option to search the data pool. With these panels, selected texts and images in InDesign® documents can be linked to databes values. They also offer the option to write back specific entries and check whether document and database contents are in sync and which database objects are used in a document.
The found data is used to solve panel specific tasks. In most cases, that means Linking selected texts and frames with a selected object in the list. Other lists are for job management.
All panels react to the current document and its selection:
 ).
).
The product pool supports multi-selection: All products selected in the document are also selected in the panel (if they are visible there).
Panels contain multiple search fields. The search is started with  . The number of records in a list is usually limited to 100.
The list in the product pool is limited to 10000. Additionally, each entry may have up to 10000 subentries.
To link a placeholder in the document with a list entry, follow these steps:
If an element of the document was linked with a database object, it is automatically loaded from the database. You can suppress the automatic load with a single click on  in the lower right of the list panels .
If automatic loads are disabled (grey arrow), placeholders are not loaded when inserting products via drag and drop from the product pool wither.
If a link does not work, it is usually because the selected placeholder has a different ClassID than the object list, see also ClassID.
By single clicking the status button , you can jump to the place in the document where the object is first linked. With repeated clicking, you can navigate through the document.
The product pool additionally offers the option to select the entire comet group. Above the status button, there is a small button for that, which must show this image:  .
.
The flyout menus of some panels can contain any number of dynamic entries in addition to their standard entries, the so-called Panel Actions. These entries are defined in the configuration data of your data pool and are added automatically after the connection is established (login). When the data connection is disconnected, they are removed again. The following panels support palette actions:
| Panel |
| Product Pool |
| Publications |
| Previews |
| ToDos |
| Settings |
| Templates |
Für Schnellzugriffe kann jede Palettenaktion auch als Front Row Button angelegt werden.
For quick access, each panel action can also be created as a Front Row Button.
The actions behind the menu items are defined in the actions table and implemented as cScripts. A description of how to create Panel Actions can be found here.
[Since v5.0 R37360 and subject to successful testing] Panelactions and Front Row scripts can be explicitly enabled only for InDesign®, Illustrator®, and/or comet_pdf. If an action is not permitted for the current application, it will not be included in the panel menus of the priint:comet plug-ins or into the Front Row panel.
Target applications are evaluated exclusively in
Panel Actions
and in the Front Row panel
and only prevent the corresponding actions from being visible in the flyouts of the panels
and in Front Row.
In all other scripts, such as placeholder scripts, Layout Rules, BuildSupport scripts, etc.,
they are explicitly ignored and have no influence on the executability (or non-executability) of the scripts.
Application-related differences in the implementation of these scripts can
be resolved here using system:version.
The specifications for target applications are made directly in the script. To do this, insert one or more of the following lines into your script:
After changing the target applications of a script, a reconnection to the data pool is required!
There are three ways to limit the selection of objects that are processed by a panel action.
 and vice-versa. With the eye set, this object is "monitored". With the button
  in the lower right of the list panels, you can disable multi-selection (
 ). If no object is marked with an eye, all objects are monitored.
. If no placeholder is monitored, the placeholder checking before processing is skipped.
). If no object is marked with an eye, all objects are monitored.
. If no placeholder is monitored, the placeholder checking before processing is skipped.
[since v4.1.8 R27334] In the following lists the last used entries of the respective data connection can be shown:
 and Drag and Drop into documents.
and
and Drag and Drop into documents.
and  .
.
To get the last used entries, click on the magnifying glass symbol while holding down the ALT key:
 + ALT (Option) : Show the last 10 recent entries in the order of their usage + ALT (Option) + Shift : Clear the list of the recent entries
The recent entries are stored per data connection in the file
$PREFS/werkii/statistics.xml
Data connections are identified by the connection name displayed in the panels:

The file is read by the respective plugins each time a data connection is established (data folder, login) and updated when the connection is disconnected.
<?xml version="1.0" encoding="utf-8"?>
<statistics>
	<recents>
		<connection label="paul@demo:comet_config">
			<products></products>
            <placeholders>120164 13 10</placeholders>
            <templates></templates>
            <publications></publications>
            <pagetemplates>260007 16 15</pagetemplates>
        </connection>
        <connection label="XML /Users/paul/Desktop/fifo/priint 5.5/xmldata/~">
            <products></products>
            <placeholders>50 30 20 2190 2166 720 71000001 20</placeholders>
            <templates>15 11 12 13 14</templates>
            <publications></publications>
            <pagetemplates>64 44 6 8 2</pagetemplates>
        </connection>
    </recents>
    <contexts></contexts>
</statistics>
Currently only the ID lists of the three entries Placeholders, Templates and Page Templates are supported. Manual changes before reading are allowed, changes to the entries of an active connection are ignored.
List panels all have a unique ID, the so called ClassID. This number is assigned by WERK II and controls multiple things:
The following table lists all used ClassIDs (to use panel IDs in scripts, you have to include
#include "internal/panels.h"
at the beginning of the script.) :
| ClassID | Description |
| Panel ClassIDs | |
| kPanelProducts (3) |
Panel Product Pool. Actions of this class are attached to the flyout menu of the panel Product Pool, see here. Also all types of Product Placeholders in InDesign®, Illustrator®, and comet_pdf documents have the ClassID 3. see also here. |
| kPanelPreviews (6) | Panel Previews. Actions of this class are attached to the flyout menu of the panel Previews, see here. |
| kPanelPageitems (8) | Panel Templates. Actions of this class are attached to the flyout menu of the panel Templates, see here. |
| kPanelPublications (9) | Panel Publications. Actions of this class are attached to the flyout menu of the panel Publications, see here. |
| kPanelToDoList (10) | Panel ToDos. Actions of this class are attached to the flyout menu of the panel ToDos, see here. |
| kPanelPlaceholder (125) | Panel Placeholder |
| kPanelSettings (419)
13 - for panel script |
Panel Settings. Actions of class 13are attached to the flyout menu of the panel Settings, see here. |
| kPanelPlaceholderValues (401) | Panel Placeholder Options |
| kPanelPlaceholderValuesInfo (413) | Panel Placeholder Infos |
| kPanelPageitemsBehavior (402) | Panel Template Behavior |
| kPanelPageTemplates (403) | Panel Page Templates |
| kPanelPageElements (404) | Panel Page Elements |
| kPanelCometAdmin (405) | Panel Comet Admin |
| kPanelTableModule (406) | Panel Table Module |
| kPanelTranslations (407) | Panel Translations |
| kPanelLayoutRules (408) | Panel Layout Rules |
| kPanelFrameTags (409) | Panel Frame Tags |
| kPanelAreaBuild (410) | Panel Area Build |
| kPanelPriintAdjust (411) | Panel priint:adjust |
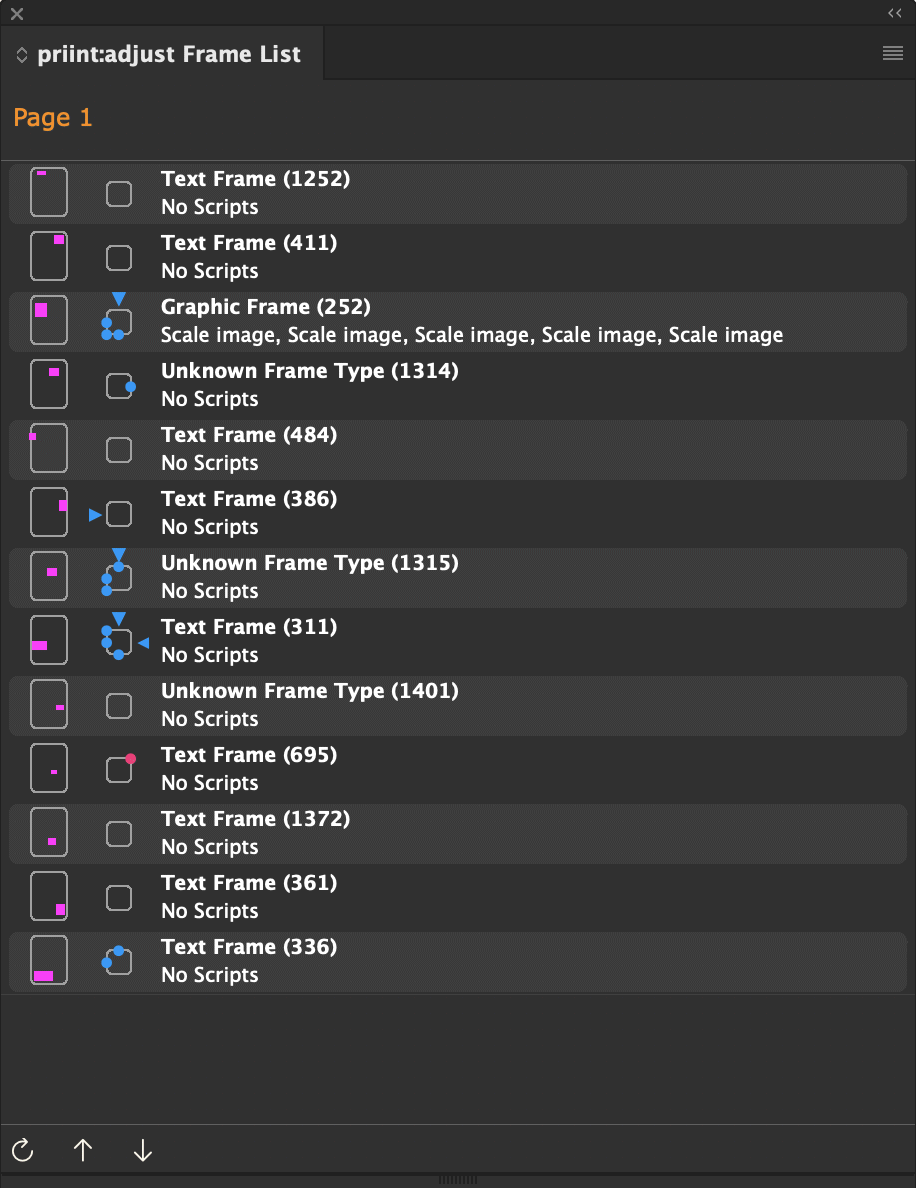
| kPanelPriintAdjustList (412) | Panel priint:adjust Frame list |
| kPanelPlaceholderValuesInfo (413) | Panel PlaceHolder Info |
| kPanelFrontRow (414) | Panel Front Row |
| kPanelNotes (415) | Panel Comet NNotes |
| kPanelPreviewDetails (416) | Panel Preview-Details |
| kPanelProductsOfDocument (417) | Panel Products of Document |
| kPanelPublicationInfo (418) | Panel Publications Infos |
| kPanelCometTests (420) | Panel Comet Tests |
| kPanelURLLink (421) | Panel Web Images |
| ClassIDs of scripts defined in actions | |
| 14 |
Preparation Script for the product build, see document::build_products and global variables for these scripts Pre/Postrules - Rules applied during grid and page building. To activate these, framerules has to be installed |
| 15 |
Template ID Scripts - If such a script is defined in a template, it is run before the template is inserted. With such a script, you can change the ID of the template to be loaded, see also Template ID Script , document::placeitems and their global variables These scripts are displayed in the popup Template ID Script of the dialog with a template's settings. To allow Template ID Scripts to run, pageitems has to be extended with the attribute scriptid (databases) or spread.scriptid (XML and SOAP). (since Version 1.3.1, R112). |
| 16 | Deprecated Scripts that run after a template is inserted. Please use Layout Rules instead. |
| 18 | Double click in the product panel |
| 19 | Double click in the document panel |
| 20 | Double click in the previews panel |
| 21 | reserved |
| 22 | Batch processing of the Illustrator Batch panel | 138 | Batch processing of th InDesign Comet++panel |
| 23 |
Attention : Unlike in other actions, the 23 must be entered in type resp. typeid and in classid. |
| 24 | Layout rules of the table module
Attention : Unlike in other actions, the 24 must be entered in type resp. typeid and in classid. |
| 25 | reserved for the table module |
| 26 | |
| 28 | Info scripts of the editions |
| 30 | Reserved |
| 31 | Reserved |
| 33 | reserved |
| 34 | Action of the script command itemlist::logical_groups |
| 35 | Action of the Page Adapter
Attention : Unlike in other actions, the 35 must be entered in type resp. typeid and in classid. |
| 36 | Layout Rule (Plugin FrameRules, Panel Layout Rules) |
| 37 | Method for Product selection for building with page templates.
These scripts are displayed in the page template build under Selection Method. |
| 38 | CometServer Jobs |
| 39 | Process products in the document
These scripts are displayed in the Document Products and can be run from there. The parameters specified in the panel are provided in the following global variables: char * gParam1; int gParamInt1; float gParamFloat1; |
| 40 | [since Comet 3.2.1] DropURL-Script |
| 41 | Whiteboard scripts |
| 42 | [since Comet 3.2.2] Export InDesign® Libraries |
| 43 | [since Comet 3.2.2] Import InDesign® Libraries |
| 44 | [since Comet 3.2.2] Dynamic Parameterlists - Scripts for loading values for the parameters of a layout rule, see here. |
| 45 | Conditions for layout rules, see here. |
| 46 | Delimiters in the text flow, see here. These scripts are shown in the template settings, in the popup menu "Texflow-Prefix" gezeigt. |
| 47 | Whiteboard Server Scripts |
| 48 | |
| 49 |
Whitebord Preview Snippets |
| 50 | Scripts for Placeholder Prefix/Postfix, see here. |
| 51 | [since v3.4 R3211] Layout rules for text placeholders, see here. |
| 52 | [since v3.4 R3211] Conditions for layout rules for text placeholders, see here. |
| 53 | [since v3.4 R3211] Postaction for document individualization |
| 54 | [since v3.4 R5942] These scripts can be run after a page template application, see here. |
| 55 | [since v4.1 R12000] Action to determine possible values for placeholder function variables, see here |
| 56 | [since v4.1 R12000] Action to determine possible values for table cells Function variables, see here |
| 57 | [since v4.1 R12500] Action for dynamic definition of placeholder function variables, see here |
| 58 | [since v4.1 R12500] Action for dynamic definition of table cell function variables, see here |
| 60 | [since v4.1 R22127] Scripts that is executed in the PubServer environment for publications. |
| 61 | [since v4.1.7 R27311] Load values of search fileds of Product Pool |
| 62 | Document Timer |
| 63 | String Comparison Script for text placeholders with autosync |
| 64 | Jobs Queue Script for Publication documents |
| 99 | Reserved for Workbench |
Instructions for configuring the priint:comet panels are specified in the panelstatements table/file. Unlike the actions that can occur multiple times (such as many Layout Rules), panelstatements exist only once each (such as loading the placeholder colors). The following table contains the list of reserved entries. In addition, all values less than 1000 are reserved.
Panelstatements of type Script are written in cScript or Python as usually. Panelstatements of type Statement are written in the language of the current data connection, that is xmlquery or XPATH, SQL or SOAP-Calls. The locker marked ![]() entries of the table are part of the standard configuration. We strongly advise against changing these statements!
entries of the table are part of the standard configuration. We strongly advise against changing these statements!
| Usage | ID | Type | Description |
| Session-Handling | 139 | Script |
Allow Login Script The script is executed directly after a successful login and can be used to reject or accept a connection according to your own criteria. If a connection is rejected, it is also automatically released immediately and the login dialog opens again. Return Values With return 0 (no error) you accept the connection. Otherwise the connection will be rejected. ATTENTION
The following global variables are defined in the script: int gLogins; // Counts the successfull connections after starting InDesign®-Start Here is an example of an ODBC connection: int main ()
{
int ret = 0;
char m [1200];
char serv [255];
char name [255];
char usr [255];
sprintf (m, "Sure to Logon?\nSRV:%s\nDB:%s\nUSR\:%s",
sql::server (gDBC, serv),
sql::dbname (gDBC, name),
sql::user (gDBC, usr));
if (alert ("OK", "Better not", 0, 1, 4, m) != 1) ret = 1;
return ret;
}
|
| 92 | Statement or Script | After Login Script
The script is executed after successful and allowed logins and after setting a new XML folder and is used to initialize connection-typical settings. The global variable gLogins is defined in the script, which counts (separately) how many SOAP/ODBC logins occurred and how many times the XML folder was changed. Recommeded Setting
Example int main ()
{
system::setdocwatch (1);
prefs::set_script_buffer (1000);
prefs::set_preserve_color_profiles (1);
return 0;
}
|
|
| 133 | Script | Change Session Script
The session ID of the connection is to be changed. In the script the variable gSessionID is defined and contains the new session ID as char[] string. |
|
| 134 | Script | Use Session Script
The session ID of the connection was changed. In the script the variable gSessionID is defined and contains the new session ID as char[] string. |
|
| 152 | Script | Before Logout
[Since v4.3 R36876] The script is called directly before a data connection is disconnected. The connection is still active - but will be disconnected in the next step. The script is intended in particular to enable you to delete your own global Python variables and other global 'things'. |
|
| Placeholder Colors | 11 | Load Colors Script Load the colors that will be used for the placeholders. If the instruction is missing, the Mac OS X crayons will be used as default colors. | |
| Product Pool | 55 | Statement |
Load the top level entries of the Product Pool. IDs starting from 1000 can be used for the instructions to load the subentries. Hint: Products can also be loaded with the help of cScript or Python. See here for more information. |
| 95 | Script | Load the ID of the action that has to be executed when double clicking a product. | |
| 148 | Script |
Filter the templates, shownn the Templates popup at the top right of the panel. 
By restricting the templates shown to approved templates only, you can ensure that only the intended templates can be assigned to products. You can deactivate filtering using the fly-out menu Show Shared Templates Only of panel Product Pool. Filter the templates in the template popup at the top right of the panle. By restricting the templates shown, you can ensure that only the intended templates can be assigned to products. |
|
| 155 | - | Product Panel of the whiteboard. The instructions are not executed in the priint:comet plug-ins. | |
| 255 | |||
| 355 | |||
| Templates | 32 | Statement |  Domain Types in the metadata dialog of the templates. The instruction is used to populate the list of area types in the metadata dialog of the templates. Domain Types in the metadata dialog of the templates. The instruction is used to populate the list of area types in the metadata dialog of the templates.
SQL-Example: select 1, 'Mandant 1' from dual
union select 2, 'Mandant 2' from dual
union select 3, 'Marktplatz' from dual
union select 4, 'Basar' from dual
union select 5, 'Bauchladen' from dual
|
| 33 | Statement | Domains in the metadata dialog of the templates. The statement is used to populate the list of domain in the metadata dialog of the templates. The ? of the statement is replaced by the ID of the selected domai type from panel statement 32.
SQL-Example: select id, name from domain where domainClassID = ? |
|
| 24 | Statement |
SQL-Example: select distinct (d.id), d.name from domain d, userxdomain x where d.ID > 0 and (x.userid = ? or 0 = ?) and d.id = x.domainid and upper(d.Name) like upper(?) and (d.domainClassID = ? or 0 = ?) |
|
| 25 | Statement | Template Types in the metadata dialog of the templates. Load the list of template types for the metadata dialog of the templates.
SQL-Example: select id, name from pageitemtypes where ID > 0 |
|
| 26 | Statement | Template States in the metadata dialog of the templates. Load the list of template states for the metadata dialog of the templates.
SQL-Example: SELECT id, value FROM relatedto WHERE id > 0 |
|
| 118 | Statement or Script | Before Deletion : The instruction is executed each time before a template is deleted and can prevent the deletion. See here for more information. | |
| 93 | Statement or Script | Load the ScriptID for the pageitem-id script (only if the pageitem-id script is enabled). If the statement is empty or not defined, the following default is used:
select spread.scriptid node pageitems.pageitem where id = ? |
|
| 94 | Statement or Script | Load the name of the pageitem-id script (only if the pageitem-id script is enabled). If the statement is empty or not defined, the following default is used :
select name node actions.action where id = ? |
|
| 22 | Search the templates according to the inputs of the search fields. Under XML and SOAP the statement also returns the single values of the templates.
SQL-Example: select ID, 0, 0 from PageItems where ID > ? and (upper(Name) like ? or Name is NULL) and (DomainID = ? or 0 = ?) limit 0, ? |
||
| 23 | Loading a template. Under XML and SOAP, the statement is not needed.
SQL-Example: select p.name, t.name, d.name, s.value, p.description, p.preview, p.leftPos, p.topPos, p.rightPos, p.bottomPos, p.spreadID, p.leftID, p.middleID, p.rightID from PageItems p, PageItemTypes t, Domain d, RelatedTo s where t.ID = p.TypeID and d.ID = p.DomainID and s.ID = p.StateID and p.id = ? |
||
| 27 | Get the TypeID, DomainID, StateID and PlaceholderID of a template. The statement is unused in XML offline and SOAP connections.
SQL-Example: SELECT typeid, domainid, stateid, PlaceholderID FROM pageitems WHERE id = ? |
||
| 28 | Change the metadata of a template when closing the dialog
SQL-Example: update pageitems set name = ?, typeid = ?, domainid = ?, stateid = ?, placeholderID = ?, description = ?, spreadid = ?, leftid = ?, middleid = ?, rightid = ? where id = ? |
||
| 29 |  Change the data of a template. Change the data of a template.
SQL-Example: UPDATE pageitems SET data = _latin1?, preview = _latin1?, leftpos = ?, toppos = ?, rightpos = ?, bottompos = ? WHERE id = ? |
||
| 30 |  Delete a template Delete a template
SQL-Example: delete from PageItems where id = ? |
||
| 31 |  Load the data (the InDesign frames) of a template to insert it into the document. Load the data (the InDesign frames) of a template to insert it into the document.
SQL-Example: select data from pageitems where id = ? |
||
| 56 | Load ID and name of the template of a specific page type for use in the page type popup menus.
SQL-Example: select distinct (ID), Name from PageItems where ID > ? and (DomainID = ? OR DomainID = 0 OR ID = ?) and (SpreadID = ? OR SpreadID = 0 OR ID = ?) order by name |
||
| 57 | Load the preview path/preview of a template for display in the dialog
SQL-Example: select preview from PageItems where ID = ? |
||
| 121 |
Since 3.2 R2155, 29.09.2010 Statement for saving templates in IDML. The statement is needed only for SQL connections. If the statement is empty or not defined, the following default is used : update PageItems set dataIDML = LATIN1 ? where id = ?
LATIN1 is replaced by the value of LATIN1 given in the table keywords. The additional saving of templates in IDML format must be activated with the script statement prefs::add_idml_to_templates. |
||
| 137 |
Since 3.3.1 R3445, 21.02.2013 Statement for saving templates in W2ML. The statement is needed only for SQL connections. If the statement is empty or not defined, the following default is used : update PageItems set dataW2 = where id = ? The additional saving of templates in W2ML format must be activated with the script statement prefs::add_w2ml_to_templates. |
||
| Publications | Panel | ||
| 36 | Statement | Searching the list entries. In XML and SOAP, the statement also returns the contents of the indivual entries. | |
| 37 | Statement | Loading the individual entries (SQL only) | |
| 130 | Statement | Search for the Template Documents. The syntax of the statement corresponds to panel statement 36. | 131 | Statement | Load the Template Document indivdual entries (SQ only). The syntax of the statement corresponds to panel statement 37. |
| 38 | Statement | Loading the items of the popup menu Domain (If your panel has this popup) | |
| 96 | Skript | Get the id of the double click action to be preforned on double clicking Publications | Publication Infos |
| 100 | Statement |
How many previews are available for the current publication? |
|
| 101 | Statement |
Load a preview. |
|
| 102 | Statement |
Get the last preview ID used. |
|
| 103 | Statement |
Create a new preview for a publication. |
|
| 104 | Statement |
Delete all previews of a publication. |
|
| 105 | Statement |
Fill the large info field of the panel with any text. |
|
| Check in and out
[Since v4.3 R36780] For test purposes, the following scripts can also be stored in the $DESKTOP folder emergency under the names ps_ID.cpp. Do not forget to delete the test scripts at some point! |
|||
| 110 | Script | Load the connection data for the publication server | |
| 111 | Script | Checkout Script - executed before opening the publication | 125 | Script | After Checkout Script |
| 112 | Script | After Save Script - executed after saving the publication | |
| 113 | Script | Before Close Script - executed before closing the publication | |
| 114 | Script | Status Script - Calculate the document status. See here for th stati given by the server. | |
| 115 | Script | Checkin Script - The checkin button was clicked | |
| 116 | Script | After Close Script - executed before closing the publication | |
| 117 | Script | Revert Script - The checkin button was ALT clicked | |
| 125 | Script | AfterOpen exclusively for the publication documents. The script is only executed when the document watching is enabled (e.g. by system::set_docwatch in the AfterLogin script). Defined variables see here. | |
| 135 | Statement | Options for metadata generation, SOAP and ODBC only. The statement is optional and will be executed when generating the publication metadata. Return of the statement is a string with the desired server options. Information about server options can be found here.
Default is "content:none;svg:bbox;". |
|
| 136 | Statement | List of metadata files to be generated, SOAP and ODBC only. The statement is optional and will be executed when generating the publication metadata. The statement can return multiple result colums with the possible values for each:
If the statement is empty or missing, everything will be exported. |
|
|
The scripts are only executed when the document watching is enabled (e.g. by system::set_docwatch (cScript) or comet.prefs.setDocWatch (Python) in the AfterLogin script). Defined variables see here. If document monitoring is enabled, it will be executed for all (even new) document... |
|||
| 42 | Script | After creating a new document | |
| 43 | Script | Before opening a document | |
| 44 | Script | After opening a document.
Desktop : The document is not yet open and visible in a window. Script functions like , layer::remove, etc., which do not have a parameter that specifies a target document or a document object (frame, table, hyperlink, color field, etc.), automatically work on the current front document and will not work at this point. In this case, please use panelstatement 59, which is executed after the document window is visible and in front. For documents, which are available via the Publication panel, there is the additionally panelstatement 125, which is executed exclusively for Publication documents. |
|
| 59 | Script | After showing the document. Server plugins run the script after opening the document ( like script 44).
The background is that placeholder actions (e.g. linklist::load) work on the current front document, which is not set in the desktop variants until the window is opened. |
|
| 45 | Script | Before saving a document | |
| 46 | Script | After saving a document | |
| 47 | Script | Before 'Save As' of a document | |
| 48 | Script | After 'Save As' | |
| 49 | Script | Before 'Save a Copy' of a document | |
| 50 | Script | After 'Save a copy' of a document | |
| 51 | Script | Before 'Revert' | |
| 52 | Script | After 'Revert' | |
| 53 | Script | Before closing a document | |
| 58 | Script | Since 3.1, R1730, 8. Feb. 2010 Script on document change. The script is called every time the front document is changed. In the scripts dialogs should not be used - closing the dialog can trigger the event again! | |
| 59 | Script | Since 3.1, R1730, 27. April. 2010 Script after showing the document show. The script is executed after a document window is opened. | |
| Comet | 122 | Script | Place URLs. A text URL from an Internet browser has been placed in the document. What should be done with the URL? The script chooses the desired action depending on the URL. For more information see here. |
| 123 | Script | Export an InDesign® library. The script defines if and how a library can be exported and selects one of the actions defined with class 42 (see above). More about this see here. | |
| 124 | Script | Import an InDesign® library. The script defines if and how a library can be imported and selects one of the actions defined with class 43 (see above). More about this see here. | |
| Settings | 85 | Load all setting entries and global variables of the datapool into the panel. Please note that server side defined global variables are not supported by PubServer. | |
| 86 | Get ID of a new Settings entry | ||
| 87 | Creating a new Settings entry | ||
| 88 | Changing the alias name of a Settings entry | ||
| 89 | Changing the path of a Settings entry | ||
| 90 | Remove a Settings entry | ||
| 91 | Enable/disable a Settings entry | ||
| Previews | 97 | Script | Load the ID of the action to be executed when a Preview is double-clicked. |
| Page Templates | 120 | Script | (Since Version 3.1, R1956, 17. June 2010) The script is executed each time before deleting a Page Template and can prevent deletion. For more information, see here. |
| ToDos | 150 | Script | Since v4.2 Which paragraph style should be used in newly created Comet Notes, see here. |
| 151 | Script | Since v4.2 Move Comet Notes completed in the ToDos panle to this layer, see here. | |
| Web Images | 141 | Script | Since v4.1 R23234 Set the image folder for Web Image downloads, see here. |
| Reserved Externally | 126 | Whiteboard : 3 Panelstatments for Attributes Panel | |
| 127 | |||
| 128 | |||
| 200001 | Aufgaben-Palette PubServer intern | ||
| 200002 | |||
Here an example for a login script. This script can be used for XML data directories. On program startup, the welcome message is automatically suppressed.
int main
{
	if (gLogins > 1)
	{
		showmessage (
				"%d. Welcome to the test environment",
				gLogins);
	}
	system::set_docwatch ();

	return 0;
}
The following is an example script for a document monitoring function. Please note that a target document does not have to be defined in all cases.
int main ()
{
	char		p[4096];

	if (document::current ()) document::path (p);
	else strcpy (p, "undefined");

	showmessage ("Before save %s";, p);

	return 0;
}
Panel Actions are stored in the actions table. The names of all action entries whose classID is equal to the ClassID of a plug-in are included in the panels fly-out menu and in the application menu Plug-Ins -> Panel Name. The sequence of the entries is controlled by the sequencenr field.
The following panels are supported:
| Panel | ClassID |
| Product Pool | 3 |
| Publications | 9 |
| Previews | 6 |
| ToDos | 10 |
| Settings | 13 |
| Templates | 8 |
For quick access, each panel action can also be defined as a Front Row Button. For information on creating front row buttons of palette actions, click here.
With a ^-separated path in front of the action name, the desired submenus are created automartically.
The name and all path parts are automatically translated into the language of the InDesign® used using the currently available translations.
The Test Script entry is entered in the bbb menu of the aaa menu.
aaa^bbb^Test Script
Separated by two commas (,,), a shortcut and a availability definition can be appended to the menu entry.
Letters are specified normally. The tag notation like Ö for Ö is also allowed. The function keys are referred to with F1 - F12. Please keep in mind, that the function keys may already taken by the OS or by InDesign®! The following keywords are used to refer to modifier keys
Modifiers are separated with +. If a keyboard shortcut is already used elsewhere, the definition is ignored. Please test a shortcut in Edit > Keyboard Shortcuts... before using it.
The action Test Script should be triggered by Shift-Control-W.
aaa^bbb^Test Script ,, Shift+Ctrl+W
Before the keyboard shortcut, an InDesign® context may be defined. This context afftects only the shortcut, not the menu entry itself, and determines which context the shortcut can be used in. The following contexts (and no others!) are available :
If this is unspecified, the shortcut can be used at any time.
The action Test Script should be triggered by Shift-Control-W in texts only:
aaa^bbb^Test Script ,, Text Shift+Ctrl+W
For automatic (de)activation of menu entries, the following options can be specified :
If neither is specified, the entry will always be activated.
If the panel and a document are open, the test script can be triggered by Shift-Control-W.
aaa^bbb^Tests Script ,, Panel Document Shift+Ctrl+W
The panel actions are added after the standard entries of the panels. The sequence of the entries is controlled by the sequencenr field.
To avoid permanent adjustments of the sequence numbers, it is a good idea to assign the sequence numbers at least in steps of 10. Then you have enough space for insertions.
Panel Actions can be inserted into the Front Rows panel. The necessary specifications are done in the inputdocumentation attribute of the action. See here for more information.
The actual implementation of the actions to be executed is done in cScript. Scripts can be edited using the panel Placeholder Options or by ALT-clicking the menu item. To edit scripts a partner license is required.
XML Offline : Action scripts are stored in the actions folder next to the actions.xml file and with the name ID.crpt. If the file does not exist when you edit, it is created automatically. To protect your script texts, the scripts are automatically encrypted when they are saved. The line
#pragma plain
at the beginning of the script will disable encryption for this file. Alternatively, you can place the crpt files directly in the actions folder. In this case, the #pragma plain preamble is mandator..
ODBC : The scripts are stored unencrypted in the statements attribute.
PubServer : Creating and editing scripts is done in ISON. Please note that scripts in PubServer connections are changed only locally and for testing. On logout local script changes are lost.
The following ODBC example adds the menu entry Action 1 to the Product Pool panel, which inserts the text 'Action 1' into the document at the current text selection.
insert into Actions
(
  id,
  name,
  classid,
  typeid,
  statement,
  sequenceNr,
  domainid)
values
(
  100000,
  'aaa^bbb^Action 1 ,, Text Shift+Ctrl+W',  -- Name
  3,           -- ClassID of panel Product Pool
  0,           -- typeID, unused by plugins
  'main () {textmodel::insert ("Action 1");}',
  2,           -- Sort order
  1003         -- Domain ID
);
The Previews panel is used to show alternative texts or images for placeholders and products. In the Preview-Details panel, the details for the entry currently selected in the Previews panel are displayed.
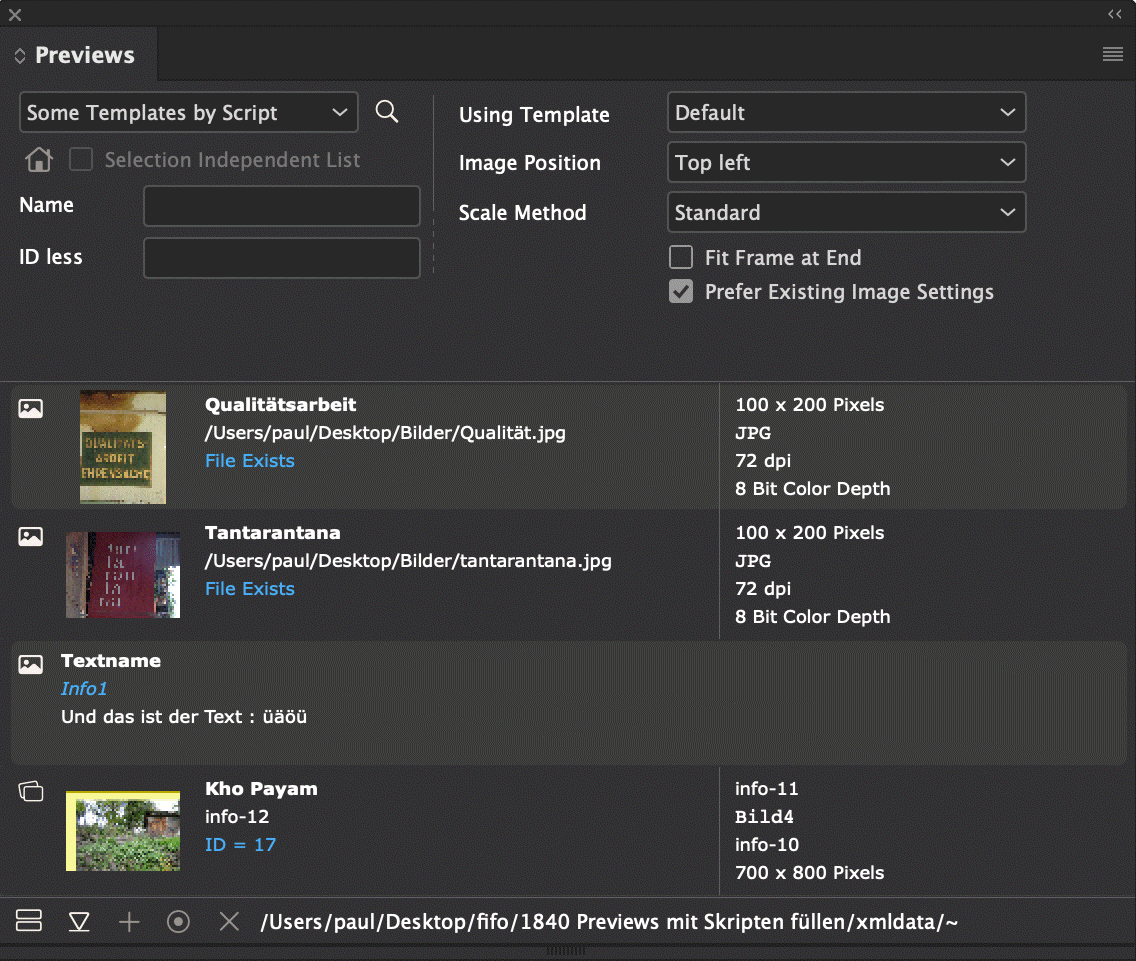
More information can be found here.
The Product Pool is the most commonly used panel of all priint:comet plugins.
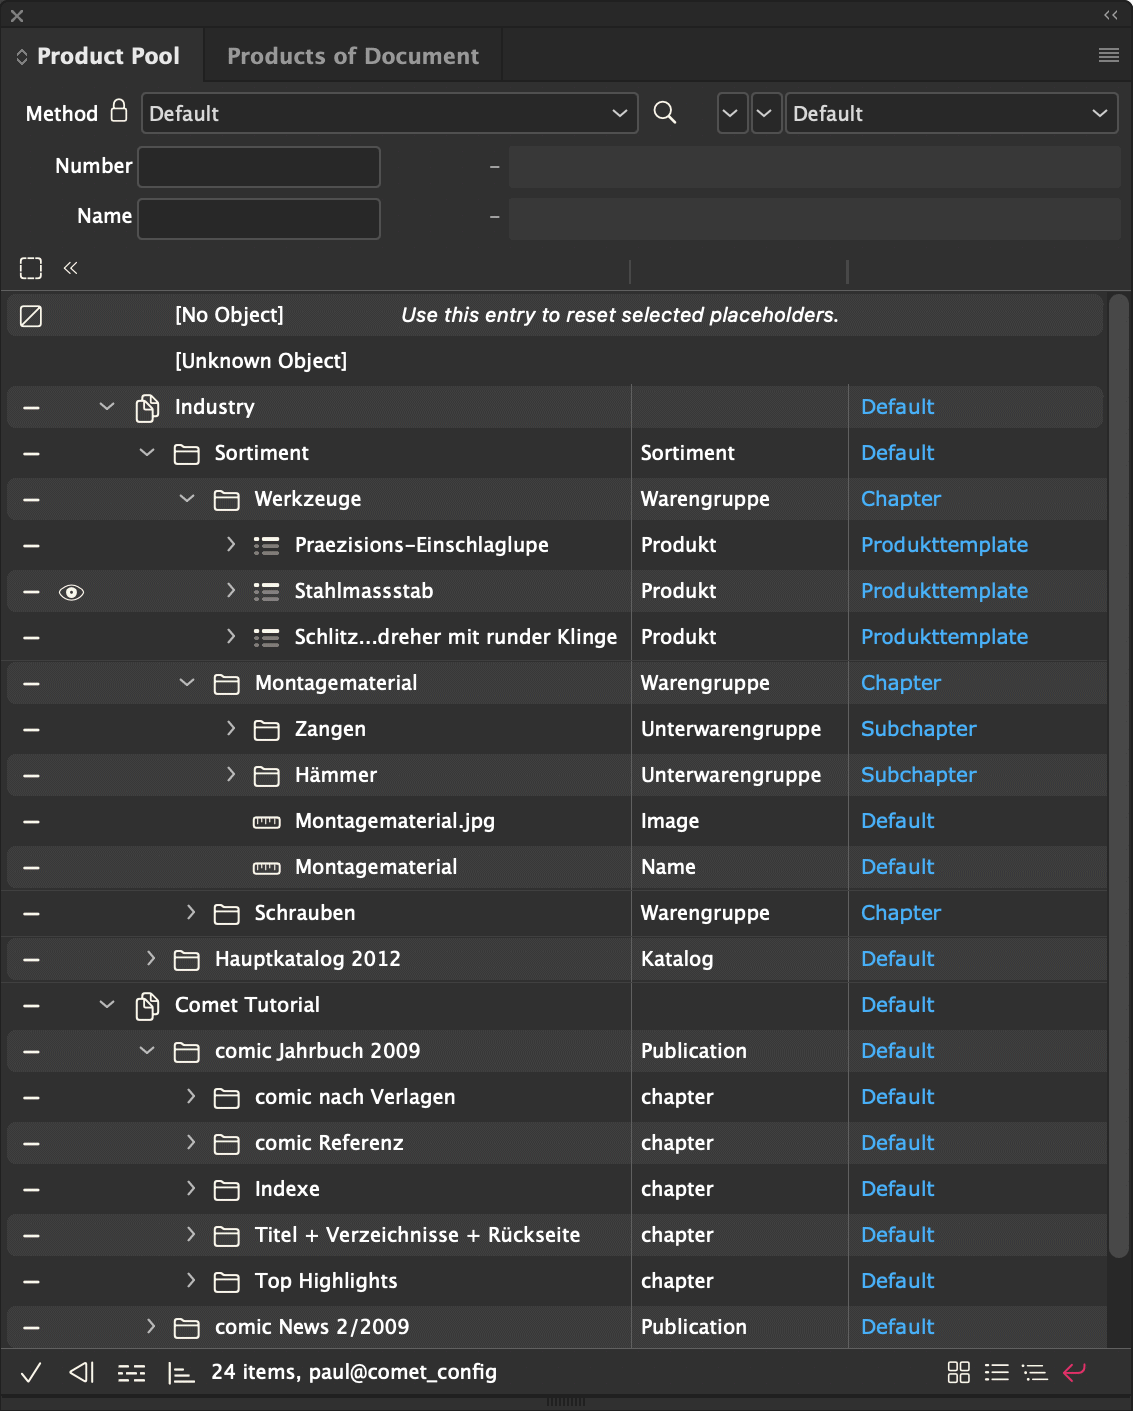
Additional information about this plugin and its panels can be found here.
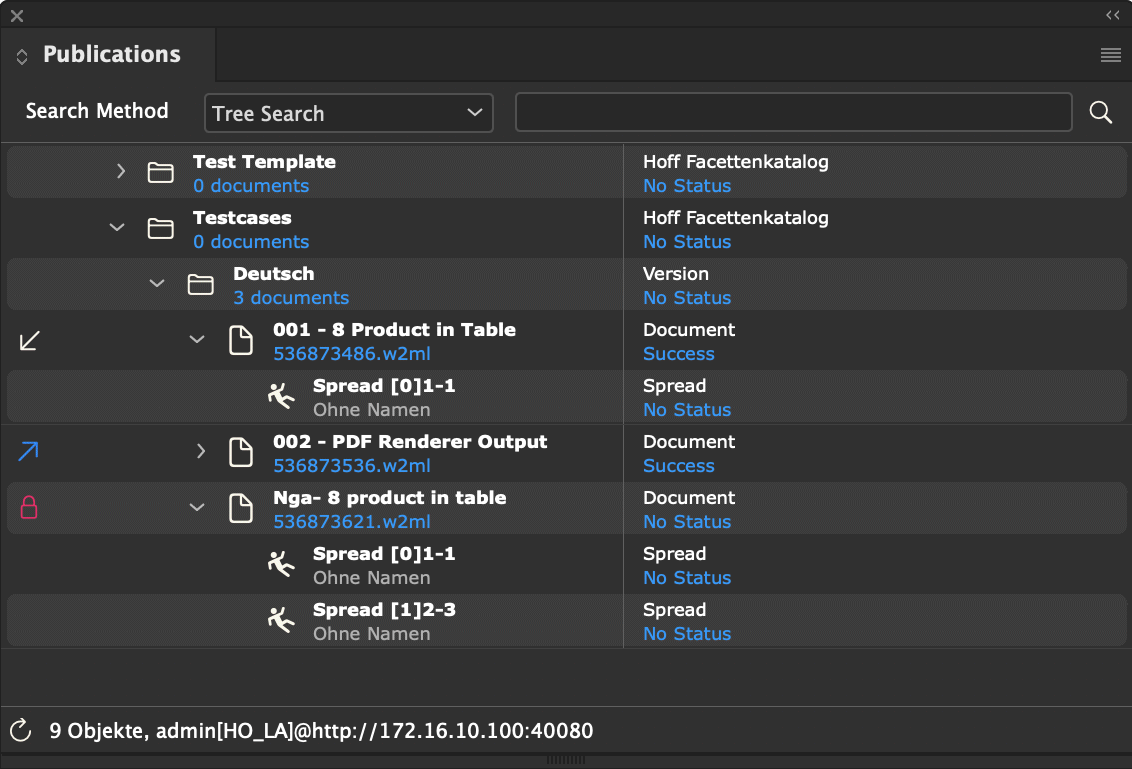
Publication management are represented by organized file references in a database. If a file is locally available, its file icon is displayed and the file can be opened. If a file is not available, it can be generated from a document template. The document template may be located in the local network or even anywhere on the internet.
More information about this plugin and its panels can be found here.
The tasks plugin provides two panels; the actual To Dos, and the panel for Comet Notes.
The list shows all placeholders in the document that are not up to date. If you have the right statements configured, the list can also show database tasks and solve them. You can find out more about this here.
[since Version 3.0, R1400] In this panel, the document's comments are managed and configured. You can find a detailed description of comments here.
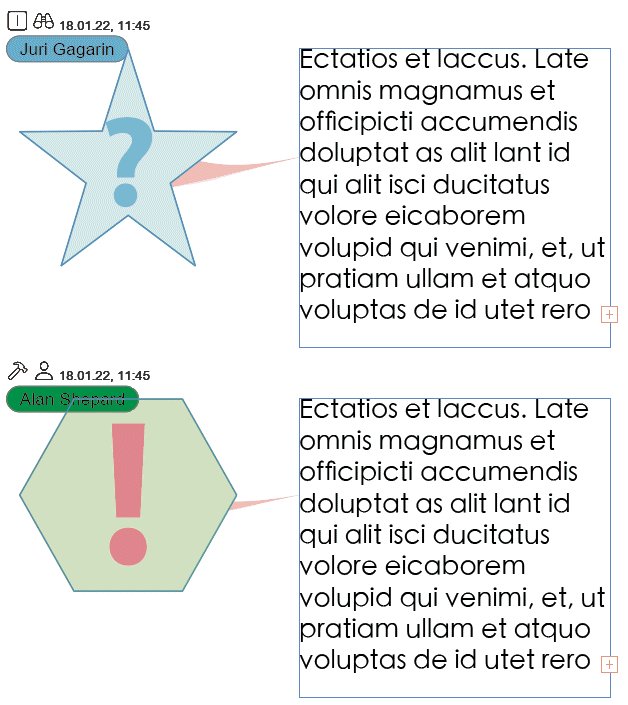
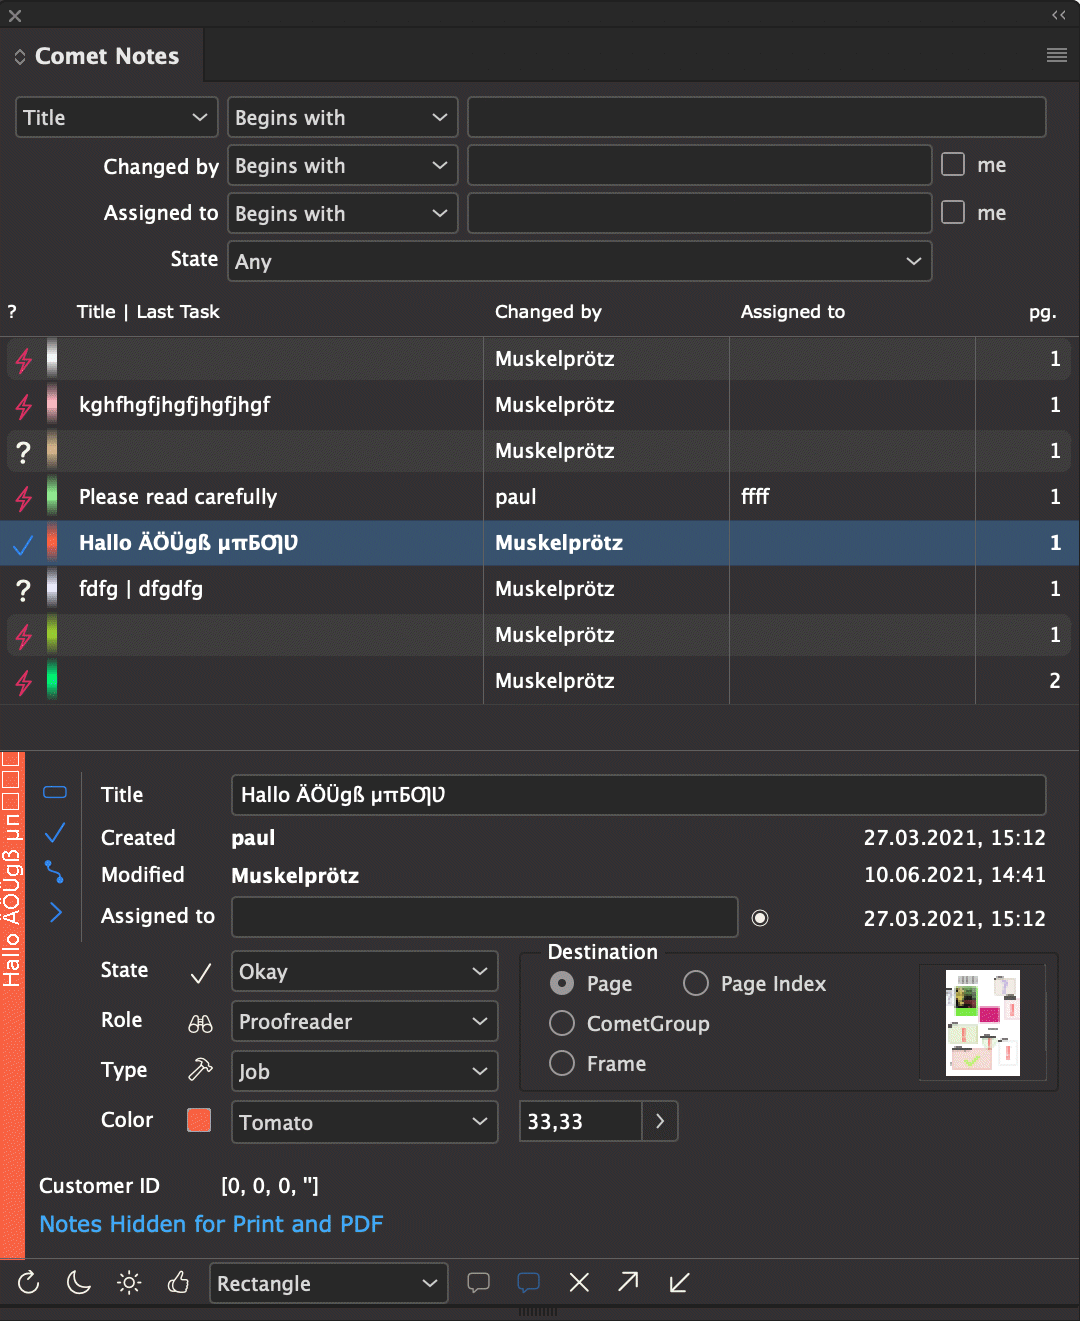
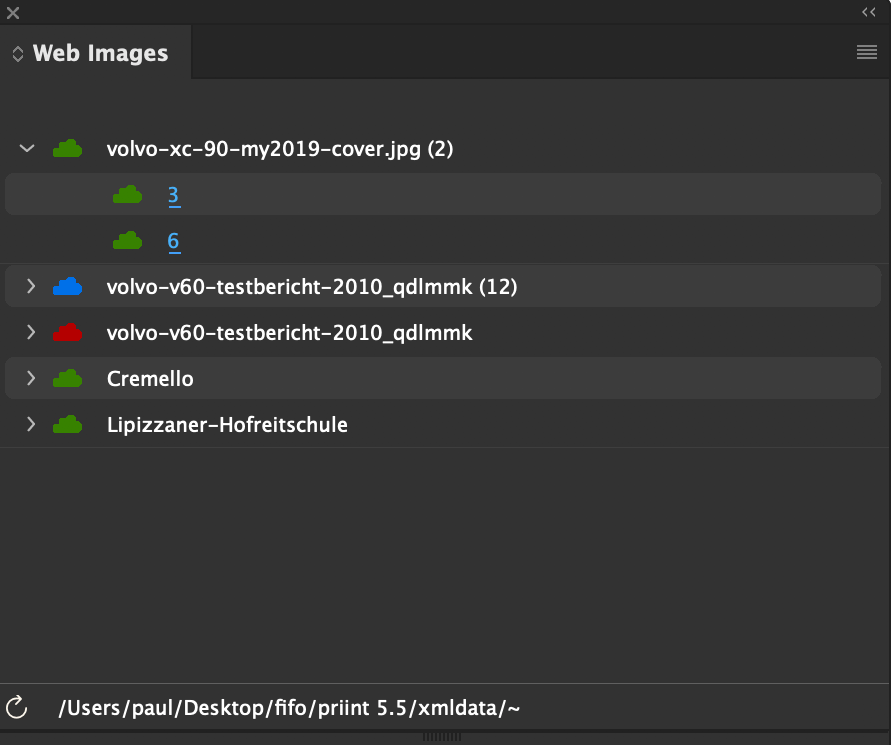
[Since Comet 4.0.5 R20002] Images in InDesign® must be either available in the local network or embedded into the document. Images located in the internet can not be processed by InDesign®. With the plug-in URL Link and its panel Web Images the priint:comet plug-ins offer a possibility to use images from the net too. To do this, images are downloaded locally first and links are made to these files then.
For more information about the Web Images see here.
XML offline and large parts of SOAP and PubServer connections are XML-based. Data from XML files are determined in two steps:
Three XML parsers are available for reading XML:
Up to v4.1.6 R25555 Classic is the standard.
Since v4.1.6 R25556 the fast XML parser is the standard.
The background for the change of the default parser used is the error susceptibility of the classic parser:
Under Windows it must be ensured that msxml is completely and correctly installed. And from Windows 10 Build 1903 on, the msxml parser won't work at all without complex corrections.
And the CoreFoundation XML parser on Mac?
Please see the following XML fragment with the German text 'Ich weiß über alles bescheid.' (I know everything.)
<Text>
Ich wei<0x00DF> <0x00FC>ber alles bescheid.
</Text>
Apart from the fact that this is a false statement anyway, what the parser reads, it is also misspelled:
Ich weiß über alles bescheid.
The space between weiß and über is unfortunately lost. The parser handles text between < and > as single entities and loses the spaces around it. And since we have to skip whitespaces around the actual content (otherwise the spaces and line separators around the whole text would also be read - and you certainly don't want that, do you?), the spaces around are lost.
In the case of the <0xXXXX> tags used above, we can solve the problem with the so-called optimized parser. This parser will also get the space before über on Mac. But attention: Only entities of the kind <0xXXXX> are considered. In the tagged text "aaa<cSize:72.000000> <cSize:>bbb" the space between aaa and bbb is still lost.
Apple therefore recommends that you no longer use the CoreFoundation parser and use the integrated NSXML parser instead. (NS stands for NextSTEP and ... well, that was a while ago.) We didn't follow this recommendation. If we have to make everything new, then it should be uniform for Mac, Windows and Linux. With Marcin Kalicinski's Rapid-Parser we have found a very good solution.
With the help of the script function prefs::set_xml_parsertype the used parser can be changed. To use the parser type for the entire duration of the data connection, it is best to specify this in the After Login script (Panelstatement 92).
The change of the used parser is only valid for the current data connection. When the connection is disconnected, the default parser is reactivated automatically
InDesign® : By default, the fast RapidXML parser is always used. The up to v4.1.6 R25555 available menu Plug-Ins -> Comet -> XML Parser has been removed due to the error-tending behavior of the other parser types. The other parsers can therefore only be used in exceptional cases and must be actively selected via script command prefs::set_xml_parsertype.
InDesign Server® : The parser type can be set globally by option -cometxmlparser classic | optimized | fast. However, as of v4.1.6 R2556, the fast option is also the default here.
comet_pdf : The parser type can be set globally by option --xmlread classic | optimized | fast. However, as of v4.1.6 R2556, the fast option is also the default here.
Data queries are usually made in the xmlquery language implemented in the plugins. In placeholder actions you also can use XPATH.
In the menue Help -> More Help menu you will find further documentation and help for the priint: comet plugins and cScript. The help is available in German and English and must be installed in the folder Doku_deDE or Doku_enEN in the same folder as the priint: comet plugins. German versions of InDesign® automatically use the German version of the Help. If the German help is not available, the English version of the local help is used. All other language versions of InDesign® use the English version of the local help.
Current versions of the Help are available with each release of the plug-ins.
If the Help is not installed locally, the help installed at publishing.priint.com will automatically be used. This help is identical to the local English help. The online help requires a login for publishing.priint.com.
The standard help can be replaced by your own help. To do this, create an XML file named oem.xml in the folder of priint:comet plugins. Here's an example:
<?xml version="1.0" encoding="Mac"?>
<oem>
    <helpfiles>
        <helpfile>
            <menu>ePaper</menu>
            <path>epaper.html</path>
            <id>1</id>
        </helpfile>
        <helpfile>
            <menu>blabla</menu>
            <path>http://www.hi13.de</path>
            <id>2</id>
        </helpfile>
        <helpfile>
            <menu>bild</menu>
            <path>$DESKTOP/Bilder/1.png</path>
            <id>3</id>
        </helpfile>
        <helpfile>
            <menu>bilder</menu>
            <path>$DESKTOP/Bilder</path>
            <id>10</id>
        </helpfile>
        <helpfile>
            <menu>-</menu>
            <path></path>
            <id>10</id>
        </helpfile>
    </helpfiles>
</oem>
For each helpfile element, a subentry with the name menu is then made in the menu Help -> More Help. Submenus within these menus are not supported. Menu separators are created with the name - (minus). The entries are sorted according to the id attribute.
The reference to the content of the menu is indicated in the attribute path. The following informations are allowed:
Please note: For the content of the help you have to take care of yourself in this case!
InDesign® does not natively support cross references. With the comet plugins, you can use crossreferences in your documents. A detailed description of crossrefs can be found here.
InDesign® supports drag and drop of images and URLs from Internet browsers. InDesign® then inserts the text of the URL. Using Mac OS X, images are inserted into the document as embedded images.
[Since Comet 3.2.1] With the help of the priint:comet plugins, the behavior of drag&drop of URLs and images from Internet browsers can be extended with cScripts as desired. A (relatively) simple use case is that images are inserted as Web Images with updating capability. See here for an example. But using more complex URLs, you may start building products or reorganizing whole documents by droping a Web address (URL) into a document (See here for an example).
Please note the following restrictions:
Which URLs you want to use can be defined in Panelstatement 122. The cScript function stored here will be called for each URL drop. In the function, you can set the action ID the URL should run. If no action should be run, leave it at 0. In that case, InDesign® will continue processing the URL as usual, i.e. insert the path into the document.
If you have set an action ID in panelstatement 122 and the function exists, the action will run on releasing the mouse button.
Here a table of all other global variables defined in the panelstatement.
| Variable | Type | Description |
| gURL | char* |
Current URL of the DragDrop Action |
| gActionID | int* |
This is where the ID of the action to be run can be set. If this variable is 0 when the function returns, no action will run. |
Actions that run after placing URLs are defined in the table/file actions, like all other actions, and have to have the ClassID 40 there. The following table describes the additional global variables defined for these actions.
| Variable | Type | Description |
| gURL | char* |
Current URL of the DragDrop Action |
| gPage | int |
1-based page number if the drop |
| gDropX, gDropY | float |
XY co-ordinated of the drop in points |
| gLayer | char* |
layer name |
| gFrame | ItemRef |
Frame at drop position or empty frame::is_valid (gFrame) == 0 Note: Unfortunately, it is not possible to identify inlines or graphic cells as the target frame. Target frames for drop events can only be "normal" document frames. |
In order to minimize the effort to test URLs, it is recommended to check for classes of URLs. Here's an example of a panelstatement 122 script for URL checks.
Apply special URLs from www.priint.com
int main ()
{
	if (strstr (gURL, "http://www.priint.net"))
	{
		if (strstr (gURL, "?PageTemplate="))*gActionID = 20020;
		else if (strstr (gURL, "?ID="))*gActionID = 20021;
		else if (strstr (gURL, "?Book="))*gActionID = 20022;
	}

	return 0;
}
URL drop events are implemented as actions of ClassID 40.
This script defines a page template for the current page, or the current page and all its successors. Here's a valid URL:
http://www.priint.net/de/index.html?PageTemplate=300&All=1
int scan_int (char* url, char* name)
{
	int			res 	= 0;
	char	*	str 	= strstr (url, name);

	if (str) res = val (str+strlen (name));

	return res;
}

int main ()
{
	int 		pid 	= 0;
	int 		doAll 	= 0;

	// Scan URL
	pid= scan_int (gURL, "PageTemplate=");
	doAll= scan_int (gURL, "All=");
	if (!pid) return 0;

	if (doAll)page::set_info (0, gPage, "ids", pid);
	elsepage::set_info (0, gPage, "id", pid);

	return 0;
}
Building a product. Here's a valid URL:
http://www.priint.net/de/index.html?ID=300&ID2=10&ID3=0&TemplateID=43
#include "internal/products.h"

int scan_int (char* url, char* name)
{
	int 		res = 0;
	char 	* 	str = strstr (url, name);

	if (str) res = val (str+strlen (name));

	return res;
}

int main ()
{
	int 		id, id2, id3;
	char 		stringid[4096];
	int 		templateid;
	Product 	p 	= 0;
	ProductList	li 	= 0;
	int 		pageTemplate;

	// Scan URL
	id= scan_int (gURL, "ID=");
	id2= scan_int (gURL, "ID2=");
	id3 = scan_int (gURL, "ID3=");
	templateid= scan_int (gURL, "TemplateID=");
	if (!id)return 0;

	p = product::alloc ();
	product::set (p, kID, id);
	product::set (p, kID2, id2);
	product::set (p, kID3, id3);
	product::set (p, kPageitemid, templateid);

	li = productlist::alloc ();
	productlist::append (li, p, 1);

	page::get_info (0, gPage, "id", &pageTemplate);
	productlist::establish (li, 0, gPage, "", pageTemplate);

	productlist::release (li, 0);
	product::release (p);

	return 0;
}
Building a list of products. Here's a valid URL:
http://www.priint.net/index.html?Book=10&TemplateID=400
int append_product (ProductList pp, int id1, int id2, int id3, char * ids, int * pid)
{
	Product 	p;

	p = product::alloc (kScriptStack);
	product::set (p, kID, id1);
	product::set (p, kID2, id2);
	product::set (p, kID3, id3);
	product::set (p, kStringID, ids);
	product::set (p, kPageitemid, pid);

	productlist::append (pp, p);
}

int scan_int (char* url, char* name)
{
	int 		res = 0;
	char	* 	str = strstr (url, name);

	if (str) res = val (str+strlen (name));

	return res;
}

int main ()
{
	int 		bookid;
	int			templateid = 400;
	char		ppath[512];
	char		cmd[4096];
	XMLTree		tree = 0;
	ProductList	li = 0;
	int			id, id2, id3, pid, todelete;
	int			pageTemplate;

	// Scan URL
	bookid= scan_int (gURL, "Book=");
	templateid= scan_int (gURL, "TemplateID=");

	// Read data
	xmlquery::app_path (ppath);
	strcat (ppath, "/");
	strcat (ppath, file::uncurtain ("$DATAFILE"));

	tree = xmlquery::open (ppath, 0, 1);
	if (!tree) return 0;

	xmlquery::send (tree, "select bookID, ");
	xmlquery::isend (tree, bookid);
	xmlquery::send (tree, ", 0, toDelete, pageitemid");
	xmlquery::send (tree, " node books.productgroup");
	xmlquery::send (tree, " where productgroupID = ");
	xmlquery::isend (tree, bookid);
	xmlquery::send (tree, " node book orderby bookID");

	if (xmlquery::exec (tree))
	{
		li = productlist::alloc ();

		xmlquery::output (tree, kInt, &id);
		xmlquery::output (tree, kInt, &id2);
		xmlquery::output (tree, kInt, &id3);
		xmlquery::output (tree, kInt, &todelete);
		xmlquery::output (tree, kInt, &pid);
		while (xmlquery::fetch (tree))
		{
			if (!todelete) append_product (li, id, id2, id3, "", pid);
		}
	}

	xmlquery::close (tree);

	// Build
	page::get_info (0, gPage, "id", &pageTemplate);
	productlist::establish (li, 0, gPage, "", pageTemplate, templateid, kShowProgress);

	productlist::release (li, 1);

	return 0;
}
Image assets of an Adobe Experiance Manager (AEM) can be dragged and dropped as images into the document without prior AEM login. The images are stored as so-called Web Images in the document.
For complete documentation on placing assets from an AEM, click here.
ATTENTION: Customizing AEM assets at dropdown is possible because the AEM drop events do not contain binary image data up to at least v6.3 of the AEM. Should Adobe add binary data to the drag and drop of assets in newer versions of the AEM, the customization process can no longer be supported and will crash InDesign®!
To use Web Images, the plug-in URL Link with panel Web Images must be installed.
The following two scripts allow you to configure your installation so that images and InDesign® documents from an Internet browser can be placed directly from AEM in InDesign® documents:
Catch the URLs from an AEM using panestatement 122
int main ()
{
	String 	url = string::alloc (gURL);

	if (	string::find (url, "/content/dam/") > 0
		||	string::find (url, "/asset/dam/") > 0)
	{
		*gActionID = 10000
	}

	return 0;
}
Apply the AEM-URL in an action of class 40
#include "internal/types.h"

int main ()
{
	String 		url 		= string::alloc (gURL);
	String 		ext 		= string::alloc ();
	ItemRef 	frame 		= item::alloc ();

	// Prepare URL
	string::prepare_aem_url (url, "admin", "admin");


	// Handle URL
	file::extender (ext, url);
	if (string::compare (ext, "indd") != 0)
	{
		if (frame::is_valid (gFrame))
		{
			//Replace existing image
			frame::image (gFrame, url, kPlaceLikeExisting);
		}
		else
		{
			//Create frame and insert image
			frame::create (frame,
							kRectangle,
							gDropX-36.0,gDropY-36.0, gDropX+64.0, gDropY+64.0,
							gPage,
							gLayer);
			frame::image (frame, url, 1);
			frame::fit_better (frame);
		}
	}
	else
	{
		//Copy/Paste frames of INDD
		string::replace (url, "http://", "aem@http://");

		//url is complete, ignore asset path, user and passwd
		file::aem_get_asset (url, "a", "u", "p", "$CACHE/xyz/tmp.indd");
		document::place_indesign ("$CACHE/xyz/tmp.indd",
							1, 0, 0,
							gPage,
							gDropX-36.0, gDropY-36.0);
	}

	return 0;
}
Note: In addition to INDD files, HTML files could also be dropped. The execution of Javascript scripts and cScript in the extracted files can also be solved with the method described above.
[Since Comet 3.2.2] In the panel menu of each library, there is an entry
Export Library
Whether that entry is activated, and what happens when it is selected, is defined by the current data connection.
The global Panelstatement 123 determines whether the menu entry Export Library is activated for a particular library. The activation is checked separately for each channel. If the panelstatement is undefined or empty, the menu entries will always be deactivated.
If it is non-empty, it has to contain a valid cScript. In this script, the following two global variables are defined:
| Variable | Type | Description |
| gLibPath | char* | Full path of the library shown in the corresponding panel |
| gLib | Library | Reference to the library shown in the corresponding panel |
| gActionID | int* | ID of the action that should run then the menu entry is selected. |
In this script, test the library's file path or other properties (see also Library functions in cScript). If the library can be exported, specify the required action's ID in *gActionID. If the library cannot be exported, assign 0 to *gActionID. The export menu then stays inactive.
Here a script that allows exporting all libraries located on my desktop (or folders on the desktop). Action 20023 will be used for the actual export.
int main ()
{
	*gActionID = 0;

	if (strstr (gLibPath, "/Users/paul/Desktop"))
	{
		*gActionID = 20023;
	}

	return 0;
}
Warning : The script will be run every time the panel menu of a library panel is opened. It should therefore not open modal dialogs.
Actions for exporting InDesign® libraries are defined in the table/file actions, and have to have the ClassID 42 there. The following table lists all additional global variables defined for these actions.
| Variable | Type | Description |
| gLibPath | char* | Full path to the library displayed in the corresponding panel |
| gLib | Library | Reference to the library displayed in the corresponding panel |
| gActionID | int* | ID or the action that should run when the menu entry is selected. |
In these scripts, use the Library functions in cScript to export the library.
This example copies the library into a storage directory. For each library entry, a preview of the entry will be saved in a subdirectory. All information about the entries will be written into the logfile (for demonstration purposes). They can also use that information to fill database tables, of course.
int main ()
{
	Asset		asset	= 0;
	int			na		= 0;
	int			i;
	char		destPath[4000];
	char		path[4000];
	char		shortname[200];
	Image		img;

	if (!gLib) return 0;

	na = library::count_assets (gLib);
	if (na == 0) return 0;
	strcpy (destPath, "$DESKTOP/MyLibraries");

	// Duplicate library file
	file::duplicate (gLibPath, destPath, 0, 1, 1);

	// Delete preview folder
	sprintf (path, "%s/%s", destPath, file::shortname (shortname, gLibPath));
	file::remove (path);

	// For each entry ...
	for (i = 0; i < na; i++)
	{
		asset = library::asset::get_nth (gLib, i);

		wlog ("", "# Asset %d\n", i+1);
		wlog ("", "# Name : %s\n", library::asset::get_name (asset));
		wlog ("", "# Descr : %s\n", library::asset::get_description (asset));
		wlog ("", "# Usertype : %d\n", library::asset::get_usertype (asset));
		wlog ("", "# Creation : %s\n", library::asset::get_creationtime (asset, 98));

		// Fetch Preview and save to disk
		img = library::asset::get_preview (asset, 200);
		if (img)
		{
			sprintf (path, "%s/%s/%s.jpg",
					destPath,
					file::shortname (shortname, gLibPath),
					library::asset::get_name (asset));
			image::save (img, path);
			image::release (img);
		}

		library::asset::release (asset);
	}

	return 0;
}
[Since Comet 3.3 R3278, only for ODBC/OCI-Data connections] If no other definition for panelstatement 123 is provided, the plugins will use a standard mechanism for exporting libraries. This uses the same menu commands:
Library Panel -> Export Library
The libraries are exported to the tables library and library_asset. The following two tables describe the database tables for mySQL. Exporting libraries requires nothing other than these tables being defined.
| library | Type | Description |
| id | int (11) | Unique ID of the table entries. The IDs are automatically assigned by the comet plugins. |
| name | varchar (255) |
Name of the library. The names do not have to be unique. If a library with the same name is imported, the existing entry is owverwritten. The path up to the library name is ignored. The reasoning here is that multiple users can use the same library this way. |
| data | longblob |
Binary Blob of the library. With this data, the library can be fully restored. |
| hash | varchar (255) |
MD5-Hash of the binary data. Before updating existing entries, the hashes are compared. If the hashes are identical, processing is aborted. |
| status | varchar (255) | Empty and currently unused ("") |
| validFor | varchar (255) | InDesign® CS-Version, the entry was created or changed with (CS2, CS3, CS4, ...) |
| createdon, createdby | varchar (14), varchar (50) |
Date/time the entry was created on, and the user who created it. Time in the format yyyymmddhhmmss |
| updatedon, updatedby | varchar (14), varchar (50) |
Date/time the entry was last updated on, and the user who updated it. Time in the format yyyymmddhhmmss |
| library_asset | Type | Description |
| id | int (11) | Unique ID of the table entry. IDs are automatically assigned by the comet plugins. |
| library_id | int (11) | ID of the corresponding library from the table library |
| objectType | varchar (255) | Type of the entry as specified by InDesign®:
|
| name | varchar (255) | Name of the library entry. The names of the entries need not be unique. |
| description | varchar (255) | Description of the library entry. |
| data | longblob | Library entry in the same format as templates. This contains all placeholders, magnets and nails, and all settings for the table module that are also defined in the original. |
| preview | longblob | Preview of the entry |
| width, height | double, double | Size of the assets in points |
| magnets | int (11) | Unused, always set to 1 |
| createdon, createdby | varchar (14), varchar (50) |
Date/time the entry was created on, and the user who created it. Time in the format yyyymmddhhmmss |
| updatedon, updatedby | varchar (14), varchar (50) |
Date/time the entry was created on, and the user who created it. Time in the format yyyymmddhhmmss |
[since Comet 3.2.2] The comet plugins insert the following menu to the program menus
File -> New -> Import Library...
Whether this entry is active and what happens when it is selected is determined by the current data connection.
The global Panelstatement 124 determines whether the menu entry Import Library should be activated. If the statement is undefined or empty, the menu entry will remain inactive.
If the panelstatement is non-empty, if has to contain a valid cScript.
You can chack with this script, if and which libraries a user is allowed to imort. If importable libraries are available for a user, set *gActionID to the ID of a defined action that can fetch those libraries when the menu is selected. If no libraries are available or the user is not allowed to install any, set *gActionID to 0.
Here a script that allows the user paul to import any library. The import will be handled by action 20024.
int main ()
{
	char 		usr [256];

	system::login (usr);
	*gActionID = 0;

	if (strcmp (usr, "paul") == 0)
	{
		*gActionID = 20024;
	}

	return 0;
}
Warning : The script wil be used each time the menu is opened. It should therefore not open any modal dialogs.
Actions that import InDesign® libraries are defined in the table/file actions and have to have the ClassID 43 there. For these scripts, no additional global variables are defined.
Use the Library functions in cScript, to open the library in these scripts.
This example collects all libraries in a storage directory and lets the user choose which one should be imported. Afterwards, the library is opened. Of course, that does not make sense to do in your scripts, you will want to at least copy the file somewhere first.
int main ()
{
	char		t1[412];
	char		t2[412];
	int			id= 0;
	int			ok;
	char		destPath[4000];
	char		path[4000];
	char		ext[256];
	IDTypeList	ids	= idtypelist::alloc ();
	int			i, ix= 0;

	// Find all libraries in the storage directory
	strcpy (destPath, "$DESKTOP/MyLibraries");
	for (i = 0; i < file::count (destPath); i++)
	{
		strcpy (path, file::get_nth (destPath, i));
		file::extender (ext, path);
		if (strcmp (ext, "indl") == 0)
		{
			idtypelist::append (ids, ix, 0, 0, path);
			ix = ix +1;
		}
	}

	strcpy (t1, "");
	strcpy (t2, "");

	// Select one library
	ok = askstring2 (
			t1, "", 0,		// Text1
			t2, "", 0,		// Text2
			0, "", "",		// Popup without DB-Content
			&id, "Libraries", 1,
			"Import Library", "", "",
			-1, -1,			// Limitation Text1 and Text2
			ids);			// List of library files
	if (!ok) return 0;

	// Open the library
	// Okay, this is somewhat strange. Usually, you would at least copy the file somewhere
	strcpy (path, idtype::stringid (idtypelist::get (ids, id)));
	library::open (path);

	return 0;
}
[Since Comet 3.3 R3278, only for ODBC/OCI-Connections] If no other definition for panelstatement 124 is provided, the plugins use a standard mechanism for importing libraries. The same menu entry is used:
File -> New -> Import Library...
First, all available libraries are shown in a dialog. After selecting an entry and confirming, you will be asked for the location you want to store the library. Finally, the library will be restored as follows:
Note: To restore a library, the entries of the library_asset table are not required. That table is allowed to be missing or incomplete in that case.