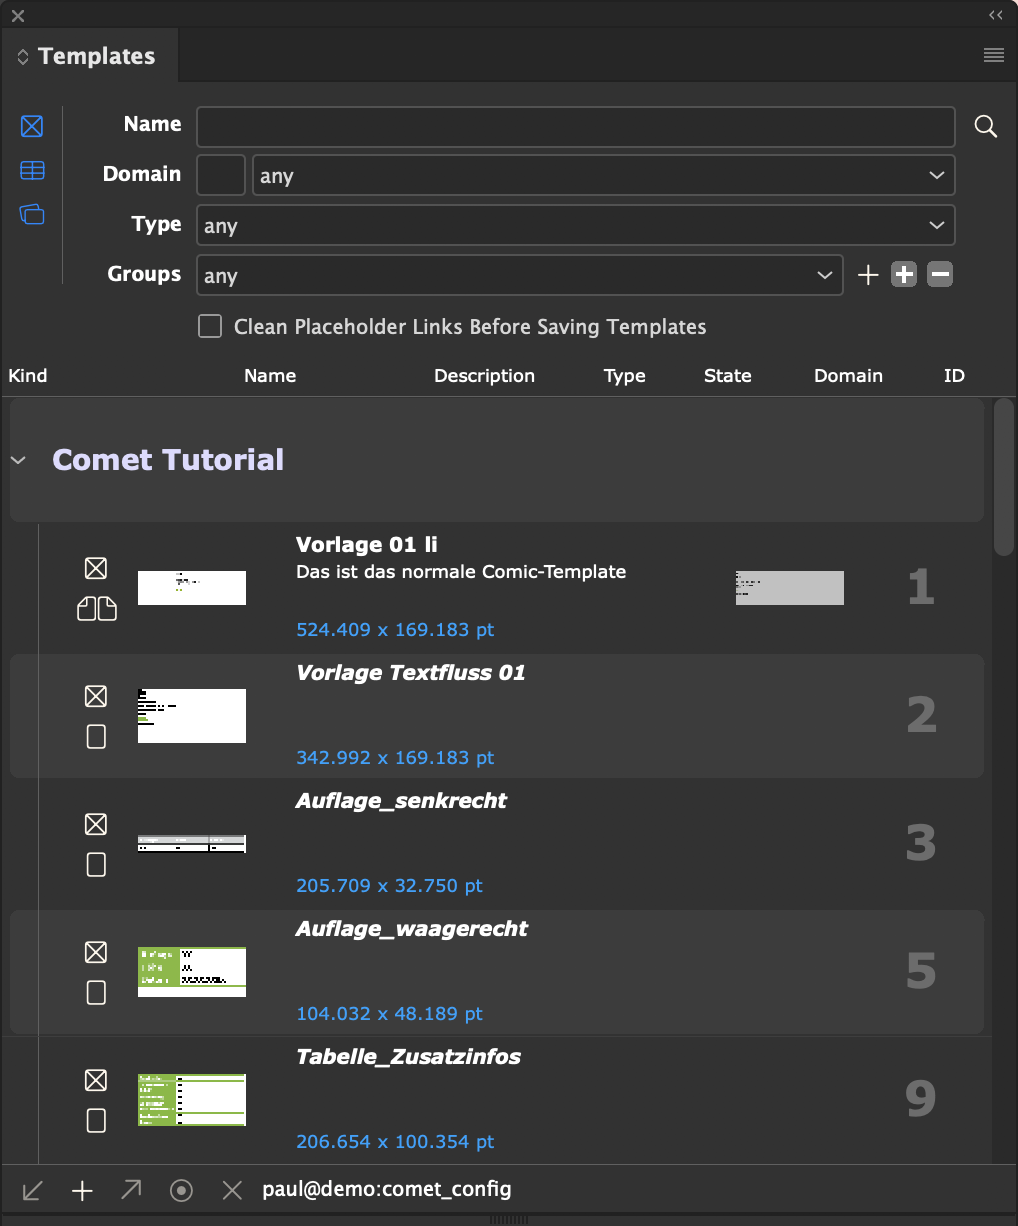
The ClassID of the panel and its objects is 8.
A list of all used panel statements can be found here.

The properties of templates are saved in the table pageitems (ODBC connections) resp. in the file pageitems.xml (XML offline and SOAP/Pubserver connections).
To create new templates in XML offline and SOAP connections, the
In PubServer connections, pageitems.xml is generated automatically by the PubServer and contains the 0 entry by default.
Here is a complete definition of a pageitem entry with all supported features:
<?xml version="1.0"?>

<pageitems>
	<pageitem>
		<id>0</id>
		<name></name>
		<description></description>
		<color>-1</color>
		<data>
		<src></src>
		</data>
			<preview>
			<src></src>
		</preview>
		<type>
			<id>0</id>
			<name>no type</name>
		</type>
		<state>
			<id>0</id>
		<value>no state</value>
		</state>
		<domain>
			<id>0</id>
			<name>no client</name>
		</domain>
		<placeholder>
			<id>0</id>
			<name></name>
		</placeholder>
		<kind>frames</kind>
		<version>-1</version>
		<leftpos>0.0</leftpos>
		<toppos>0.0</toppos>
		<rightpos>0.0</rightpos>
		<bottompos>0.0</bottompos>
		<spread>
			<position></position>
			<leftitem>0</leftitem>
			<middleitem>0</middleitem>
			<rightitem>0</rightitem>
			<continue>0</continue>
			<scriptid>0</scriptid>
		</spread>
		<format>0</format>
		<magnets>0</magnets>
		<memberships></memberships>
		<active>3</active>
		<buildSupportScript>0</buildSupportScript>
		<hasShapes>0</hasShapes>
		<hasMinSize>0</hasMinSize>
		<realWidth>0.000000</realWidth>
		<realHeight>0.0</realHeight>
		<textflowPrefix1Action>0</textflowPrefix1Action>
		<textflowPrefix1></textflowPrefix1>
		<textflowPrefixNAction>0</textflowPrefixNAction>
		<textflowPrefixN></textflowPrefixN>
		<position>1</position>
	</pageitem>
</pageitems>
The corresponding template is determined as illustrated in the table below:
| SpreadID | Page Type | Template Used | ||
| Database, Table pageitems | ||||
| Left | Neutral | Right | ||
| 0 | all | self | ||
| 1 | left page | self | MiddleID | RightID |
| 2 | neutral page | LeftID | self | RightID |
| 3 | right page | LeftID | MiddleID | self |
| XML and SOAP, file pageitems.xml | ||||
| Left | Neutral | Right | ||
| all | self | |||
| left | left page | self | spread.middleitem | spread.rightitem |
| unisex, middle | neutral page | spread.leftitem | self | spread.rightitem |
| right | right page | spread.leftitem | spread.middleitem | self |
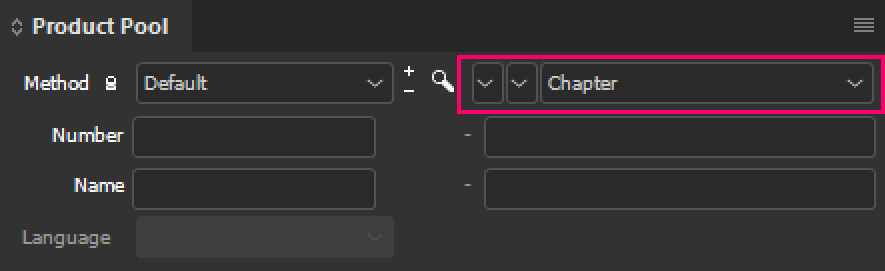
Since Version 2.1 R 1760 Templates are received in the template popup in the product pool. In this menu, only frame templates are shown, snippets and table templates are not included :
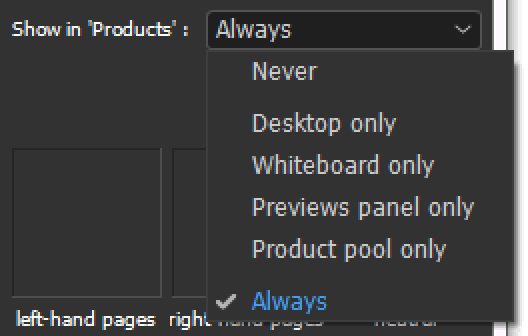
In the template settings (during creation or the button  in the Templates panel) you can specify the visibility of the template in other windows. The following values are defined :
Before R1760 (22.2.2010), template visibility necessitates a data model extensions (because the setting has to be saved somewhere). Whether the extension exists is tested on connection with a data pool. If it does not, all templates are visible by default. The following values are defined :
| Value | Visibility |
| 0 | Invisible |
| 1 | visible in the desktop application |
| 2 | visible on Whiteboard |
| 3 | always visible |
| 10 | only visible in the preview panel |
Extend the table pageitems with the field active of type int. Set each of its values to 3 :
mysql> alter table pageitems add active int;
mysql> update pageitems set active = 3 where id > 0;
Extend all pageitems.pageitem-Element in the file pageitems.xml with the attribute active :
<active>3</active>
Since Version 1.3.1 R112
After the page type Templates are determined, the Template ID Script of the target template is executed. This script can, with regard to the target page and position, change the template ID that should actually be used.
Warning : Since v3.3 R2630 the script is also used during page build. You can find a full description of this here..
Template ID Scripte are defined in actions and have the ClassID 15.
The script is only executed when the script ID of the template is greater 0. If the script returns a value other than 0, the template is not inserted, and the inserting function throws the error pageItemNotDefinedErr (1247).
With the global variable gPageitemID (only defined in template ID scripts), the ID of the template about to be inserted can be changed. A complete list of global variables defined in template ID scripts can be found here. Here a simple example:
int main ()
{
	*gPageitemID = 123;

	return 0;
}
To activate Template ID Scripts, which are only needed in rare circumstances, you have to extend the pageitems table and/or the file pageitems.xml with the attribute/element scriptid. The following steps are required:
Extend the table pageitems with the attribute scriptid. The value for all entries is initialized to 0. Here the necessary SQL statement:
alter table PageItems add scriptid number (10);
update PageItems set scriptid = 0;
commit;
For XML and SOAP, the file pageitems.xml has to be extended with the element
pageitems.pageitem.spread.scriptid
We suggest the following procedure:
<dummy>
	<file>pageitems.xml</file>
	<attr>pageitems.pageitem.spread</attr>
	<name>scriptid</name>
	<type>name</type>
	<writable>1</writable>
</dummy>
> xmlquery
> open pageitems
> update scriptid = 0 node pageitems.pageitem
> commit;
Template ID Scripts, like all other scripts, are managed in the actions table or in the file actions.xml. Set the actions' classID to 15.
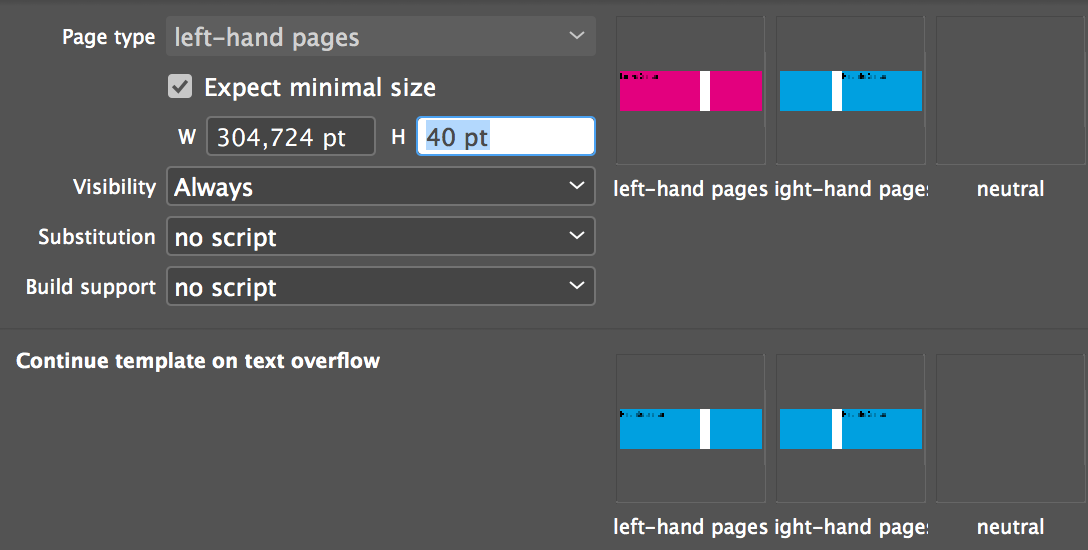
[Since v4.1 R21612] The product building checks the size of the available space in the page element before inserting a product template. The template size is the size of the bounding box around all frames of the template. The size of the main template is displayed in the list of templates:

If the page element is too small, the next matching page element is searched for. In order to get as little white space in the document as possible, it is necessary to make the templates as small as possible. On the other hand, the small templates, of course, have the problem that they are quite hard to edit because all the frames have been reduced to their minimum height.
Using the option Expect minimal size of the dialog for the settings of
a template (Button  of panel Templates), you can set an expected minimum value for the template size. The product build then uses the values given here instead of the real size of the frames for size checking (and the frames in the template can be of any size). The specified minimum size applies to all subtemplates!
Templates whose minimum size is used for testing are marked with a red star behind the size specification in the panel:

Please note of the following hints:
 Templates.
The following commands can insert templates into the document :
| Instruction | Description |
| document::store_macro | Change a template in the data pool (cannot be reverted) |
| document::insert_macro | Insert data base stored in the database into the document |
| document::place_items | Insert template into the document |
| document::build_products and related | Grid build |
| productlist::establish and related | Page build |
Since version 1.4, placeholders can be linked with tables. The tables themselves are then managed as a template and the templates store their kind in an attribute (new in 1.4). The following kinds are defined :
| Database | XML/SOAP |
| 0 | Frames |
| 1 | Table |
| else | Frames |
To decide whether a template contains a table or a frame, the template data model has to be extended. The following steps are required:
Extend the table pageitems with the attribute kindID. The value for all entries is initialized to 0. Here the necessary SQL statement:
alter table PageItems add kindID number (10);
update PageItems set kindID = 0;
commit;
If you want to, you can add a table that maps kindIDs to a name, as shown above. This table is not required to use the plugins.
For XML and SOAP, extend the file pageitems.xml with the element
pageitems.pageitem.kind
The following procedure is recommended:
<dummy>
	<file>pageitems.xml</file>
	<attr>pageitems.pageitem</attr>
	<name>kind</name>
	<type>name</type>
	<writable>1</writable>
</dummy>
> xmlquery
> open pageitems
> update kind = 'frames' node pageitems.pageitem
> commit;
[Since Version 1.4.2, R 504] Between a template's frames, magnets that determine the distance between the frames, can be defined. If frames change their position or size during loading, the distances are simply restored to their previous values. If there are nails defined at opposite edges, the frames do not change position, but size.
For magnetized templates the priint:adjust plugin must be installed.
When defining magnets between the frames of a template, you have to define nails at the opposite edge of the first frame.
When inserting a template, it is first checked for magnets. Only if it contains magnets at all, the (expensive) process of distance recovery is started. The required information is stored in the attribute
magnets
If you want to use that attribute, the file/table panelstatements has to be extended analogously to the table placeholders with the attribute magnets.
InDesign® documents are not backward compatible, i.e. documents created with a newer InDesign® version cannot be opened by older InDesign® versions.
To make the content of newer documents available in older InDesigns, you can export the document in the newer version in IDML format. IDML can be opened across all versions. In newer InDesigns, Adobe also automatically provides a cloud service that downgrades your document (and certainly runs the IDML loop of honor to do so as well).
Vice versa, a newer InDesign® can open older documents. Adobe promises a two-version backward compatibility here, but it also opens older documents. Nevertheless, you should carefully check the content of older documents opened in this way!
Attention: Older documents are always opened as new and unsaved documents which will do not have a file path yet. All actions based on the file path of the document like document::save will fail therfor!
| InDesign® | Major Version |
| CC 2018 | 13 |
| CC 2019 | 14 |
| 2020 | 15 |
| 2021 | 16 |
| 2022 | 17 |
| 2023 | 18 |
| 2024 | 19 |
As of v4.2 R32000, templates can be saved together with an InDesign version number. The priint:comet plugins then warn against editing and overwriting templates of older InDesigns and the use of templates of newer InDesigns is prevented in advance.
Here you will find descriptions on how to activate the feature:
Templates from a different InDesign version as the currently used are marked with a red star in front of the name in the panel.
For templates from more recent InDesign versions, the name and preview are also grayed out. Here is a screenshot:
[Since v5.0 R36820] Templates can be provided with a timestamp when they are created and saved. These timestamps are automatically loaded when the templates are loaded. If a template is to be saved or deleted later, the current timestamp of the template in the datapool is determined first. The change is only executed if the current timestamp is less than or equal to the initial timestamp. After the change, the template in the data pool is given a new timestamp. The timestamp thus prevents the unintentional modification or deletion of 'just' modified templates.
Timestamps are given in milliseconds universal time (UTC) after Jan. 12, 1970.
In addition to the timestamp, the login name of the last change is stored in the template.
Attention: When the templates panel is reloaded, the timestamps are also reloaded!
Here you will find descriptions on how to activate the feature:
[since Version 3.1, R1956, 17th June 2010] Before a template is deleted with  , the data pool may be queried if this is allowed. The required statement for this is stored in
Panelstatement 118
The stament may be a database command (for SOAP, SOAP commands are also allowed) or a cScript.
Selects and SOAP statements contain a question mark ? which is replaced by the template ID. Exactly one result column of type string is expected, see here.
The following statement forbids deleting any templates.
select "beep" from pageitems where id = ?
For more complex checks, the instruction can also be written as a script. The result of the check is passed in the output variable gResult: If gResult is empty, it is deleted, otherwise not. A detailed description of the variables defined in the script can be found in the following table.
| Variable | Type | Description |
| gResult | char[5000] - Return value |
The following information is permitted as a result:
|
| gRecordID | int | ID of the Template |
| gRecordStringID | char* | readonly Name of the Template |
| gTimestamp | int | [Since v5.0 R36820] Timestamp of the last change to the template. The specification is in milliseconds and corresponds to the timestamp of the templates. See also system::now with the format specification 113. |
| gLastUpdatedBy | char* | [Since v5.0 R36820] readonly Who made the last change to the template? |
This example script forbids deletion of templates with uneven IDs.
int main ()
{
	if (gRecordID % 2)
		sprintf (	gResult,
					"Uneven Templates (%d) may not be deleted.",
					gRecordID
				);
	return 0;
}
| Result String | Description | |
| Empty, NULL, or no result found | The template may be deleted | |
| "beep" | The template may not be deleted. | The failure to delete is communicated with a beep sound. |
| "no_message" | The deletion attempt is ignored | |
| other | The message is shown in a warning dialog. | |
Continuation frames are used when at least one text of a template has an overset after load, but the product (possibly with a mofified frame) should be continued.
The template may, for example, contain a table that could get so tall that it does not fit on a single page. Next to the table, a product image should be displayed. How do you get this image onto the next page?
To use continuation templates, you have to do three things:
If the template contains a frame that should continue, which has an overset after load, that frame is first set to its maximum height within the templaate.
If the current page element checks the size of inserted frames, the text frame is resized such that the page element is filled maximallyl. If the page element should not perform that check, the current template grows up to the bottom page boundary. In either case, overset is checked again after the resize.
If the overset could be removed successully, the frame size is adjusted to the content. If there is still overset after the resize, the continuation template is loaded and product continuation is attempted. The text frame with overset is automatically linked with the corresponding frame in the continuation.
The new template is placed in the next possible page element of the product build. If no viable element is found, a new page is created, as if the list of products to build contained another entry that should be processed now.
Like other templates, continuation templates are allowed to create new pages. Read more about this here.
If a frame's overset should be checked during page build can be specified in the frame properties (see here). You can mark any text frame as a continuation frame. If text frames are located below each other, only the upper-most frame is allowed to grow. Lower frames keep their size. Frames located beside each other can grow independently.
When changing a text frame's size, frames below have to be relocated downwards. To keep the distances in place, you have to define appropriate magnets between the frames. Do not forget, however, to fixate the opposite edge with a nail!
The linking of textframes between template and continuation is of course automated. You must however specify which frames should be linked with each other. For that, there's the frame identifier, which can be set in the frame properties. If two frames with the same identifier can be found in the template and continuation, these frames will be linked.
Any unicode character can servve as an identifier. Depending on which fonts are installed on you machine, some characters may not be displayed properly, though.
The unicode identifiers are also used to determine the order in which a template's layout rules are applied.
If the frame in the continuation is no text frame, it is converted to a text frame. Any images in the frame are deleted in the process.
Text links can only be set between two frames at once. You should make sure to only use the identifier of the frames you would like to link only once each. To spare you constant annoyance by warnings, the identifiers are not checked.
Templates can contain subtemplates for left and right pages and for continuations. To create a template group, follow these steps:

 in the Template Behaviour panel
in the Templates panel
in the Template Behaviour panel
in the Templates panel
[since Version 3.2.3 R2568] If a template is used during text flow builds, you can also set the delimiting text that a product gets from the template. You can specify two different delimiters :
You can use predefined delimiters (spaces, paragraphs), fixed texts (even TaggedText), or script generated texts. The setting can be changed in the template dialog in the region Textflow-Prefix.
To use this feature, the data model has to be extended,, read more about this here.
Delimiters can be generated by scripts. This allows specific delimiters depending on page template and element, template, page and product.
Delimiter scripts, lika other scripts, are defined in actions and have the ClassID 46. The following global variables are defined in addtion to the usual gRecordID, ..., gFrame, ...:
| Variable | Type | Description |
| gPageNum | int | current page number (1 based) |
| gTemplateID | int | current template |
| gTemplateName | char* | |
| gPageTemplateID | int | current page template |
| gPageTemplateName | char* | |
| gElement | int | current page element |
| gElementName | char* | |
| gParam1 | char* | User defined text from the "Template Sttings" |
| gPrefix | char* | Result String, 5000 characters max. Fill this string with the desired prefix text. |
The first product is prefixed with a 1. Keep in mind: If the new paragraph should have a different paragraph style than the current text end, you have to explicitly set a paragraph style: If the delimiter is inserted before the product, its paragraph style if not yet known. If the delimiter is inserted after the product (which is possible in principle), the new product text's first paragraph gets the paragraph style from the current text end.
int main ()
{
	sprintf (gPrefix, "%%!TT<ParaStyle:Titel>1. ");

	return 0;
}
For all other products start with a new paragraph and are counted. A placeholder (11 in this example) is used for counting, which is used only once per round.
int main ()
{
	LinkList 	lli = linklist::alloc ();

	linklist::text_collect (lli, gFrame, 0, -1, 1, 11);

	sprintf (gPrefix, "%%!TT<ParaStyle:><ParaStyle:Titel>%d. ", linklist::length (lli)+1);

	return 0;
}
[Since Version 3.2] The panel Template behaviour shows the template-relevant data of the current frame selection or Comet Group.
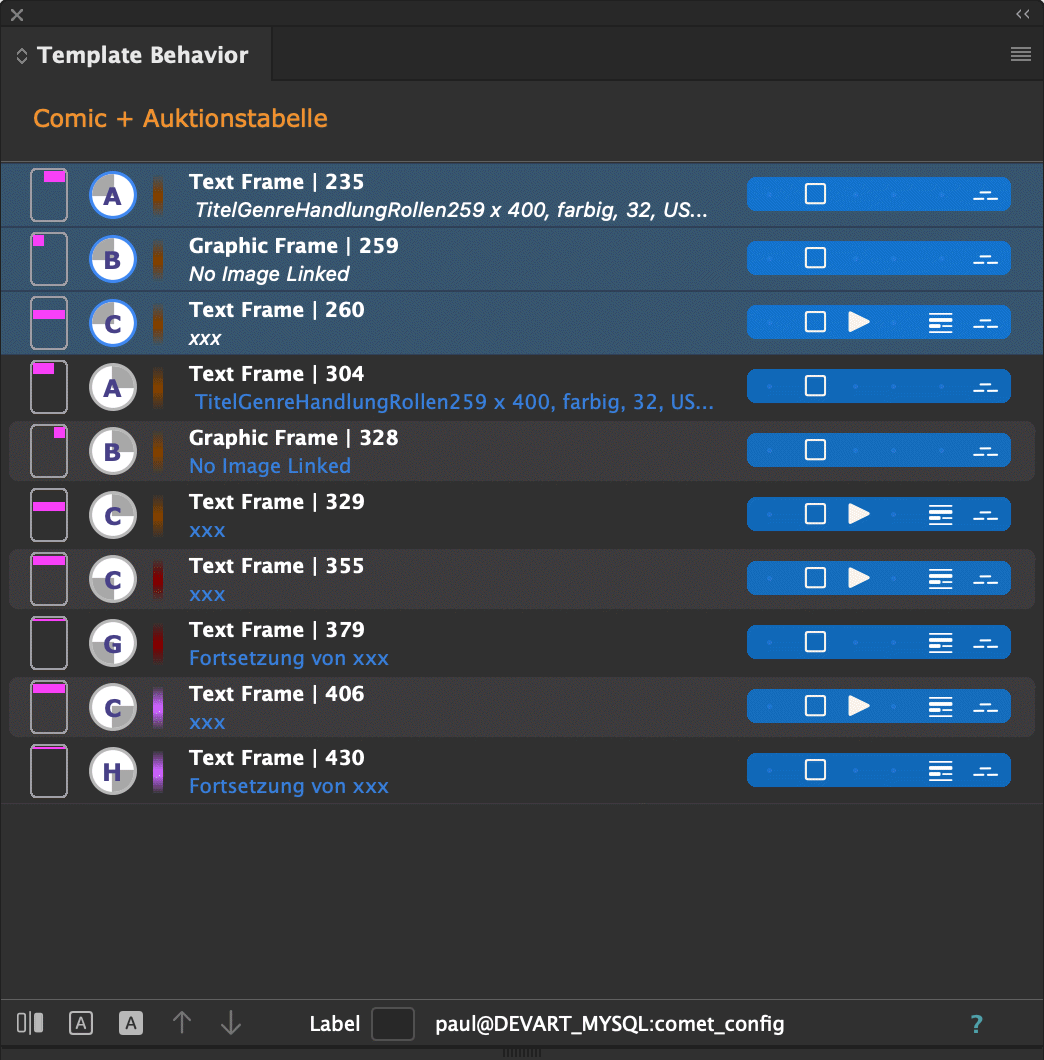
The list automatically is adjusted to the current document selection. Conversely, entries in the list may be selected via the document frames. The list is sorted by template kind (left, right, continuation) and by the frames' sequence numbers.
Three possible selections are distinguished:
If at least one frame in the current document selection shows its template behaviour, all frames on the page belonging to the same template are shown. The list's heading is set to the template name and displayed in orange.

Group membership is implemented with internal marking in the frame. The marking cannot be affected. It consists only of the user name and the current data and time. The marking is updated when saving a template, or when creating the mirrored (and continuation) frames with the mirror button in the panel (). When creatin frames via copy and paste, the marking persists.
If no frames in the selection show their template behaviour, but all frames belong to the same comet group, all frames in the comet group are shown. After the name of the comet group (i.e. its ID), the name of the template that inserted the frames into the document, is shown. If the frames were not inserted by template, this part remains empty. If multiple templates were used, all template names are shown.
The list heading contians the comet group ID and the template name/s:

If no frame in the selection shows its template behaviour, and the frames belong to no (or multiple) comet groups, the current frame selection is shown.
The list heading in that case:

| Button | Description |
|
Create the mirrored frames. Only the positions are mirrored, not the frames themselves. Alt Key : Hold the shift key to also create the frames for the continuation. Text frames with no other text frames below them are automatically marked as continuation frames. |
 |
Show and Hide template settings of the selected document frames. Alt Key : Hide for all frames in the documents. |
  |
Change the Sequence Number |
 |
Change the Identifier |
 |
Select all frames in the list with the same identifier as the first selected entry. |
What do the entries in the panel show?
| Column | Description | |||||||||||||||||||||||||||||||||||||||||||||||||||||||||||||||||||||
| 1 |  In a rectangle with the same proportions as the current document page, display the approximate position and size of the frame on the page. In a rectangle with the same proportions as the current document page, display the approximate position and size of the frame on the page. |
|||||||||||||||||||||||||||||||||||||||||||||||||||||||||||||||||||||
| 2 |
|
|||||||||||||||||||||||||||||||||||||||||||||||||||||||||||||||||||||
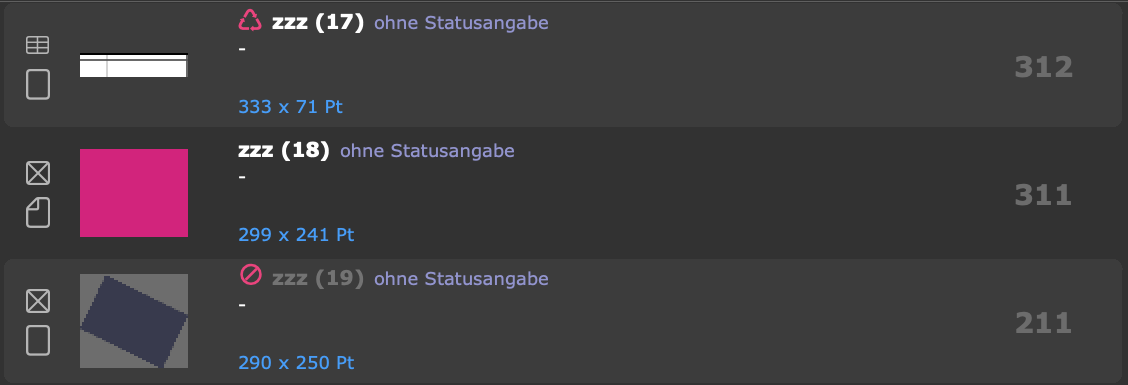
| 3 (top) | Frame type and ID | |||||||||||||||||||||||||||||||||||||||||||||||||||||||||||||||||||||
| 3 (bottom) | Image path or text opening (where available) | |||||||||||||||||||||||||||||||||||||||||||||||||||||||||||||||||||||
| 4 |
|
|||||||||||||||||||||||||||||||||||||||||||||||||||||||||||||||||||||
Order, label and continuation type of the frames can be shown in the document.

How to turn on and off the template behavior on frames:
at the bottom left of the panel Template Behavior
If a template is opened by double-clicking, the template behavior of all frames is visible automatically.
The order of the frames in the panel Template behavior determines the sequence in which the frames can be processed in Product Building and Reorganization. In Text Flow Builds the order determines in which order the frames (or their contents) are inserted into the current text. The sequence number is highlighted in black at the bottom of the frame:
To change the order, use the buttons
and
in the bottom left corner of the panel.
Please note: If you turn existing frames into templates, the frames may have
no different sequence numbers yet.
Please check if the sequence numbers of the frames are fixed for new templates. If the
Sequence numbers not yet defined, click at least one of the following buttons
or
.
The Label is an identifiaction code and gives a frame a unique and permanent identification within the template resp. its Comet Group. Please note that the identifiers must remain unique even after product build-ups. Any frames added during the construction must therefore each be given further and different identifiers. To set the frame label you can use the frame::set_smart_item_data function.
The label consists of a single Unicode character and can be found in the Label field in the panel Template Behavior. The label is highlighted in red at the right top of the frame:
Labels are used in the following situations:
If you do not require any of the above functionalities, the label can be omitted. But if you assign labels, you must make sure that the labels are unique inside Comet Grous!
Templates can create new pages or skip to the next page element. When a jump to the next element is attempted (setting  ) and the build is on the last page element, a new page is created automatically and the build is continued on its first element.
This setting can be made on any frame in the group. For better visibility, the small image is stored in every frame in the group in the first line in the list Template Behaviour, highlighted in green. The same color is used in the preview of the template in the Templates panel.
For the "Next Page Element" property, you need at least v4.0.5 R9730.
Too create new pages, the Table/file framerules has to be defined in the data pool.
The Table/file framerules was introduced in Comet 2 to support the Layout Rules panel. This panel has become obsolete in Comet 4. framerules is still required for the template behaviour "New Page/Next Page Element", however.
[since v3.3 R2688, 28.10.2011]
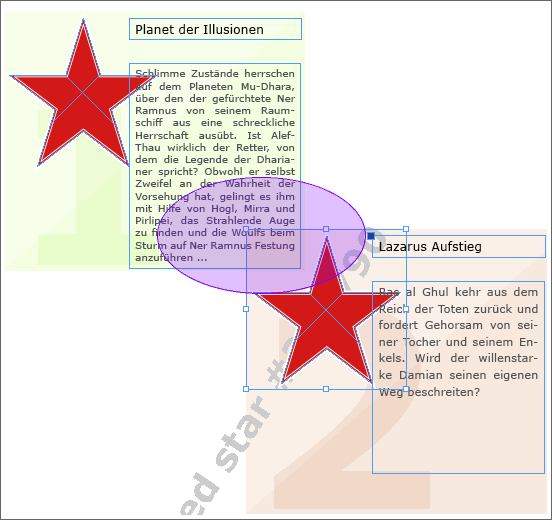
Page build and reorganization have to check in different places, whether existing page content is overlapped. In that case, the next free location is searched based on the settings of the page template and element.
A new product does not have document frames that could be checked, though. Thus the bounding box of the template frame during template saving is used. That box is visualized in the Templates panel:
In some circumstances the bounding box test is not precise enough, so you may want to use the actual frame edges for textin. In the image, the text of the predecessor product should be allowed to reach into the free space of the star. The usual bounding box test would fail here.
You can specify for each frame in the template, which area should be tested for overlap, whereby :
 or
or  ), the bounding box is no longer used for testing, but the specified frame areas.
and are not supported in 1:N elements - the build checks if a template can occupy a space; it does not check where it might be placed. This is a rarely encountered problem with relatively high mathematical complexity, which we will gladly solve for you on request.
In XML and SOAP, the elements pageitems.pageitem each have to be extended with the hasShapes element. Each entry gets the value 0.
Here an example for an extended pageitem element:
<pageitem>
<id>1199</id>
....
<hasShapes>0</hasShapes>
</pageitem>
<pageitem>
The required information about the frame edges and gaps are simply stored next to the template file with the extension shapes. The Shapes-file is automatically written when saving the template.
In SQL the table pageitems has to be extended with the attribute shapes of type CLOB/text.
Here the required SQL statement for a mySQL data base:
alter table pageitems add shapes text;
The feature will be available after the next connection to the extended data pool. You should then see the following line in the logfile after login:
# Support page item shapes : yes

 Additional frame properties. The properties can be changed by mouse click.


