The ClassID of the panel and its objects is 3.
Linked objects (products) of placeholders are distinguished by so-called RecordIDs. RecordIDs consist of three integers and a string. For a placeholder to be recognized as linked, the first number of the RecordID must be greater than 0 and the other two numbers must be ≥ 0:
RecordIDs are only identical if all three numbers and the string (case sensitive) are identical. To avoid errors, you must ensure that the RecordIDs are unique in the context in which they are set and that whole numbers are actually used for the first three number fields.
RecordIDs are used in a variety of contexts. The most common use of RecordIDs is as Product IDs for placeholders: When linking a document placeholder to a product, the RecordID of the product is set in full and unchanged into the document placeholder. The product can later be uniquely identified via the placeholder's RecordID and updated/synced/stored using the placeholder's actions. The currently set RecordID of a placeholder is shown in the Placeholder Values panel. If the placeholder is selected in the document and the product is visible in the panel Product Pool, the list entry in that panel is selected.
Weitere Verwendung finden die RecordIDs in Dokumenten und Publikationen und in priint:comet Hyperlinks. Beschreibungen zum Lesen und Setzen von RecordIDs finden Sie in den Dokumentationen der jeweiligen Funktionen und Objekte.
In placeholder scripts and scripts of the table module the content of current Comet ID can be requested as follows:
| cScript Environment Variable | Statement-<Tag> | |
| ID | gRecordID | <ID> |
| ID2 | gRecordID2 | <ID2> |
| ID3 | gRecordID3 | <ID3> |
| StringID | gRecordStringID | <STRINGID> |
Please also note the following information about StringIDs in the Table Module and in connections to PublicationServers!
So-called Multi-StringIDs can be made from the StringIDs via the Table Module. Up to three individual StringIDs are joined together, separated by |--|. Scripts must not place multi-stringIDs in placeholders.
In placeholder scripts and scripts of the Table Module the contents of the three parts of a Multi-StringID can be queried with the global variables gRecordStringID1, gRecordStringID2 and gRecordStringID3. In direct queries of placeholders and the Table Module, the contents of the three parts of a multi-stringID can be accessed with the <STRING1>, <STRING2>, <STRING3> tags.
Publication Servers usually use only the StringIDs to identify the products and always set the three numbers of the Comet IDs to
1, 0, 0, "stringID"
The formatting of the StringIDs follows uniform rules. A full description and how to access the individual parts of a PubServer stringID can be found here.
Products can be dragged by their name part into the panel Products Of Document. To insert products in InDesign® documents, they are dragged by their icons.
The following table describes all actions and key combinations that are supported when dragging and dropping products into documents. If you hold down the H key, the following table is also displayed directly during drag and drop. You can also find help on dragging and dropping products in the Tool Hints panel when the Selection Tool is selected.
| Destination | Mac | Windows | Description | |
| H | Show this help | |||
| Unlinked Text, End of Text | Normal | Insert the product template into the text flow. |
||
| In the placeholder panle, at least one entry is marked with an eye. | Insert, link and load the marked placeholder for each product. The content of search field 2 is used as separator (/r = end of paragraph, /n = softreturn, /t = tab). | |||
| Text Placeholders | Link and load the placeholder with the first product. | |||
| Graphic Frames | Link and load the target frame with the first product. | |||
| SHIFT Over Text Frames | Relink and load all placeholders of the frame. If the frame is part of an InDesign group, all other frames of the group will also be processed. | |||
| Free Area | ALT | Y | Insert product template | |
| + CMD | + A | Reorganize page after inserting | ||
| + CMD + SHIFT | + A + SHIFT | Place product template at the top left of the page element | ||
| + Leerzeichen | Use continuation template | |||
| Table Cells | CTRL | STRG | Relink and load rows starting from drop column. Excess products are ignored. | |
| + CMD | + A | Relink and load rows starting from drop column. New lines are created for surplus products. | ||
| + ALT | + Y | Relink and load columns starting from drop row. Excess products are ignored. | ||
| + ALT + CMD | + Y + A | Relink and load columns starting from drop row. New columns are created for surplus products. | ||
| ESC | Abort | |||
The following table describes the panel statements that can be used to configure the loading of products:
| ClassID | ID | Description | Remarks |
| 3 | 7 | Search of list entries | This statement is only used in versions < 1.1.9 (without Treeview). New versions use the statement 55. |
| 8 | Load individual entries | ||
| 3 | 55 | Load top level entries | The command loads IDs and content of the products. The command also returns the ID of the panel statement that can be used to load the subentries. The command may contain instructions to label the search fields. |
| 3 | >= 10000 | Load subentries | Command to load subentries |
| 18 | 95 | Load the ID of the script to be executed on double-click of a product. |
To load products into the treeview this mechanism is used:
The real command for loading depends on the type of the data connection. ODBC connections expect an SQL SELECT statement, XML datapools an XML SELECT command, SOAP connections expect a getProductList command.
Since only panel statement 55 (toplevel) evaluates search criteria, only this stament has input values which must be marked in the command with ?. These parameters are expected.
| Parameter | Type | Description | Remarks |
| 1 | int | Limits the ID to ID > 0 | is always replaced with 0 by the plugin |
| 2 | string | Content of the first search field with appended % | only default search. For more search criteria see here. |
| 3 | Content of the second search field with appended % | ||
| 4 | int | rownum < | is always replaced with 10,000 by the plug-in |
All statements use the same kind of return values.
| Column
standard / SOAP |
Parameter | Type | Description | Remark | ||
| 1 | 1 | ID | int | Unique ID of the data record. | With the ID of the data record the status (+, x, ...) of the product is set in the panel. | |
| 2 | 2 | ID2 | ||||
| 3 | 3 | ID3 | ||||
| 4 | - | StringID | char* | NOT ON SOAP (Use column 17 for StringIDs in SOAP)
For usage of the StringID two conditions must be met:
|
||
| 5 | 4 | classID | int | Internal ClassID of the object | Not used yet | |
| 6 | 5 | iconID | int | Number of the icon to be used for the object | You can find a full list of available icons here. | |
| 7 | 6 | 1. Column | string | Values displayed in the panel list | ||
| 8 | 7 | 2. Column | ||||
| 9 | 8 | forceDelete | int | Object state |
>0 : If the object is not planned for in the document it is not inserted into the product
list. If the object is planned for in the document it is deleted from the list if all links
to this product have been removed from the document.
0 : Product that can be commonly planned <0 : The object is not to be planned for in the document. The link button is deactivated and the object is not tested when states are tested with |
|
| 10 | 9 | panelStatementID | int | >= 10000, reference of a panel statement of the same type which can be used to load subentries. | If the value is 0 the object can not be expanded. | |
|
||||||
| 11 | 10 | docID | int | ID of the document | The parameter is currently unused and can be filled with 0. | |
| 12 | 11 | masterpage | string | Name of the parent page in the form prefix-name (e.g. "C-Doublepage") | If during product creation a new page must be created for this
product this parent page is used. If the parent page does not exist or the value is empty the
default page of the creation is
used.
Value is used in grid orientated product builds only. On page template based builds, parent pages are defined by the page templates itself. |
|
| 13 | 12 | reserved | string |
Enter the value "" here. Since v4.1.6 R26627 Infos1 and Infos2 of the placeholders in templates. The information is inserted into all frame and/or text placeholders of the product template before the placeholders are loaded. The information is given in the following format: ### apply_info1 'info1' apply_info2 'info2' with the following values:
The following example sets "aaa" in Infos1 and "bbb" in Infos2 of all placeholders of a product: ### 3 'aaa' 3 'bbb' To set Infos1 and Infos2 in cScript please use product::set with the kaywords
|
||
| 14 | 13 | Customized icon | string | Customized icon | "" or definition of a customized icon for the product. If the field is not empty, the entry iconID from column 6 (or 5 in SOAP) is ignored. | |
| 15 | 14 | pagetemplateID | int | Create a new page with the given page template before building the product |
0 or valid ID of a page template. In the panel the name of the page template is shown behind the template name: Template@Pagetemplate Use this option rarely: Specifying a page template automatically creates a new page before inserting the product during product buldings. |
|
| 16 | 15 | reserved | int | Enter the value 0 here. | ||
| 17 | 16 | pageItemID | int | Template used for inserting the product |
Templates are detected depending on the page: If the used template is limited to left pages but also defines right pages, on right pages the right templateis used. If the value is 0 or if the template does not exist the default template of the creations is used. |
|
| - | 17 | stringID | string | StringID of product | SOAP ONLY
For usage of the StringID two conditions must be met:
|
|
The commands support the whole set of panel statment tags like <user>, <now>. Here you can find a complete list of the variables.
In order to reference the values of higher level objects when subentries are loaded additional variables are supported in the statements.
| Name | Type | Description | Remarks |
| parent.ID | int | ID of the parent record | With parent.parent the parent record of the parent record is referenced (etc.). |
| parent.ID2 | |||
| parent.ID3 | |||
| parent.StringID | string | ||
| parent.classID | int | internal ClassID of the parent record | |
| parent.Row1 | string | List text of the parent record | |
| parent.Row2 | |||
| parent.ForceDelete | int | Forcedelete value of the parent record |
You can also use the current values of the search fields of the panel on every level. The image shows the tags assigned to the search fields. If a search field is empty the tag gets the value "%", otherwise it gets the exact value of the search field (i.e. not converted into upper case).
The statements have the same rows for the database and xml and for top level and subentries. But for XML and all subentries (database and XML) the order of ClassID and IconID is exchanged: ... IconID, ClassID, ...
To rename search fields or fill them in on start use this mechanism.

In addition to the built-in priint:comet icons, t he Product Pool entries can be provided with their own icons. Please use column 14 (for XML-Offline and ODBC with hasstringids = 1) resp. column 13 (otherwise) of the load statement for that. The following definitions are supported:
| Keyword | Description | Example |
|
ImagePath : "local_path" IconPath : "local_path" |
Complete path of an image in the local net. $-Alias defintions at the beginning of the path are supported. |
ImagePath : "$DESKTOP/Imaages/bbb.png" |
|
ImageURL : "image_url" IconURL : "image_url" |
Valid image URL |
ImageURL : "http://www.hi13.de/bbb.png" |
|
SOAPImage : "field_id" SOAPIcon : "field_id" |
fieldID of an image of the current SOAP/PubServer connection. |
SOAPImage : "icons/bbb.png" |
Attention : In all cases, there must be a space before and after the colon.
Images should always be PNGs with alpha channel. A corresponding file extension is not required. Other image formats like GIF, JPG or EPS can be processed for historical reasons and are still supported, but the quality of the images is significantly worse than that of PNGs.
You can use the slash / as a path separator regardless of the operating system. If you still want to use the backslash \, then please remember that this character usually has to be masked twice here (\\\\) - once for the call and once within the path.
Images are scaled automatically.
When loading the images, an attempt is first automatically made to load an image variant that matches the current InDesign® UI color. Only if there is no corresponding image variant the basic image without an extension is used:
![]() Light UI : Imagename_L
Light UI : Imagename_L
![]() Dark UI : Imagename_L
Dark UI : Imagename_L
![]() Selected : Imagename_R
Please note :
InDesign® uses the same icon for selected list entries in light and dark UI.
The _R icon will therefore be used in both the light and dark UI and you should be a little careful with the colors of your icons.
Below you will find an image with the standard colors used by the priint:comet plugins.
Selected : Imagename_R
Please note :
InDesign® uses the same icon for selected list entries in light and dark UI.
The _R icon will therefore be used in both the light and dark UI and you should be a little careful with the colors of your icons.
Below you will find an image with the standard colors used by the priint:comet plugins.
The colors used by the priint:comet plugin icons can be found here: ![]()
Icons for products can be installed locally in your InDesign®. To do this, use the script command prefs::install_image with the parameter destination set to "products". Please note, however, that locally installed icons are only visible in the executing InDesign® and will be lost when the priint:comet plugins are reinstalled!
Here are two examples for SQL and XML.
First the panel statement 55 for loading of all top level objects.
select ID, 1401, 1702,
   3,      -- unused
   2012,   -- House
   Num, Name,
   ForceDelete,
   10000,  -- Load the subentries
   0, '',
   '', '', 0, 0,
   7       -- Template 7
from WIIProducts
   where        ID > ?
      and       upper (num) like ?
      and       upper (name) like ?
      and       rownum < ?
Load the second level objects.
select     ID, <parent.ID>, 123,
   2009,                                -- Cog
   ObjectType,
   Name, Value, ForceDelete,
   10001, -- Load the subentries
   0, '',
   '', '', 0, 0,
   7 -- Template 7
from            WIIElements
where   productID = <parent.ID>
union
select ID, <parent.ID>, 123,
   2010,                                -- No passing
   ObjectType,
   Name, Value, ForceDelete,
   10001,
   0, '',
   '', '', 0, 0,
   7 -- Template 7
from            WIIElements2
where   productID = <parent.ID>

union
select ID, <parent.ID>, 123,
   2011,                                -- Heart
   ObjectType,
   Name, Value, ForceDelete,
   10001,

   0, '',
   '', '', 0, 0,
   7 -- Template 7
from            WIIElements3
where   productID = <parent.ID>'
Load the third level objects.
select 1, 1401, 1702,
   2003,        -- Bulb
   -1,
   <parent.Row1>||' '||to_char(<parent.ID>),
   <parent.Row2>||' '|| to_char(<parent.ID2>),
   0,
   0,     -- No more subentries
   0, '',
   '', '', 0, 0,
   7 -- Template 7
from dual
union
select 1, 1401, 1702,
	               2002,   -- Book with pencil
   -1,
   <parent.Row1>||' '|| to_char(<parent.ID>),
   <parent.Row2>||' '|| to_char(<parent.ID2>),
   0,
   0, -- No more subentries
   0, '',
   '', '', 0, 0,
   7 -- Template 7
from dual
The statements for XML are made in the same way as panel statements. Some differences must be observed:
Here is an example entry supporting StringIDs . The definition parts with an orange background return a StringId. The return value of id is automatically translated into a string. In order for the subentries to be loaded the panel statement 10001 has to be defined.
<panelstatement> <id>10000</id> <usage>1</usage> <domain></domain> <statement> "$MYFILE" select id, <parent.ID>, 123, id objecttype, 2009, name, value, forcedelete, 10001, docid, masterpage, grid.name, grid.elem, grid.id, grid.elemid, pageitemid node elements.element where productid = <parent.ID> </statement> <in_parameters></in_parameters> <out_parameters></out_parameters> <description>Load subentries</description> <hasstringids>1</hasstringids> </panelstatement>
SOAP services must implement a special command for loading (sub)product lists. You can find a full description of the SOAP service here. The plug in can use four methods of the soap connection:
This example demonstrates a valid SOAP statement to load the top level products (panel statement 55):
<panelstatement>
   <id>55</id>
   <usage>Load the products of the product pool as treeview</usage>
   <domain></domain>
   <statement>
      getProductList id > ? and name like ? and num LIKE ?
   </statement>
   <in_parameters></in_parameters>
   <out_parameters></out_parameters>
   <description></description>
</panelstatement>
Contrary to the just described statements for database connections and XML data you can not specify
which panel statement is to be used for loading the sublevel entries in the SOAP statement getProductList. This definition is done on the server. If the server returns e.g.
20000 the panel statement could look like this:
<panelstatement>
   <id>20000</id>
   <usage>Load sublevel products SOAP</usage>
   <domain></domain>
   <statement>
      getSubProductList id = <parent.ID>
   </statement>
   <in_parameters></in_parameters>
   <out_parameters></out_parameters>
   <description></description>
</panelstatement>
This example describes a valid pair of panel statements 7 and 8 which can be used to load
products of a panel. When adapting theses statements care has to taken that the new statements
have the right return rows and input variables. The next pictures demonstrate at which place of
the selects panel values and return values are to be inserted.
 corresponds to [1] in the statement,
 corresponds to (1) in the statement.

In statement 2 for demonstration purposes the tag <userid> is used. This tag will be replaced before the statement execution by the ID of the current user. More defined tags are available here.
insert into PanelStatements values (
	       7,
	       '',
	       'Load the IDs for the product pool',
	       'select ID, 1401, 1702
	       from WIIProducts
	       where   ID > ?                      -- 0 from plug-in
	               and     upper (num) like ?  -- [1]
	               and     upper (name) like ? -- [2]
	               and     rownum < ?',        -- 10,000 from plug-in
	       'number, varchar2, varchar2, number',
	       'number, number, number');

	insert into PanelStatements values (
	       8,
	       '',
	       'Load one product in the product pool',
	       'select
	               Num,    -- (1)
	               Name,   -- (2)
	               ForceDelete
	        from WIIProducts where ID = ?',
	       'number',
	       'varchar2, varchar2, number');
The value of ForceDelete controls the look of the state button: If ForceDelete is != 0, the status is set to 'Can be deleted'. If the product is no longer placed in the document it is not loaded into the list. If it is still existing in the document and is deleted from the document, the corresponding entry is automatically removed from the list of products.
The entries on the list can react to double clicks. The action to be performed is defined as follows:
Here are some examples of valid panel statements which can be used to define a valid double click ID.
select 900+<depth> from dual;
"datafiles.xml"                        -- some XML file
select 900+<depth>
select id%3 from ... where ID = ?
select id%3 from ... where ID = <ID>   -- The ? are optional
And here a simple double click script
int main ()
{
    showmessage ("Zeile %d, ID = %d",
          gClicked+1,
          gRecordID);
    return 1;
}
At the right top of the panel is a pop-up menu that contains the (alphabetically sorted) available templates. With two small pop-up menus on the left before the pop-up, this list can be limited to domains and the so-called clients. Nevertheless, the list can quickly become confusingly long.
Panel statement 148 can be used to automatically filter the list. The statement is available from v4.1.8. R27979 and must be a cScript. The filter script is executed at each login/logout and at each document change. It receives a list with the IDs of all currently available templates. Unnecessary entries are removed from the list by the script and the remaining templates are inserted in the popup. If the script is missing or empty, all templates will be included in the selection popup.
The filter script can be deactivated (and reactivated) with the help of the flyout menu Show Shared Templates Only.
| Name | Type | Description |
| gDocument | ItemRef |
Current front document |
| gTemplateIDs | List |
List of the IDs of the available templates. Templates that are not to be shown in the pop-up of the panel are removed from the list by the script. |
PubServers since v4.1.9 have a standard version of the script: The publication of the document is determined via the document ID and the result list is filled with the templates assigned to the publication. If no templates are assigned to a publication, all templates are shown.
The example shows a simple script that always displays only those templates that begin with the same letter as the file name.
int main ()
{
    char 	docName	[512];
    char 	tName 	[512];
    int 	i;
    int 	len 	= list::length (gTemplateIDs);

    document::name (docName);
    strlower (docName);

    if (len > 0 && strlen (docName) > 0)
    {
        for (i = len-1; i >= 0; i--)
        {
            strcpy (tName, datapool::get_template_name (list::get (gTemplateIDs, i)));
            strlower (tName);

            if (docName [0] != tName [0])
            {
                list::remove_pos(gTemplateIDs, i);
            }
        }
    }
    return 0;
}
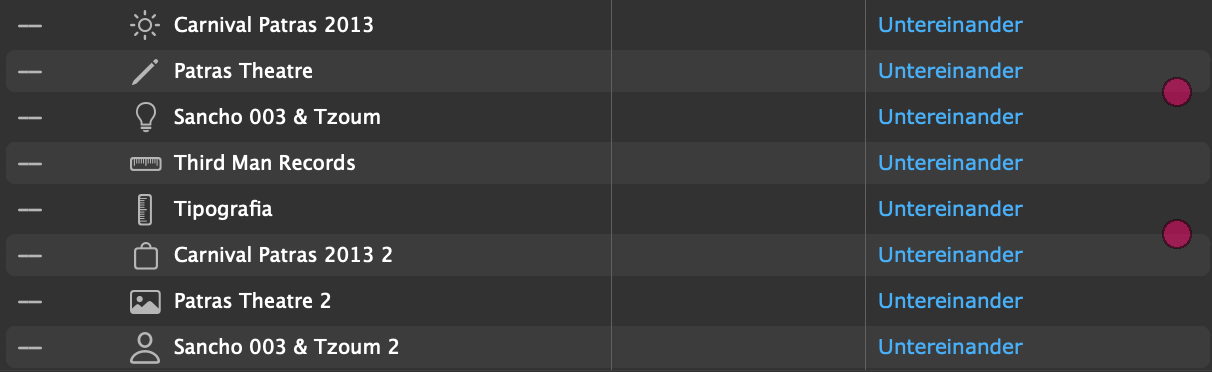
[Since v4.2 R31657] Products can be kept together with their successor product in such a way that both products are placed on one page when building. Please note the following restrictions:
To keep a product together with its successor, right-click the product and hold the Shift key. Products held together with its successor are marked with a red dot on the right side of the product list. In the screenshot Patras Theatre and Tipgrafia are held together with their respective successors.
Using the cScript functions product::set/get with the selektor kProductKeepWithNext you can also set/get the property programmatically.
[Since v5.0 R37460] If the current page element (or its remaining place) is too small for both products, the next page element is used. If this page element is also too small, the 'keep with next' is released and the second product is only placed in the next but one page element. In some special cases, you may also want to place the first of the two products on a new page. To do this, use product::set to additionally set the slot kNewPageOnFailedKeepWithNext to the value 1.
[Since v5.0 R37460] Alternatively, or if you are not using a build script for your products, you can also create a new page in case that ‘Keep With Next’ fails by using a special Build Support Script for Templates: In the situation kKeepWithNextFailed, set the value of the variable gKeepWithNextNewPage to 1.
[Since v5.0 R37460] Here is a simple example of a Build Support Script that, if an attempt to keep two products together on one page fails, creates a new page and tries to set them up again there.
#pragma plain

#include "internal/types.h"
#include "internal/text.h"
#include "internal/table.h"

int main ()
{
	if (gSituation == kKeepWithNextFailed)
	{
		*gKeepWithNextNewPage = 1;
	}


	return 0;
}
Since keeping two products together is not clean-up resistant, this property cannot be set in the panel Products Document.
For repeated tests, especially in the development phase of a project,
you can save the products of the document with the Save button  of the panel in so-called products XML. Since v4.2 R32973
the element <keepWithNext> is also supported here and initialized with 0 for all entries:
of the panel in so-called products XML. Since v4.2 R32973
the element <keepWithNext> is also supported here and initialized with 0 for all entries:
<keepWithNext>0<keepWithNext>
You can (manually) change the value 0 to 1. Then this product will be kept together with its successor
when the reorganize button  of the panel is executed.
The frames of Parent Pages (formerly known as Master Pages) may contain frame and text placeholders. These frames and their placeholders can be overridden (localized for the current page) and loaded in the following situations.
Multiple overrides of the same parent page frame on the same page are allowed. The priint:comet functions automatically detect whether a parent page frame has has already been overridden. In this case, only the placeholders of the overridden master page frames are reloaded.
Parent page frames that are to be overridden by the above priint:comet functions must be be marked for this as follows:
[Bis v4.2 R33358] Frame Placeholder
[Ab v4.2 R33359] Frame Placeholder and/or Override Marker
Since v4.3 R34830 The parent page frames are loaded in the order of their frame labels and the Layout Rules are executed immediately after loading for each frame. This is how you define the labels:
In versions prior to v4.3 R34830, the frames are loaded in the order of their Z order.
[Until v4.2 R33358] To override a parent page frame and load its placeholder, the frame must be linked to a placeholder with an ID > 0. An additional link to a product is not necessary, so the frame may have the record [0, 0, 0, ""].
Often master page frames contain only text placeholders. In these cases, the frame must also be provided with a placeholder! For this placeholder, use something like the following empty loading script:
int main ()
{
	return 0;
}
[Since v4.2 R33359]
Alternatively (or in addition) to marking by a frame placeholder, frames can also be marked by using the
Placeholder panels fly-out menus Placeholders in Frames of Parent Pages ->. The menues are only active in parent pages! The following variants are supported:
Link to First Product on the Page The frame and all text placeholders are linked to the ID of the first product of the current page before loading.
Link to Last Product on the Page The frame and all text placeholders are linked to the ID of the last product of the current page before loading.
Do Not Relink The behavior is the same as marking with a frame placeholder.
Please note the following:
The menus are only active in parent pages. In normal page frames, the property cannot be set.
The placeholders of the overriden parent page frames are reloaded exclusively in the situations mentioned above. In particular, placeholders displaying contents of the first or last product of a page will not be reloaded if the product is deleted or moved on the page!
The blue marker is not a placeholder marker. To make the marker visible please active both both of the following menues:
The settings are stored in the priint_LoadMaster frame label of the frames and can also be set and changed using panel Comet Admin -> Frame Labels. The following values are defined for priint_LoadMaster:
| Bowl | Description |
| first | Show the corresponding value of the first product of the page |
| last | Show the corresponding value of the last product of the page |
| custom | Do not relink the placeholder |
| rowwise | [Default] Line by line search for the first product. In the picture E is the last product: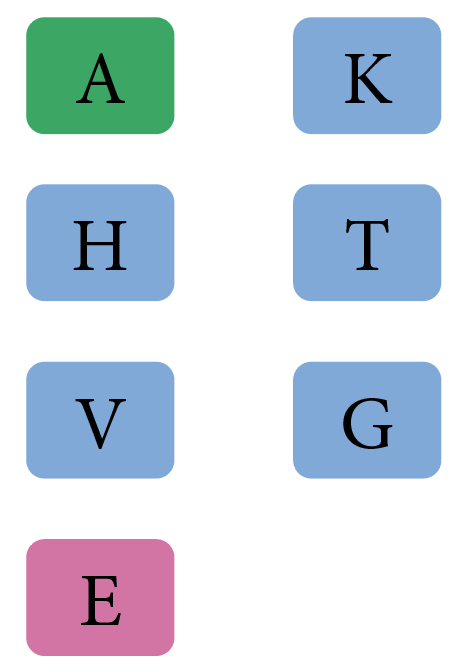 |
| colwise | Column by column search for the first product. In the picture G is the last product: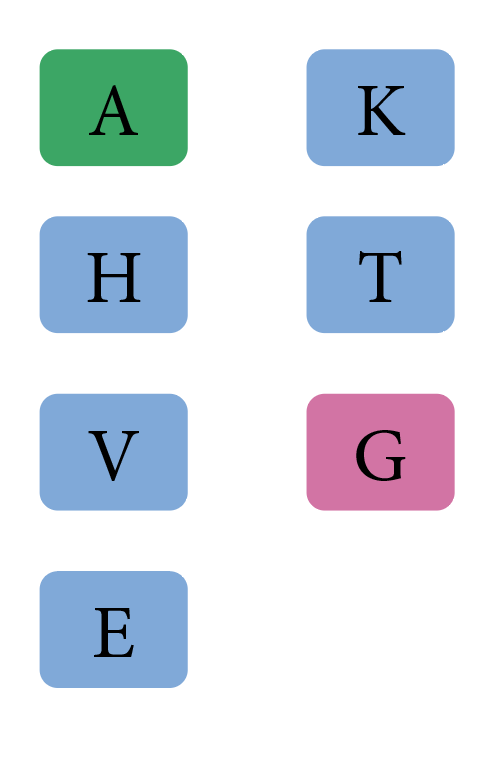 This sorting cannot be selected via menu. Please use panel Comet Admin -> Frame Labels and add the word colwise manually to the value first or last. A blank in between would be a good idea :-) |
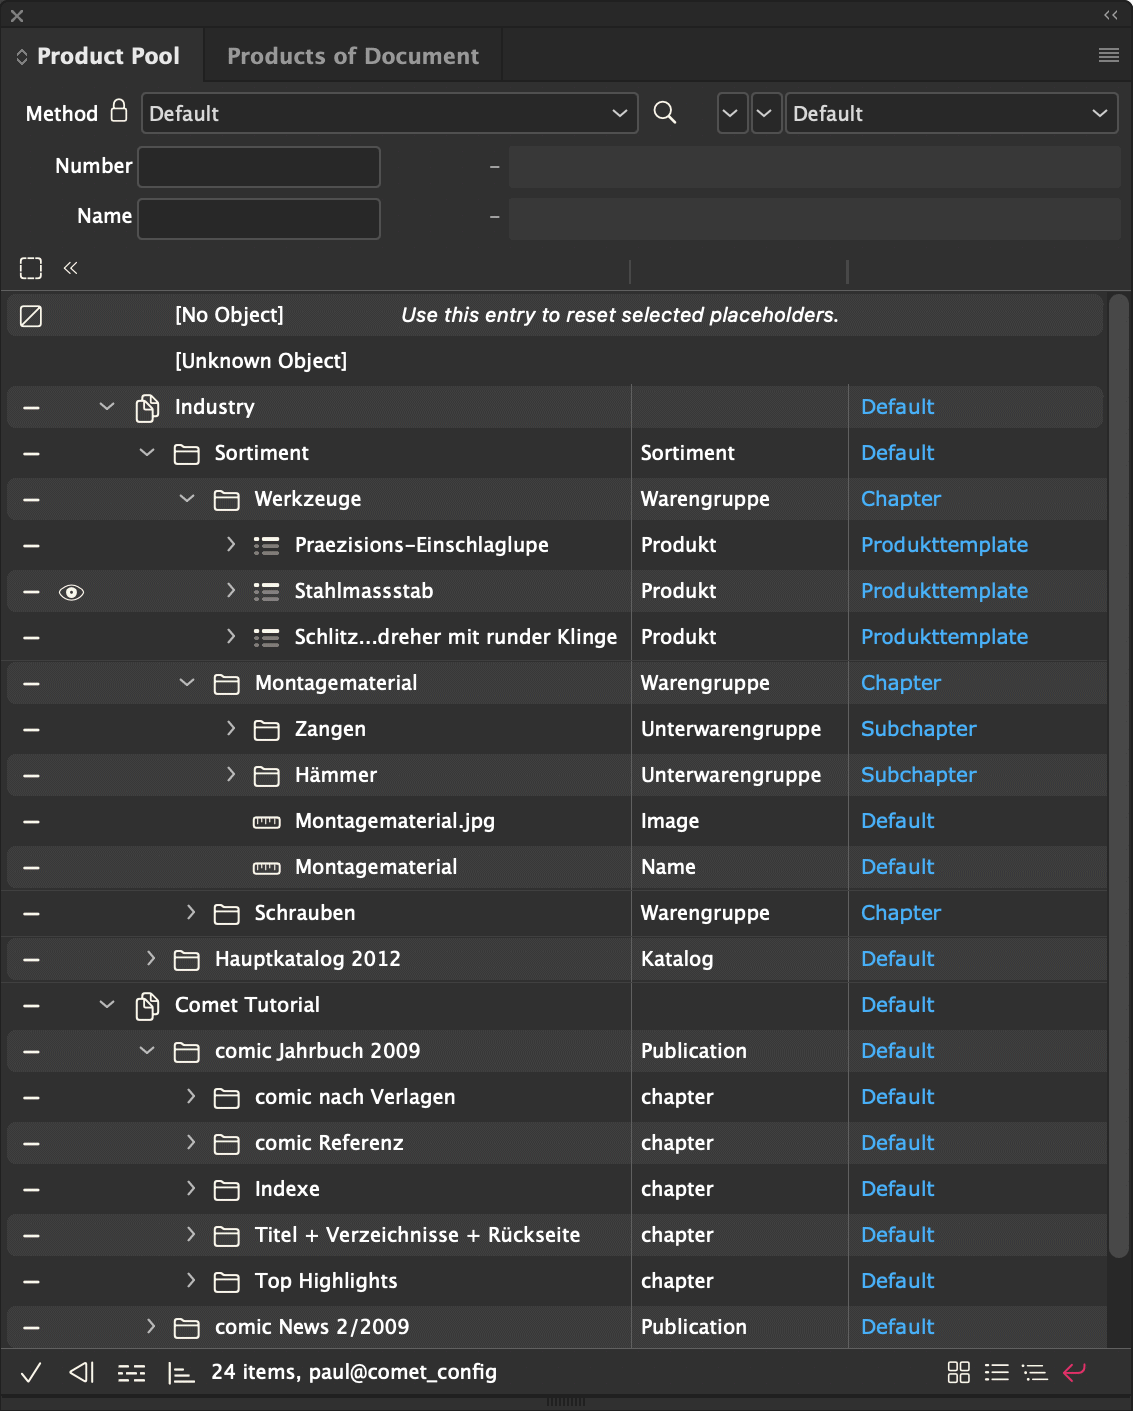
To search for products, different methods are used. Three types of search methods are distinguished.
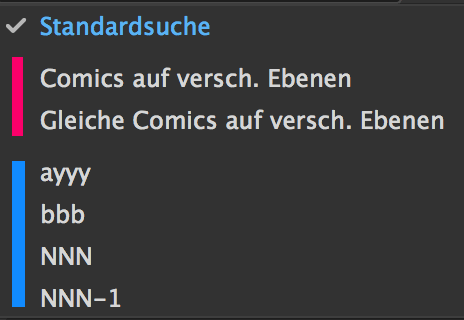
In the following figure the red marked entries are pre-configured and the blue marked entries are custom searches. (Since the surface adjustment of InDesign® CC 2017.1 separators in menus unfortunately are nearly unvisible.)
When logging in or setting a data folder (which may also be at the start of InDesign®) automatically all available search methods are loaded. When a search method is choosen, the names of the four search boxes and their contents can are changed according to the definition of the search method. If the predefined search value consists of several lines, the text field is automatically converted into an editable drop-down menu. The search popup itself will get the configured help text as tool tip.
Besides the standard search, you can access pre-configured and custom searches. All available search methods are shown in the search popup panel. If pre-configured or custom search methods are selected, the search will begin immediately. It first reads the information of the search fields and then performs the search statement.
The search statement is only used for the top level entries. To load the sublevel entries the panel statements of the products are used as usual.
For very complex queries, the Product Pool can also be loaded using cScript.
Attention : Loading with the help of cScript is only supported in FindStatements!
The following steps are necessary for this:
Implementation of the action. The following global variables are defined in the script:
char		gDocumentID[];
ProductList	gProducts;

// When loading subentries the values of the calling product are given here
// Empty or 0 in top level calls
//
int			gRecordID;
int			gRecordID2;
int			gRecordID3;
char		gRecordStringID [];
char		gRecordStringID1 [];
char		gRecordStringID2 [];
char		gRecordStringID3 [];
int			gLevel;
int			gIconID;
int 		gDefaultTemplateID;			// since v4.3 R36620
char 		gDefaultTemplateName [];	// since v4.3 R36620
The task of the script is to fill the list gProducts. The products of the list must be created with product::alloc (kListOwner) and must define at least the attributes kID, kRow1, kRow2 and if possible kPageitemId. You can access the search field inputs directly with the <searchvalue1>, ..., <searchvalue4> tags. These tags are automatically replaced in the script text before the script execution. But please note that the search values usually have a % at the end!
Here is a sample script for loading the Product Pool.
#include "internal/types.h"
#include "internal/products.h"

int main ()
{
	Product  	p;
	int   		i;
	String  	row1 	= string::alloc ();
	String  	row2 	= string::alloc ();

	for (i = 1; i < 10; i++)
	{
		string::set (row1, "Product %d", i);
		string::set (row2, "%s %d", gDefaultTemplateName, i);

		p = product::alloc ();
		product::set (p, kID,   		i);
		product::set (p, kRow1,			row1);
		product::set (p, kRow2,  		row2);
		product::set (p, kPageitemid,  	gDefaultTemplateID);

		productlist::append (gProducts, p);
	}

	return 0;
}
To save your own searches, use the fly-out menus of the panel:
Saving a search requires the installation of the table/file findstatements with the attributes label1, label2, ... ..
In PubServer connections and generally in search methods without search fields, no own search methods are created.
To delete your own searches, use the fly-out menus of the panel:
Pre-configured search methods are part of the current data set. They are created once and can be used (but not changed or deleted) by all users.
As a system configurator you can set the parameter candelete of the search entry to 0.
For the configuration of search methods the tablefindstatements (with XML and SOAP the file findstatements.xml) is needed. For classical applications (< 1.3.3 P/R 47) the search methods can be supported by the table conditions (or the file conditions.xml).
Even when the classical search method is not used, the table conditions (or the file conditions.xml) must exist. Of course the table can be empty then.
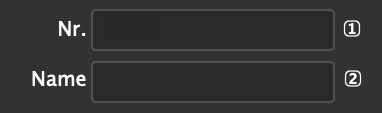
All search methods are managed in the table/file findstatements. The search methods access the current search criteria via the tags <searchvalue1> (left top) to <searchvalue4> (right bottom). The tags are replaced by the respective current values in the panel. The following applies:
The following table explains the fields of findstatements and their use:
| Name | Type | Description |
| id | int | Unique ID of the data record |
| classid | int | The panel the search method is used in. Currently only the product pool (ClassID 3) is implemented. |
| userid | int |
(only database) User ID. Only users with this UserID can see
this entry.
0 : All users see this entry |
| description | char* | Description of the search method. The text is shown as (yellow) help text in the popup. |
| label | char* | Name of the search method to be displayed in the search popup. Dividing lines in the menu are created with "-". |
| sequencenr | int | Order of the menu entries. |
| source | char* | only XML and SOAP Experimentally (not used currently) |
| statement | char* |
Search statement. For linking with the current search criteria the stament can contain these
cues:
|
| • Saving of search results and simplified search. If the entries are missing no user methods can be saved and the search must be configured with the classical method. | ||
| candelete | int | 0 : Pre-configured search methods 1 : Costum search methods |
| label1 | char* |
Labeling of the search fields
The labels are translated according to the standard procedures. Search fields with the following labels are automatically deactivated:
If all search fields are deactivated, the search fields are automatically hidden and the height of the product list is adjusted accordingly. |
| label2 | ||
| label3 | ||
| label4 | ||
| value1 | char* | Values of the search fields. Text entries are automatically appended with "%" during the search.
Since v4.1.7 R27303 : If the content consists of several lines, an editable drop down menu with the corresponding entries is automatically created from which the search criteria can be selected. It is still valid:
Since v4.1.7 R27311 : The specification ##ID (e.g. ##12345) executes the script with the Action-ID ID. This script determines the content of the search field. The action must be defined with ClassID 61! The following global variables are defined in the script: int gStatementID; // ID of findstatements or 0 in case of standard search The result gValues may contain line separators. Then a search dropdown is formed from the individual lines (see above). An exclamation mark (!) at the beginning of the line marks the default selection of the drop down. Here is an example: Create a drop down with the entries Searchvalue 1, Searchvalue 4, Searchvalue 9, ... and the current datetime. Searchvalue 9 should be pre-selected. #include "internal/types.h"
int main ()
{
int i;
String dt = string::alloc ();
for (i = 1; i < 6; i++)
{
if (i == 3) string::append (gValues, "!");
string::append (gValues, "Scriptvalue %d\n", i*i);
}
string::append (gValues, "-\n");
string::append (gValues, "%s", system::now (dt, ddmmyyyy_hhmmss));
return 0;
}
|
| value2 | ||
| value3 | ||
| value4 | ||
|
sourcefiles
alias |
char* | only XML and SOAP In the plug in Settings you can set up alias names for files and folder that can be used during evaluaion of XML statements. In order to make it unnecessary for users to make these settings before searching, you can also make them in the findstatement. For details, see next chapter.. |
Only XML and SOAP Many search statements of an XML installation use alias names instead of fixed file names to refer to source files. The current mapping between alias names and paths are set up with the plug in Settings. In order to make it unnecessary for users to make these settings in this panel, you can also make them in the file findstatement.xml.
All aliases defined in a search method are automatically also set in the panel Settings gemacht. When the search method is changed the old mapping is restored. If the search method contains a mapping that does not yet exist it is created.
Mappings are defined like in this example:
For a search method the alias names $XMLDATA and $IMAGES are needed.
<sourcefiles>
    <sourcefile>
        <alias>XMLDATA</alias>
        <path>Kommunen.xml</path>
    </sourcefile>
    <sourcefile>
        <alias>IMAGES</alias>
        <path>$DESKTOP/Bilder</path>
    </sourcefile>
</sourcefiles>
The classical method ensures that search methods are configurable on all panels. This is most often unneeded. But the classical method is also the only way to rename the search fields of the standard search.
To label the search fields and their current values the classical method needs the table conditions.
| Name | Type | Description |
| id | int | Unique ID of the data record |
| label | char* |
Label of the search field The labels are translated according to the standard procedures. Search fields with the following labels are automatically deactivated:
|
| sequencenr | int | Which search field is meant? |
| typeid | int |
Type of the search value. Strings are quoted automatically:
|
| value | char* | This text is inserted into the search field designated by sequencenr. |
| replacebyvalue | char* | unused |
| conditionmenueid | int | 0 |
The binding between search statement and the current search criteria is done with the keywords
%!conditionID, with ID a valid id from conditions
and is made in the following way:
The key word %!condition may not be used in comments!
Now remains to be resolved how the conditions can realize a search. So far, the search criteria were not yet changed:
When a new search method is selected all %!conditionID of the search statement are evaluated like in the real search. But in contrast to the search, here beside the sequencenr also the fields label and value are evaluated and used for labeling and content of the search fields.
If you want to change a search field that is not used in the search, but maybe only in sublevel entries, you can use the keyword
%!CONDITIONID
It is evaluated in the same way as %!conditionID.
This keyword may only be used in comments, it is not evaluated by the search.
The %!CONDITIONs are used after the evaluation of the %!conditions and can overwrite their changes.
/* %!CONDITION29 is used on level 3 */
Change the labeling of the third search field of the standard search. To that end first a condition is defined. Then in panel statement 55 a comment line is inserted.
/* 1. Define the condition 29 */
<condition>
   <id>29</id>
   <conditionmenueid>0</conditionmenueid>
   <label>Elemente</label>
   <sequencenr>3</sequencenr>
   <typeid>3</typeid>
   <value></value>
   <replacebyvalue></replacebyvalue>
</condition>
/* 2. Insert a comment into panel statement 55 */

/* %!CONDITION29 is used on level 3 */
Definition of a pre-configured search method which can used as an example for custom search methods.
<findstatement> <id>3</id> <label>Printprodukte</label> <description>anything</description> <classid>3</classid> <userid>0</userid> <source></source> <statement> "$XMLDATA" select ID, 0, 3, 3, 2012, DescShort#__igNOre__, "", 0, 20000, 0, "", "", "", 0, 0, 0 node Publication.ProductGroup where 1 > 0 and Nummer like <searchvalue1> and DescShort#__igNOre__ like <searchvalue2> orderby DescShort#__igNOre__ </statement> <sequencenr>30</sequencenr> <label1>Nr.</label1> <label2>Name</label2> <label3>Elemente1</label3> <label4>-</label4> <value1>Print</value1> <value2></value2> <value3>F</value3> <value4></value4> <candelete>0</candelete> </findstatement>
Platzhalter von Texten und Rahmen können durch Shift-Klick in die erste Spalte der Produktliste mit dem jeweiligen Produkt verknüpft werden. Dabei werden die Platzhalter aller ausgewählten Rahmen und/oder Texte mit dem Produkt verknüpft. Ist das sog. Autoload-Button der Palette aktiviert (rot)

werden nach dem Verknüpfen alle Platzhalter sofort geladen.
You can load multiple Comet Groups at together :
Here is a short film to demonstrate :
Template changes can be made directly from the product search:
The above movie also contains a template change at the end.
Tip : Since the placeholders are not linked to new Product IDs, it is sufficient here to select any products in the panel. Only the set template is used for the template change in each case.
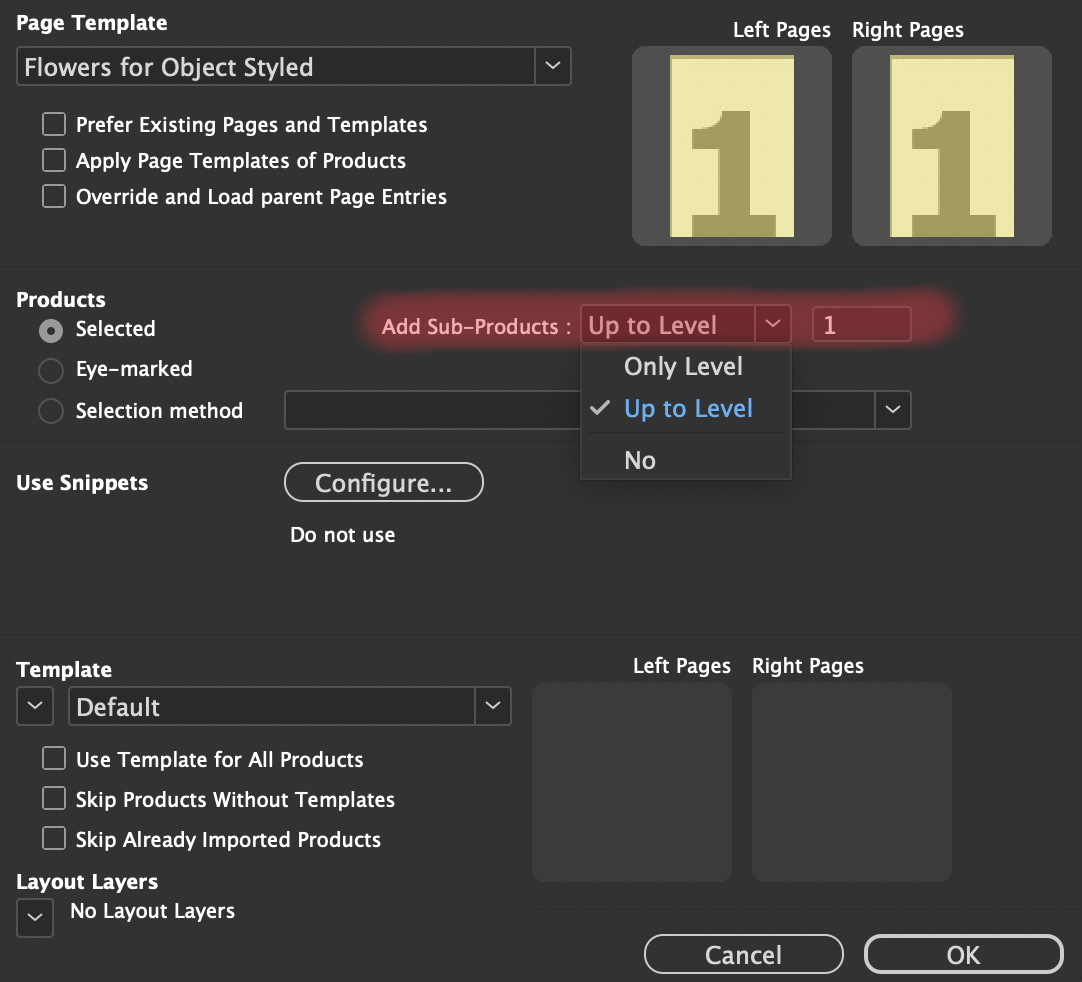
In the Build-Up dialog you can specify how sub-products should be handled:
For each selected product, level 0 is the highest selected product in the hierarchy. This means that if a product and at least one of its parents are selected, level 0 is the level of the highest selected parent object. The products must not be expanded so that sub-entries can be loaded. Here is an example of a product selection (where the sub-entries are only expanded for demonstration purposes):
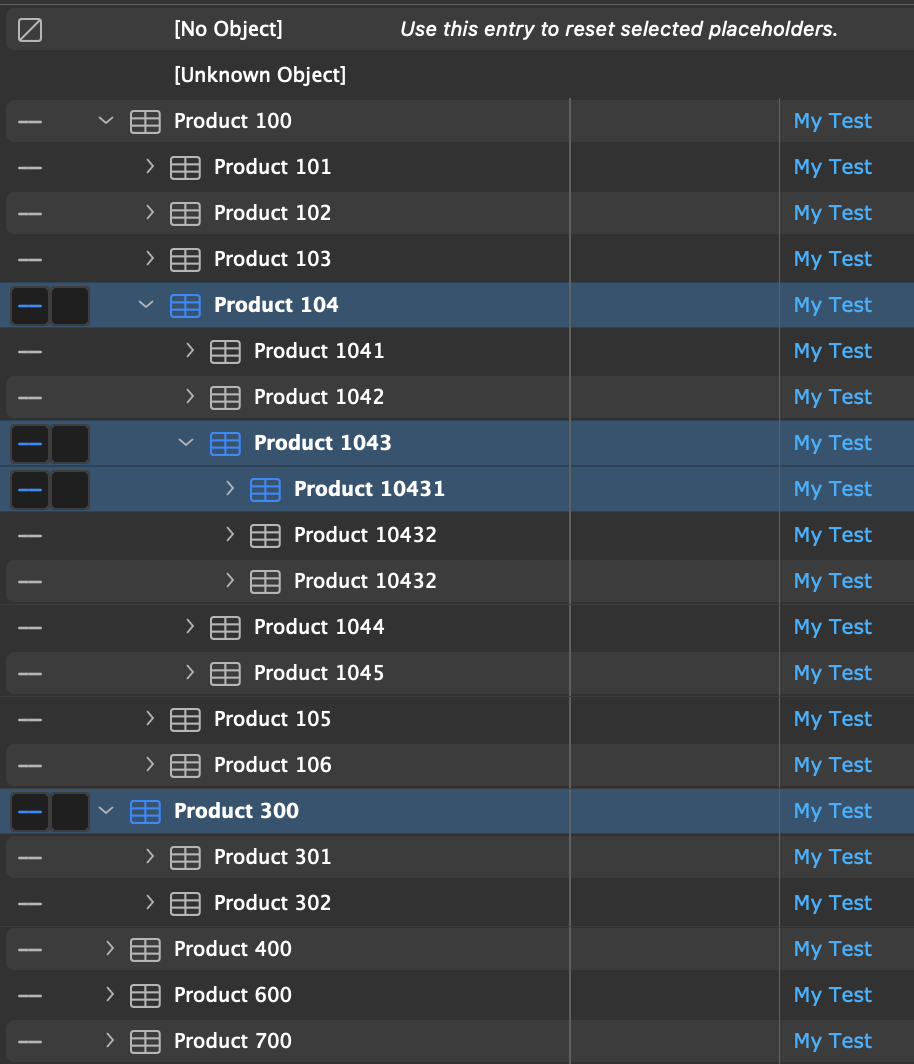
The following products are found with this selection:
Only Level 1 : Starting from the highest selected in each case only the products of the relative sub-level (here 1) are found:
301 - 304 : These products are located in the first sub-level of 30.
3041 - 3046 : Although these products are also one level below the selected product 304, they are ignored.
The reason for this is that 304 has already been 'overruled' by the selection of 30.
4011 - 4013 : These products are one level below the selected product 401.
Search max. Levels 1 : Starting from the highest selected product the system searches for products with a defined template down to the specified relative sub-level. If a product has a template defined, diving into the sub-products is aborted.
30 : This product is selected and has a template defined. All products under 30 are ignored.
4011 - 4013 : The parent product 401 is a top-level selection, but has no template defined itself. The search is therefore continued in the sub-products.
Note 1: If 401 had defined a template, 401 would be used instead of 4011 - 4013. To do this, either select a temporary template for 401 at the top right of the Product Pool panel or define a template in the Build-Up dialog.
Note 2: The setting Skip Products Without Template of the Build-Up dialog has no meaning in the selection method Search max. Levels.
All Down to Level 1 : [Since v4.3 R36020] The selected products and all sub-products down to the specified sub-level are loaded.
30
301 - 304
401 : This product is not used - it does not have a template defined.
To get this product as well, either select a temporary template for 401 at the top right of the Product Pool panel
or define a template in the Build-Up dialog.
4011 - 4013
No : Exactly the selected (selection or eye) products are chosen. There is no search in sub-levels. Attention! All sub-products must have a template defined! Otherwise the build-up will lead to an error! To do this, either select temporary templates for for all sub-products at the top right of the Product Pool panel or define a template in the Build-Up dialog.
30
304
3041
401 : This product is not used - it does not have a template defined.
To get this product as well, either select a temporary template for 401 at the top right of the Product Pool panel
or define a template in the Build-Up dialog.
The test case used for this documentation can be found here. You need at least InDesign® 2025 for the test project. Unzip the project and connect to the unzipped folder in InDesign®. To test other product hierarchies, you can edit the products.xml file. For your own Product Lists, you can edit the actions/1000.crpt action of the folder.
For the creation with page templates  the list of products to be created can also be made by
a script. These scripts must have the ClassID 37. They get the list
to be filled as a global variable (gProducts). The next table shows all
global variables the scripts can use.
the list of products to be created can also be made by
a script. These scripts must have the ClassID 37. They get the list
to be filled as a global variable (gProducts). The next table shows all
global variables the scripts can use.
| Name | Type | Description |
| gProducts | ProductsList | This list is filled with the products that are to be created. |
| gPageTemplate | int* |
You can also define the page template in this script. At the start of the script the
variable has the value defined in the creation dialogue.
Note that this is a pointer, so assignments look something like this: *gPageTemplate = 12; |
| gErMess | char [1024] | If the script should generate an error you can fill this string. In case of errors the return value of the script must be unequal 0. |
A simple select script.
#include "internal/types.h"
#include "internal/products.h"

int append_product (ProductList pp, int id1, int id2, int id3, char * ids)
{
	Product 	p;

	p = product::alloc (kGlobalStack);
	product::set (p, kID, id1);
	product::set (p, kID2, id2);
	product::set (p, kID3, id3);
	product::set (p, kStringID, ids);

	productlist::append (pp, p);
}

int main ()
{
	append_product (gProducts, 100, 0, 0, "");
	append_product (gProducts, 300, 0, 0, "");
	append_product (gProducts, 400, 0, 0, "");
	append_product (gProducts, 600, 0, 0, "");

	// *gPageTemplate = 12;
	// strcpy (gErMess, "That was your error!");
	return 0;
}
In the panels Product pool and Products of the document there is a button to reorganise des document or parts of the document:
The cleanup always starts with the Cometgroup of the first select document frame. In the next table you can see how you can control the reorganisation with which key:
| Product pool | Products of the document | |
| Alt click |
Clean up only the current page. Products that don't fit on the current page are stacked (messy) on the next page at a distance of 1x1 points. When cleaning up the next page these products keep their order. |
|
| Shift click |
Independent of the document selection the whole document is cleaned up. If the alt key is pressed at the same time, the key is without effect. |
|
| Control click |
The contents of friendly frames are also loaded anew. Attention: The control key must only be pressed before releasing the button! |
|
| Used page templates | ||
| Without Cmd key |
The page templates set in the document are not changed For new document pages the page template is used that is defined as the successor of the page template of the last document page. |
Every page template entry of the list leads to a page change with the requested page template. Thereafter the successor settings of the page templates are used. If the first selected list entry is no page template, the page template set in the document is used as the start template. |
| With Cmd key |
The page template of the first page to be cleaned up is kept. The page templates of all following pages are used according to the successor rules of the page templates. |
The page templates defined in the document are not changed. The page template entries of the list are ignored. For new document pages the page template is used that is defined as the successor of the page template of the last document page. |
For the installation of the tables and data records needed for the product pool please open the installation folder und execute all sql files in an sql program in order:
@ 'Daten/Products/products.sql'
Since v4.1.5 R23000 After the last finish of your documents you may probaly wish to update prices and some other things agai, but your agency has no access to your data system. In this case, the required data can be recorded in advance. The agency then only needs the folder with the recorded placeholder content.
To set the update folder, please use the menu
Behavior when loading placeholders ->Set update folder
To activate recording, choose menu
Behavior when loading placeholders -> Load and export to update folder
To use recorded date, please choose menu:
Behavior when loading placeholders ->Import from update folder
Using the cScript funcrions prefs::set_updatetype, ... you can also script this steps.
Actualization merely replaces content. Loading actions that make further document changes or replace content only partially or incrementally can not be supported.
The data folder does not need to contain data for each placeholder of the document. However, if it contains data for a placeholder, data must be available for all products that are to be updated.
The panel shows the products built up in the current document.
The list of products shown in the panel can be changed manually. Use to reorganized the document according to the current list. The reorganization starts with the page of the first selected entry of the list. If this page contains a continuation template, it goes back to the first Comet Group of the continuation. If no list entry is selected, the reorganization starts at the beginning of the document.
Frames and Comet groups added manually to the document are automatically deleted by the reorganisation.
The list can be edited with the following actions:
| Action | Button(s) | Description |
|
Reload the list |
 |
Attention : Manual changes to the list will be lost when reloading! |
|
Exclude layers from the reorganisation |
In the Layout Layers pop-up, any number of layers of the document can be excluded from the reorganization. The setting is valid until the next change of page template. |
|
|
Change order |
  |
Buttons |
|
Delete elements |
 |
Button |
|
Add page breaks |
Drag and drop from the panel Page Templates. Please note that each page template means a page change. |
|
|
Add products |
Drag and drop the products from the Product Pool |
|
|
Change product template / page template |
Pop-up Template/Page Template below the list. The content of the pop-up menu depends on the type of list entries selected. |
|
|
Change page breaks |
Clicking the page symbol at the beginning of the page templates lines changes the page type of the page break from Any to Right page to Left page back to Any. Missing empty pages are automatically inserted by the reorganization. |
|
|
Take over manually added frames and Comet groups |
 |
If the eye button on the left of the list is red, manually created frames and comet groups are included in the document structure. |
|
Save list |
|
With the button A list saved in this way can be reloaded into the panel using drag and drop. This is particularly helpful for tests. |
With activated synchronisation of the selection  the frames of the product are selected in the document. This makes it possible to select frames of several spreads, which is not possible with InDesign® on-board tools - a good opportunity if frames are to be (re)edited uniformly in some way. We have built in two standards scripts here:
Any number of further actions can be defined as actions of ClassID 39. The following global variables are defined in the scripts:
| Name | Type | Description |
| gDocument | ItemRef |
Current document |
| gParam1-4 | char* |
char*-Strings of the paramters 1-4 |
| gParamInt1-4 | int |
int values of parameters 1-4 or 0 if the value is not an integer string |
| gParamFloat1-4 | float |
foat values of parameters 1-4 or .00 if the value is not an floating number |
You can enter any text in the inputdocumentation of the action. This text is shown as help text for the action in the panel. Please note that help texts are limited to 255 characters by InDesign®.
outputdocumentation describes the four parameters of the action in a ##-separated list. Single-line texts generate a single-line text input field for the parameter. Line separators within a token automatically create a pop-up menu for the corresponding parameter with the line texts as content. An '!' at the beginning sets the default entry. With '-' you create a menu separator.
 .
.