CometTests are intended to ensure that possible deviations or errors in plug-in or InDesign® changes can be detected as quickly as possible. The more tests you have defined, the more certain you can be that everything will still work as before after the software updates.
CometTests are defined and executed using the panel Comet Tests .
There are two different types of tests :Document Tests and Assert Tests.
Each Document test performs the following four steps (a more detailed description can be found here) :
The correctness of the proofs must be checked manually. See here for more information.
Since document tests are based on image comparisons of proof and actual results, document tests can only test what leaves visible traces. For example, to check the number of files created in a test, this number must be made visible, e.g. by an inserted text in the document. Here you can find more about test strategies.
Make sure that your tests are executed in a stable, unmodified test environment! Test results essentially depend on the test data not being changed. Test transformation includes everything that has an influence on the appearance of the result, i.e. fonts, images, templates, placeholders, database contents, etc..
With Assert tests, the procedure is much simpler because they do not require an InDesign® document. With assert tests, a cScript is executed in which the call to the test::assert function determines whether the test has run successfully or not. This way you can define yourself the criteria under which a test succeeds or fails.
Please note : A missing call to test::assert is an error already.
All tests can use different data sources. However, documents and actions of tests must be locally defined (and are not obtained from the external data source).
The test definition is done in the comet_test_suites.xml file of the user prefs:
Comet tests can also be stored in and loaded from other files. To do this, use the ![]() button at the bottom right of the Comet Tests panel. The current path of the test file is displayed to the left of this button. Once set, it is retained when InDesign® is restarted.
button at the bottom right of the Comet Tests panel. The current path of the test file is displayed to the left of this button. Once set, it is retained when InDesign® is restarted.
Tests can be sorted into treeviews of any depth. Here is an example of a used XML file:
<comet_tests>

				 <structure_version>2</structure_version>

				 <domain>

				  <id>2</id>

				  <name>Base Functions</name>

				  <description/>

				  <children>

				   <domain>

				    <id>3</id>

				    <name>Create Frame</name>

				    <description/>

				    <children>

				     <test>

				      <type>kDocument</type>

				      <id>4</id>

				      <name>cScript</name>

				      <connection></connection>

				      <file>$DOCUMENTS/CometTests/Base Functions/Create Frame/createFrame_cscript.indd</file>

				      <prescript></prescript>

				      <action>$DOCUMENTS/CometTests/Base Functions/Create Frame/createFrame.cpp</action>

				      <postscript></postscript>

				      <simulateoverprint>0</simulateoverprint>

				      <description/>

				     </test>

				   </domain>

				   /children>

				 </domain>

				</comet_tests>
Test definitions are maintained entirely via the panel Comet Tests. Here is a full description of the XML structure anyway:
Paths may start with the usual $prefixes for file paths. Test environments with such files can easily be passed between different users and it is certainly a good idea to store test documents at such centrally defined paths. The conversion of the paths is done automatically by the priint:comet plugins. For example, the file
/Users/your_name/Documents/comettests/scripts/aaa.cpp
is stored in the test like this automatically:
$DOCUMENTS/comettests/scripts/aaa.cpp
Additionally, the keyword $DEFINITIONFOLDER is defined and replaced by the path of the current test definition file. Furthermore, the respective parent folder can be reached with ../ at any position in the path. So if the file with the test definitions is e.g. in the folder C:/Users/leo/AppData/Local/werkii, the path $DEFINITIONFOLDER/../aaa.indd points to the file C:/Users/leo/AppData/Local/aaa.indd .
Please note that test definitions are defined independently of data connections. Connection-specific aliases can therefore not be supported when defining test.
Data connections are defined in the connections.xml file. The file has exactly the same format as the connections.xml of InDesign® Server and comet_pdf. The file must also be located in your user prefs:
<connections>

				 <connection>

				  <id>1</id>

				  <name>demo</name>

				  <type>odbc_utf8</type>

				  <server>demo</server>

				  <user>demo</user>

				  <password>****</password>

				  <db>comet_config</db>

				  <lang></lang>

				  <client></client>

				  <passcredentials></passcredentials>

				 </connection>

				</connections>
In the test description, a data connection can be referred to in the <connection> element. If the element is not empty, the desired data connection is established before processing. After the test, the data connection is disconnected again.
Each Document Test requires its own InDesign® document. The document is specified in the test description in the <file> field and can be located anywhere in the local network. Incomplete paths are resolved relative to the user directory.
After executing the test, a snapshot of each spread of the document is taken. The images are stored in subfolders "next to" the InDesign® file (see InDesign® versions). The spread number is added to the name of each file. Test documents also receive the extension COMET_TEST. The document is then closed again without being saved.
InDesign® opens documents of older versions as new, unsaved documents without a file path always. Tests that require the file path (e.g. for test images) will not work in this case!
Documents that do not have a file path after opening are therefore saved to the original file after opening. From the original file a copy with the name extension _TMP_ is made before. At the end of the test, the old file is restored and the _TMP_ file is deleted.
If the test document is to remain open after the test, this procedure will not work because the modified original file still remains in use and therefore cannot be overwritten again. Therefore, if the test document is to remain open after the test, no intermediate version will be created in the current InDesign®® version and tests accessing the document path will fail.
Each test can perform up to three actions:
All scripts are defined by file paths. Preparation and post-processing may be empty, the test itself may not. The scripts may be located anywhere in the local network (but not in a database!). Incomplete paths are resolved relative to the user directory.
The preparation script is already executed before the actual InDesign® document is opened (Document Test only) - this way you can e.g. create the actual document only in the preparation script.
The test script works on the document specified in the test. Please note that the document must not be saved in the action script, because tests should always be started from the same initial situation. In the case of an Assert Test, the actions must be cScript! scripts!
The post-processing script is executed after the test document is closed (Document Tests only).
A distinction is made between four types of scripts. The script type is determined by the file extension:
| Typ | Extenter | Description |
| cScript | c, cp, cpp, crpt |
Valid cScript. Script document is the current test document. cScripts are not encrypted. |
| JavaScript | js, jsx, javascript |
Valid InDesign®-JavaScript. If no other document was open before test start, the test document is the first document of app.documents: var myDocument = app.documents.item(0); |
| AppleScript | scpt, applescript |
Valid AppleScript. With $$APP$$ you designate the name of the currently executing InDesign®. If no other document was open before the test start, the test document is the active document: tell application "$$APP$$" |
| List of Products | xml |
Establish products. A complete product build-up is performed in the test document. The file contains the products to be built and their page elements. Format and creation of these files are described in detail in the documentation of comet_pdf. Once you have created this file, the test can repeat the product build using this file. |
The panel Comet Tests contains various tools:
| Icon | Description |
Perform testExecute all tests marked with an eye. If no eye is set, all tests will be executed - because this may be a lot of tests, you will be asked beforehand if you really want to execute all tests. Before each test, all old images of this test are deleted. After the test, the status field of the test is set. Errors are displayed in the second column of the list. If you keep the ALT key pressed, the first executed test will remain open after its execution. This gives you the opportunity to check the test result. Always close test documents without saving them! Holding down the Ctrl/CMD key deletes the test results. |
|
Generate proof dataNew proof data is generated for all tests marked with an eye (i.e. new spread previews are created). If no eye is set, proof data is generated for all tests. Old proof and test data for this test are deleted beforehand. If only one test is marked, the generated proof images are opened in a graphics program. The ALT key must be pressed to trigger this action. If you hold down the Ctrl/CMD key, the proof data is deleted. |
|
Create a new testA dialog requests all the information required for a test. Please also note the information on the file path of the documents and scripts used. Holding down the SHIFT key will create a new domain. If there is no connection to a test definition file, you will be prompted to choose the location for a new file. This will then be automatically created and a connection established. |
|
Edit testA dialog requests all the information required for a test. Please also note the information on the file path of the documents and scripts used. Hold down the ALT key to open the folder containing the test document (and images) of the test. |
|
Delete testDeletes the selected test/test domain. Several modifiers are available for this action, which are activated via keys: Alt: Deletes the test from the list and from the XML definition These modifiers can be combined in any way. Thus, a combination of Ctrl+Alt+Shift permanently deletes the test and its associated data. When a test domain is selected, the action is performed for all children! |
|
Reload testReloads all tests from the XML definition. |
|
Import testsImports existing test definitions from an XML file. But of course the associated test data must be installed manually! |
|
Export testsExports the selected tests to an XML file. If a test domain is selected, all underlying domains and tests will be exported as well. The resulting file can be used as a test definition file. |
|
Connect to test fileSwitches the current XML test definition file being worked on. For this action several modifiers are available which are activated via keys: Alt: Disconnect. Empties the panel and disconnects from a definition file. |
Tests are represented as nodes in a treeview. Each node represents either a test or a test domain. A test domain represents a container for any number of tests and subdomains. Test domains can be recognized by their blue marked name.
| Icon | Description |
|
Shows whether a test is marked. If an eye is visible, this test will be included when running the tests or generating the proof data. Domain entries get an eye if at least one of the included tests has an eye. The eye is a button and can be activated or deactivated with a mouse click. If you mark a test domain with an eye, all child nodes are also activated or deactivated. |
|
|
Indicates the type of test (Pages: Document Test, Curly brackets: Assert Test) |
|
|
If this icon appears, the test has been performed successfully or the proof data has been generated successfully. If this icon appears for a test domain, all child tests have been performed successfully. |
|
|
If this symbol appears, there were errors during the execution of a test or the generation of the proof data. If this icon appears on a test domain, there were errors on at least one of the child nodes. |
|
|
If this symbol appears, the proof data is missing for the test node and must first be generated. If this symbol appears for a test domain, the proof data is missing for at least one child node. |
When running the tests, each test goes through the following steps. Oblique steps are optional and are executed only if the test is configured accordingly:
Proof data and test results of document tests are stored depending on the operating system and the InDesign® version. For this purpose, the data is stored in subfolders next to the InDesign® file of the corresponding test. These subfolders are named as follows:
(PROOF|TEST)_$OS;/(PROOF|TEST)_ID_$IDVERSION;
The variable $OS; corresponds to the operating system: "WIN" on Windows, "MAC" on the Mac and $IDVERSION; is the major version of the used InDesign® .
If proof or test data is deleted from the Comet Tests, only the data of the current InDesign® version are deleted!
When comparing the test data with the proof data, there is a fallback method:
First, an attempt is made to find proof data of the current InDesign® version. If this is not successful, proof data of older InDesign® versions will be searched until they are found or no corresponding proof data folders are available anymore. In the latter case, as a last fallback, an attempt is made to search for proof data next to the InDesign® file (where they were stored before R19216).
If no proof data of the current InDesign® version is found and data of an older version is used instead, a warning is written to the log file.
If successful, the test will be marked with a check mark :

Domain entries of the Comet Tests get this checkmark only when all subentries have a checkmark.
Erroneous tests are marked with a red exclamation mark. The error status is passed up through all folder entries:

A short description of the cause of the error appears next to the test name. In addition, the errors are included in the gray tip text of the test in the list.
If the Comet option Write logfile is activated, a separate test logfile is written at the same location as the Comet logfile.
If only a single document test was executed and the test failed because the proof and the actual result are different, the first two different images are displayed in a suitable graphics program.
Since Comet 4.1, Comet tests are also supported in InDesign® Server mode. For this purpose, a number of new cScript commands have been added to the cScript class test. Of course, these commands can also be used in desktop mode. The commands usually work with a so-called test path. This is the path with which the test entry can be found in the hierarchy of the tree (and not the file path of the test file!). Separators are normal slashes "/". If this path points to a domain, all tests below it will be considered. To consider all tests, use an empty path.
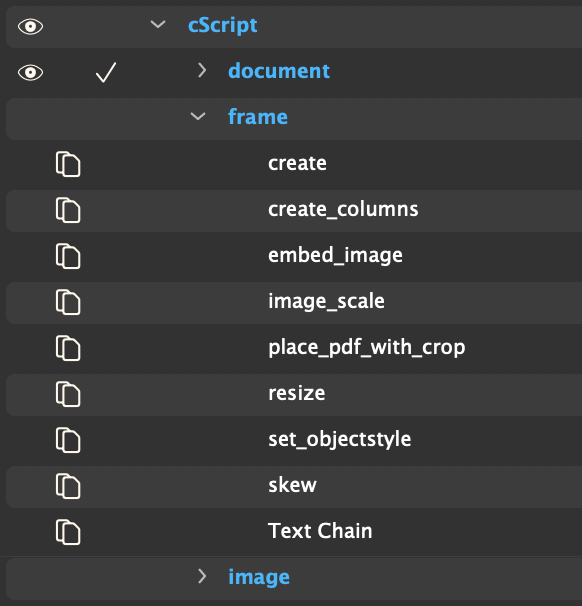
To address the tests create, create_columns, embed_image, ... use the following path:
"cScript/frame"
In the following we want to describe some strategies how tests can look like.
The most commonly used and easiest to configure tests are tests of the product build. For this purpose, simply use the document that you also use for the build as the test document. After you have done the build, save the products of the document as described here. Then undo the build, put the generated products XML and a copy of the test document into a folder of your choice and create the test with ![]() .
.
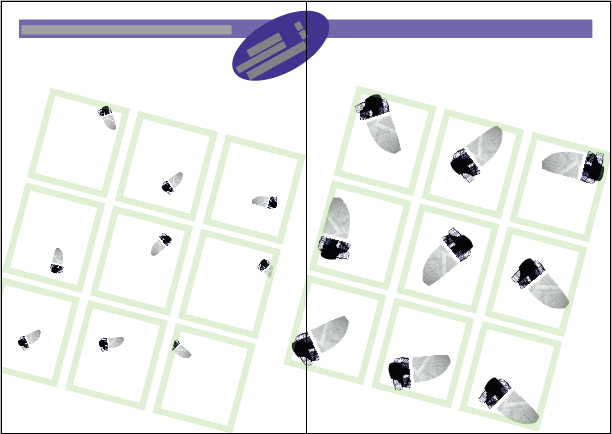
We often made test documents in double-sided documents: on the left document pages are the test frames, on the right document pages are the results.
This actually seems unnecessary, since the CometTest for its part already records before and after images. However, in the case of failed tests, you as a human can more easily see the differences.
In the image you can see a typical page of our test document for image placements: On the left you see the frames before applying the Adjust Image Placement layout rule; on the right, you see the expected results. If a test designed in this way goes wrong, it is now quite easy to find the place of the error:
This way you can check placeholders in a fairly simple way:
Use the following script to load all placeholders of a document. Applied to the placeholder created above, the script causes the placeholder of the left page to be loaded and the placeholder of the right page to remain unchanged - both texts or images should be the same after the test. It is best to place the script in a central folder of your test folder (which you have long since created).
//
// Description: Load all place holders of all frames of the current front document
// Author: Paul Seidel
// Date: 26.Jan 2017
// Copyright (c): 2017 Werk II, Paul Seidel
//
//

#include "internal/types.h"
#include "internal/text.h"

int main ()
{
	ItemList 	pl  	= itemlist::allframes ();
	ItemRef  	fr  	= item::alloc ();
	int   		i;

	for (i = 0; i< itemlist::length (pl); i++)
	{
		itemlist::get (pl, fr, i);
		placeholder::load (fr);
	}

	return 0;
}
Analogously to the procedure described above for testing placeholders, you can proceed to test actions that are not defined in placeholders. To do this, you can associate frames with cScripts in the XML structure of the document. These scripts are then executed by the Comet Test.
How to define cScripts in the document XML structure:
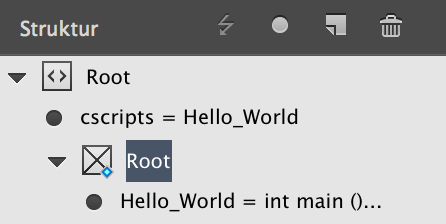
Sounds elaborate, but it is not. You only have to do steps 1-4 once.
XMLStructure scripts defined in this way can be executed in the panel Comet Admin -> Comet too.
With the script defined like this on the frame, the test is easy to create:
Now you only need a script that executes all cScripts of the XML document structure of the frames of the document. It is best to place the script in a central folder of your test folder:
//**
//
// Description: Execute cscripts defined in the XML structure  for all
//frames of the current front document
// Author: Paul Seidel
// Date: 26.Jan 2017
// Copyright (c): 2017 Werk II, Paul Seidel
//
//**

int main ()
{
	ItemList	li 	= itemlist::allframes ();
	int     	i;
	ItemRef		fr 	= item::alloc ();

	for (i = 0; i < itemlist::length (li); i++)
	{
		itemlist::get (li, fr, i);
		xml::exec (fr);
	}

	return 0;
}
Layout Rules may also be suitable for testing. The procedure is similar to that of the cScripts in the XML structure of the document:
Now you only need a script that executes all layout rules after geomtry changes of all frames of the document. It is best to place the script in a central folder of your test folder (which you have already created).
//**
//
// Description: Apply layout rules 'After geometry changes' for all
// frames of the current front document
// Author: Paul Seidel
// Date: 26.Jan 2017
// Copyright (c): 2017 Werk II, Paul Seidel
//
//**

int main ()
{
	ItemList	li		= itemlist::allframes ();
	int     	i;
	ItemRef		fr 		= item::alloc ();

	for (i = 0; i < itemlist::length (li); i++)
	{
		itemlist::get (li, fr, i);
		frame::apply_layout_rules (fr, 8);
	}

	return 0;
}
As mentioned at the beginning, Comet Tests are based on image comparisons. So only what can be made visible can be tested. However, if you want to test whether, for example, a certain file is created, Comet Tests are not useful at first. In this case you have to try to test the desired information via cScript and then write the result as text into the test document.
A test shall check whether a document can be packed. Conceivable would be the following : Add a document XML cScript to any frame of the document. (see here). The script packages the current document using document::export_ (0, your_path, "package", "", 0, 2, ...). After this test if there is actually a file at your_path and write the test result into the frame:
if (!file::exists (your_path))
{
	strcpy (txt, "<ParaStyle:><cFont:Arial>Test failed : ")
	strcat (txt, your_path);
}
else
{
	file::reomve (your_path);
	strcpy (txt, "<ParaStyle:><cFont:Arial>Test okay");
}

frame::replace (gFrame, txt);
The test itself is then created using a script from the XML Document Structure.
When you are sure that your test works properly, create the proof for the test. To do this, use the ![]() button of the Comet Tests panel. To create the proof of a test, the ALT key must be pressed.
button of the Comet Tests panel. To create the proof of a test, the ALT key must be pressed.
You might find the following functionalities helpful in reviewing your test: