| Trailer | 32 Repair Hyperlinks | 16 Replace <in:> Tags By <w2inline:> | 8 Check Tables | 4 Undefined ParaStyles | 2 Missing ParaStyles in Cells | 1 Missing ParaStyles in Empty Cells |
| ! | • | • | • | • | ||
| 0 |
All auto-corrections are switched off. [Since v4.3 R36870] In addition, the following standard corrections are automatically switched off for entries that are longer than 2 MB (bytes, not letters!):
See above for more information. |
|||||
| 1 | • | |||||
| 2 | • | |||||
| 3 | • | • | ||||
| 4 | • | |||||
| 5 | • | • | ||||
| 6 | • | • | ||||
| 7 | • | • | • | |||
| 8 | • | |||||
| 9 | • | • | ||||
| A | • | • | ||||
| B | • | • | • | |||
| C | • | • | ||||
| D | • | • | • | |||
| E | • | • | • | |||
| F | • | • | • | • | ||
| G | • | |||||
| H | • | • | ||||
| I | • | • | ||||
| J | • | • | • | |||
| K | • | • | ||||
| L | • | • | • | |||
| M | • | • | • | |||
| N | • | • | • | • | ||
| O | • | • | ||||
| P | • | • | • | |||
| Q | • | • | • | |||
| R | • | • | • | • | ||
| S | • | • | • | |||
| T | • | • | • | • | ||
| U | • | • | • | • | ||
| V | • | • | • | • | • | |
| W | • | |||||
| X | • | • | ||||
| Y | • | • | ||||
| Z | • | • | • | |||
| a | • | • | ||||
| b | • | • | • | |||
| c | • | • | • | |||
| d | • | • | • | • | ||
| e | • | • | ||||
| f | • | • | • | |||
| g | • | • | • | |||
| h | • | • | • | • | ||
| i | • | • | • | |||
| j | • | • | • | • | ||
| k | • | • | • | • | ||
| l | • | • | • | • | • | |
| m | • | • | ||||
| n | • | • | • | |||
| o | • | • | • | |||
| p | • | • | • | • | ||
| q | • | • | • | |||
| r | • | • | • | • | ||
| s | • | • | • | • | ||
| t | • | • | • | • | • | |
| u | • | • | • | |||
| v | • | • | • | • | ||
| w | • | • | • | • | ||
| x | • | • | • | • | • | |
| y | • | • | • | • | ||
| z | • | • | • | • | • | |
| # | • | • | • | • | • | |
| * | • | • | • | • | • | • |
Activate the auto correction flags 2, 4, 8 and 16 directly in the text to insert.
%UTT... because in the line U the bits 16, 8, 4, and 2 are set
The inserted text may contain text placeholder. Missing placeholdersdefinitions are automatically loaded from the data connection. Placeholders that are not defined are removed from the inserted text.
The contents of inserted placeholders are loaded automatically. With the import hint
autoload=...%!TT...
at the very beginning of the tagged text and before the %!... marker, you can control how inner placeholders in the inserted text are to be handled.
In cScript calls of frame::replace et. al. the automatic loading of the inner placeholders can also be suppressed with the autoload parameter. If the inserted text contains the import hint autoload=off/on, this parameter is ignored.
The following specifications for autoload are supported. Multiple values are separated by blanks or commas:
| Keyword | Description |
| off | Placeholders inside the inserted text are not loaded. |
| on | Placeholders inside the inserted text are loaded. |
| prefer-inner |
If the inserted text does not contain any inner placeholders, the original placeholder is applied to the entire inserted text. If the inserted text contains at least one inner placeholder, the original placeholder will be removed and the inner placeholders will be treated according to on, off. |
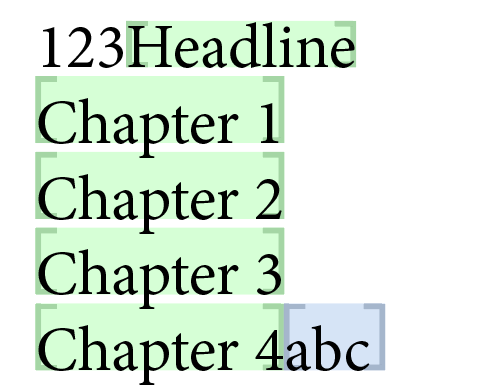
Given a placeholder that inserts the following TaggedText. (For better readability, the text paragraphs are separated by line delimiters.)
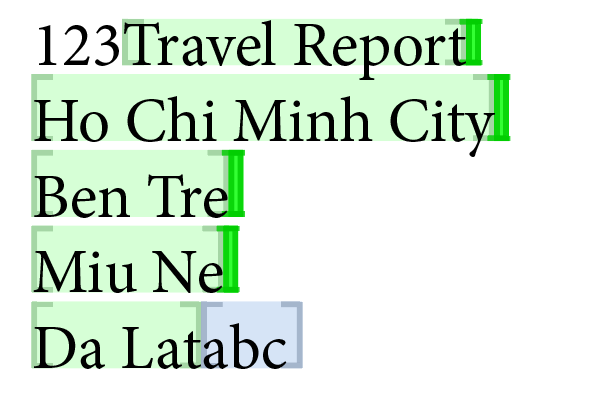
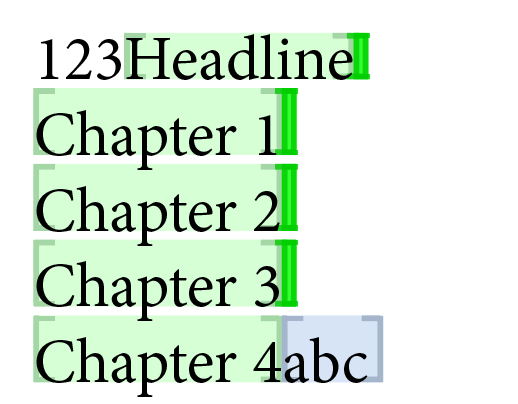
%!TT
<ParaStyle:H1>
<w2: 20, 1, 0, 0, '', infos1 'Travel Report'>Headline<w2:>
<ParaStyle:H2>
<w2: 30, 1, 0, 0, '', infos1 'Ho Chi Minh City'>Chapter 1<w2:>
<ParaStyle:H2>
<w2: 30, 1, 0, 0, '', infos1 'Ben Tre'>Chapter 2<w2:>
<ParaStyle:H2>
<w2: 30, 1, 0, 0, '', infos1 'Miu Ne'>Chapter 3<w2:>
<ParaStyle:H2>
<w2: 30, 1, 0, 0, '', infos1 'Da Lat'>
Here is a screenshot of the placeholder before loading:

The inner placeholders 20 and 30 of the inserted text only load their respective Infos1 text.
int main ()
{
    textmodel::replace(placeholder::sget_value (gFrame, "Infos1", textmodel::start ()));

    return 0;
}
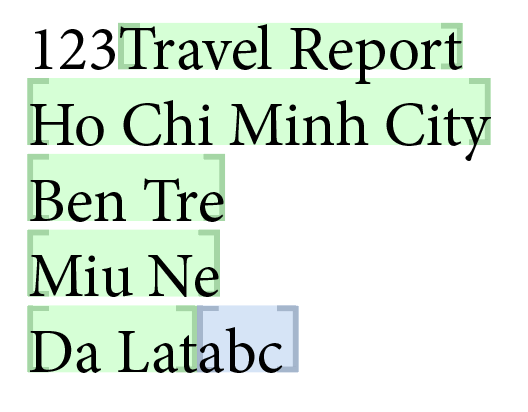
With the various specifications of autoload you will get the following results. The results differ in integrated and historical import.
Here are the results with historical import, i.e. when the Integrated Creation of Placeholders from TaggedText menu is deactivated:
| autoload | Result |
| Empty |
The inner placeholders are loaded. However, beware: the 'free' texts between the inner placeholders retain the current placeholder! Loading the text again will multiply the number of placeholders in the text! |
| off |
The inner placeholders are not loaded. But beware: the 'free' texts between the inner placeholders retain the current placeholder! Loading the text again will multiply the number of placeholders in the text! |
| off, prefer-inner |
The specification has no effect in this case and produces the same (somewhat dangerous) result as autoload=off%!TT... in the line above. |
| on |
The result is the same as if you omit the autoload info. |
| on, prefer-inner |
The result is almost the same as if you omit the autoload info. But in this case, however, the dangerous placeholders between the inner placeholders are are removed. The result will therefore be the best in (almost) all cases and we have only not made it the standard for backwards compatibility reasons.
|
Here are the results with Integrated import, i.e. when the menu Integrated Creation of Placeholders from TaggedText is activated.
Even if the integrated mode with inner placeholders appears to be the worse option at the first glance, the integrated mode is the real better choose!
| autoload | Result |
| Leer |
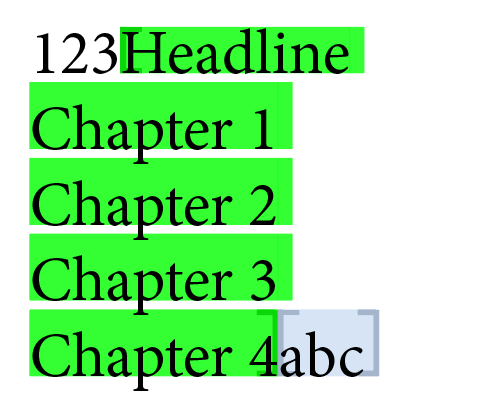
The current placeholder is applied to the inserted text before the inner placeholders are loaded. So the inner placeholders are lost and are not loaded. |
| off |
Same result as 'Empty' one line above. |
| off, prefer-inner |
The placeholder is replaced by its inner placeholders and the text between these placeholders. However, the inner placeholders are not loaded. In contrast to the historical mode, the texts between the inner placeholders no longer have a placeholder - so they cannot be multiplied on reload/update. |
| on |
Same result as 'Empty' in the first line of the table. |
| on, prefer-inner |
The current placeholder is removed and replaced by the inserted text including its inner placeholders. The inner placeholders are loaded. 'Free' un-placeholdered texts between the inner placeholders do not have a placeholder. The result will therefore be the best in (almost) all cases and we have only not made it the standard for backwards compatibility reasons.
|
[Since v4.1 R22423, 30. Apr 2018] Instead of InDesign®-TaggedText, the text can also be HTML-formatted. HTML-formatted text is marked by _html_ directly behind the %!TT trailer.
HTML imports are not part of the WERK II support!
Insert "Hello world!" into the document. The character style "red" must be defined in the document!
%!TT_html_Hello <span class="red">world</span>!
To insert TaggedText inside the HTML you use the pseudo tag <?IDTT ?>. To enter non-xml-compliant control characters for TaggedText, use the pseudo tag <?ACE ?>.
Please note that font style tags like <i> or <b> need a font before they can applied otherwise the font at the insertion point inside thr document is used. More information you will find here..
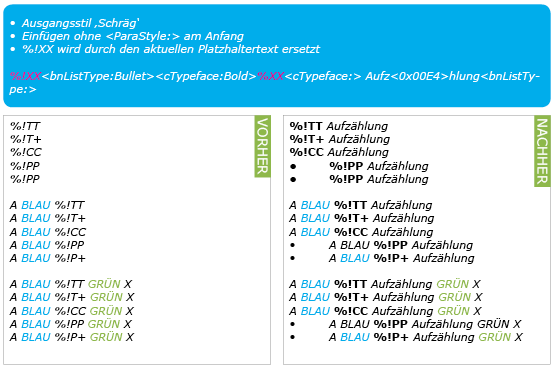
See the next screen shots for an explanation of how the prefixes are working. Imaging, you have two paragraph styles defined in an InDesign® document (The german word 'Schräg' means 'Italic' in English :-)):

#include "internal/text.h"

int main ()
{
    String		str	= string::alloc ();
    char		tt	[2048];

    textmodel::gettext (str, 0, 4, kExportPlain);

    sprintf (tt, "%s%s%s%s",
        string::get (str),	// Prefix
        "<bnListType:Bullet><cTypeface:Bold>",
        string::get (str),
        "<cTypeface:> Aufz<0x00E4>hlung<bnListType:>");

    textmodel::replace (tt, 0, -1);

    return 0;
}
The image now shows (on the left side (VORHER means BEFORE)) different situations of a placeholder in the document. On the right side (NACHHER means AFTER) you can see the loaded placeholders. No one of the placeholders
should set a new paragraph style, but %!PP and %!P+ are setting a bullet point. In addition, with %!P+ all local overrides are still there, GRüN (GREEN) and BLAU (BLUE) are not black.
Now we add a para-style at the beginning of the text:
"<ParaStyle:HTML\\_comet\\:UnorderedList-li>"
The the results are as shown below. Sll placeholders are setting the requested para style. But only %!PP and !%P+ are creating the bullet points. And, in addition, only the +-prefixes keeping the local overrides.
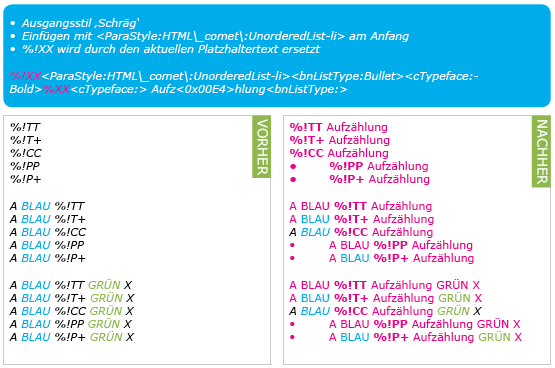
While inserting formatted text the current paragraph settings are used. But any character style settings differing from the paragraph style definition are ignored.
Imagine a paragraph style with the font Courier and a font size of 20 points defined. But at the insertion point the current font is changed to Arial 30.
The inserted text will be inserted using Courier 20. In the following example a superscripted number with an extra small size shall be inserted after nr
%!TT14<CharStyle:Superior>.01
Littera gothica quam nr.
Littera gothica quam nr 14.01.
You may expect that the 14 gets the big Arial font and the 01 Arial after all. The problem is the conflict between the two contradicted style setting from the
current text and the inserted text. In this case, the new settings are winning - and the new settings say nothing about a (bigger) font.
Normally you can not know the current settings at the insertion point. What you need is a joker, that gives you the current settings automatically at run time. Well, here it is! You can use jokers as often as you need it. But be aware, a joker ends at the next character style (<CharStyle:...>) or paragraph style (<ParaStyle:...>) usage inside your tagged text.
| Application | Syntax | Description |
| Complete | <???> | The joker is replaced by all text settings differing from the current paragraph settings. |
| Partiell | <???: style1:style2...> |
The joker is replaced by all text settings differing from the current paragraph settings except the colon (:) seperated properties.
All character properties defined by InDesign® TaggedText allowed here, for a complete list of this keywords see here.
You may know nothing about the insertion point, but you know the character style you use inside the %!TT text. So, if you know, for instance, the character style uses its own font size, ommit the fontsize from the joker by using (<:???:cSize>) |
Using jokers, you can handle the above example (Littera gothica quam nr.) well. Starting your text with a complete joker will show the 14 in Arial 30.
%!TT<???>14<CharStyle:Superior><???>.01
Littera gothica quam nr 14.01.
Thats nearly okay. Only the font size of 01 is wrong, your character style deinition of Superior says 10, not 30 points! The second joker must suppress the size information from the document!
%!TT<???>14<CharStyle:Superior><???:cSize>.01
Littera gothica quam nr 14.01.
As an advertent reader you notice, that %!TT and jokers are not necessary in the example above. It is enough to import 14.01 without any tagged text! The only thing you need
is a simple hint for 01 using the character style Superior, see Character styles of simple text.
14<CharStyle:Superior>.01
Littera gothica quam nr 14.01.
If your situation is simplified to such a solution, you should perfer the simple and fast simple text with character styles.
Only to remember and to see, how mighty jokers are, a list of all InDesign® tagged text character options :
| Typ | Tag |
| Basic character formats |
cFont cSize cTypeface cAutoPairKern cLigatures cTracking cCase cKerning cLeading cNoBreak cUnderline cPosition cStrikethru |
| Advanced character formats |
cHorizontalScale cVerticalScale cSkew cBaselineShift cLanguage |
| Character Color |
cColor cStrokeColor cColorTint cStrokeTint cStrokeWeight cOverprint cStrokeOverprint |
| OpenType Features |
cOTFOrdinal cOTFFractions cOTFDiscLig cOTFTitlAlt cOTFContAlt cOTFSwaAlt cFigureStyle |
| Underline Options |
cUnderlineColor cUnderlineGapColor cUnderlineGapOverprint cUnderlineOverprint cUnderlineGapTint cUnderlineOffset cUnderlineTint cUnderlineWeightOffset cUnderline |
| Strikethrough Options |
cStrikeThroughColor cStrikeThroughGapColor cStrikeThroughGapOverprint cStrikeThroughGapTint cStrikeThroughOffset cStrikeThroughOverprint cStrikeThroughTint cStrikeThroughWeightOffset cStrikeThroughType |
To import XPress marked text, prefix this text with %!XT. You may use text::xpress_to_tagged to check whether you get the expected results. More about technical details you can find at cxTexttempl2IQuest.
You can insert hard and soft returns into the document using the following tags/characters:
| Type | Input | Description |
| %!TT | <ParaStyle:...> | New Paragraph, possible without a style name, see here for more information |
| <nl:> | Paragraph delimiter. But in contrast to <ParaStyle:...> the current paragraph style is used always. | |
| <add_para_delim:> |
Since 4.1.8 R27406 and for InDesign® only Placeholders over several paragraphs are marked by InDesign® with modified line separators in the tagged text (see here). To prevend these line delimiters from the auto-corrections made by the priint:comet text import they must be specially marked. After automatic text correction the tags are replaced as follows:
|
|
| <rm_para_delim:> | ||
| \n | soft return | |
| \r | ignored | |
| \r\n | ||
| %!XT | \n | hard return |
| <\n> | soft return | |
| <\#10> |
| Tag Name | Syntax | Description |
| Text placeholders | ||
| w2 | <w2:...>your text</w2> |
The text enclosed be this tag will become a placeholdered text with the definitions giving in the start tag.
You may use <w2:> as end tag tag too. |
| w2cross | <w2cross:...> | Create a cross reference destination. There is no closing tag defined. |
| outw2 | <outw2:type 1, color 0>your text<outw2:> | Placeholder prefix/postfix. See here for more information. |
| Inlines | ||
| in | <in:...>any text</in> |
Create an inline frame inside the current text. You can fill the inline frame with any content you like and link the frame it self too.
In tags are able to be nested.
You may use <in:> as end tag tag too. |
| w2inline | <w2inline:...>any text<w2inline:> |
[Since v4.1 R21000] The tag is the same as the <in:> tag, except that it is integrated into the default import export of TaggedText, so it can be used in more deeply nested tables. If your previous implementation works well with <in:> tags, there's no reason to change that. For new implementations, we strongly recommend using the new <w2inline> tag. |
| graphiccell | <graphiccell:...>any text<graphiccell:> |
[Since v4.0.5 R21000 and CC2015] Convert a table cell into a graphic cell and shape the new frame.
This tag is only useable in table cells! |
| floating | <floating:...>any text</floating> |
Create a floating frame beside the current text position. Definition of floating box is given in the start tag. The text enclosed by the tag becomes
the content of the floating frame. Not supported since R 333 (11. April 2007). Use cscript functions frame::inline_, frame::inline_above, frame::anchor and frame::gt_anchor or textmodel::inline_, textmodel::inline_above, textmodel::anchor and textmodel::gt_anchor instead. Releases prior R 333 (11. April 2007) must have the FloatingElements plug-in installed.} |
| Tables | ||
| w2table | <w2table:...> | Table information for the table module.. See here for more information. |
| w2cell | <w2cell:...> | Cell information for the table module.. See here for more information. |
| Paragraph delimiters | ||
| nl | <nl:> | Insert a hard return (new paragraph). |
| w2para | <w2para:> | Placeholdered paragraph delimiter. See here for more information. |
Without the plug-in Comet or one of its variants InDesign® does not "know" the above tags and can of course not import this tags therfor. The tags will appear as plain text in the document.
The definitions used for the text placeholders of the priint:comet plug-ins (w2, w2inline, ...) are extensions of the InDesign® standard. Without further solutions, InDesign® will regard these definitions as errors when importing so-called TaggedText (and insert the tags directly and unchanged into the document). The priint:comet plug-ins offer two options for importing TaggedText with placeholders
Before the actual import, all placeholders are collected from the TaggedText and then removed. After the import, the collected placeholders are applied to the imported text. This approach has two disadvantages: Technical details of InDesign® make it impossible to always pre-calculate the correct target position in the text from the text position in the TaggedText. If errors occur, the placeholders are created incorrectly. And of course this solution will not work in the standard import.
By extending the native TaggedText Importer integrated in InDesign®, the placeholders can be created directly during the import. This extension solves both problems of the historical approach.
The following priint:comet tags can be processed with the integrated TaggedText import:
-
w2 : priint:comet Text Placeholder
outw2 : priint:comet Placeholder Prefix and -Postfix
w2cross : priint:comet Cross References
w2para : Placeholder over Paragraph Delimiters
w2inline : Inlines in Text
graphiccell : Graphic Cells in Tables
w2table : Table Information of TableModule
w2cell: Tablecell Information of TableModule
With the menus
-
Plug-Ins -> Comet -> Integrated Creation of Placeholders from TaggedText
Plug-Ins -> Comet -> Write Placeholders To TaggedText
-
prefs::get_tags_writeable, prefs::set_prefs_writeable
prefs::get_tags_writeable, prefs::set_prefs_writeable
See next table for detailed information :
| Format/Action | Remarks |
| InDesign®-TaggedText-Export |
Integrated Export If the option Write Placeholders To TaggedText is activated, all priint:comet placeholders and their definitions are written into the exported TaggedText. ATTENTION Inlines and graphics cells are not supported for TaggedText by Adobe and unfortunately we can not extend this. So, this information will be lost on export.
Historical Export If the option Write Placeholders To TaggedText is deactivated, no priint:comet tags are written into the result.
Due to some technical reasons, the export cannot completely suppress the placeholder export.
We write empty paragraph styles definitions into the output instead |
| InDesign®-TaggedText-Import |
Integrated Import If the option Integrated Creation of Placeholders from TaggedText is activated, priint:comet tags are applied on import. For w2 tags their definitions must be available either through the tag itself or from the connected data source. W2 tags with no definitions are inserted as placeholders with the ID 0. ATTENTION Graphics cells are not supported for TaggedText by Adobe and unfortunately we can not extend this. The tags are imported as text like all unknown tags. Historical Import If the option Integrated Creation of Placeholders from TaggedText is deactivated, priint:comet tags are ignored (and will NOT appear as text in the document as well). |
|
kExportTagged, <TaggedText> kExportTT, <tttext> |
Regardless of the setting of the menu, the exported text will not contain any priint:comet nor empty <dps:> tags. |
| kExportW2, <w2text> | Regardless of the setting of the menu, the exported text will contain all priint:comet tags and their current definitions. |
| Import by priint:comet functionalities (e.g. textmodel::insert) and import text trailer beginning with %!TT et al. |
Integrated Import If the option Integrated Creation of Placeholders from TaggedText is enabled, placeholders and w2inlines are created directly during import. If there is no definition of the placeholder (LoadID, SyncID, ...), an empty placeholder with the placeholder ID 0 is created. Historical Import If the option Integrated Creation of Placeholders from TaggedText is disabled, then the import is much more complex. Since InDesign® does not know our tags, it would import these tags as Text into the document. Therefore, we filter all our tags out of the text before importing them and remember their text positions and contents. This information is then placed after the import over the imported text. The critical thing hre is the prediction of the text position from the TaggedText alone. For example the length of table anchors is not predictable and the content of variables, including their text length, is only known after the import. We strongly recommend using the Integrated Import! |
Use this tag to link parts of the text with placeholders. Placeholder and record IDs are expected to be integers. The (optional) record string ID is expected to be a quoted string.
<w2:
placeHolderID,
 	recordID [, recordID2 [, recordID3 [, recordStringID
 	[, definition]]]
 	[, infos1 string]
 	[, infos2 string]
 	[, prefix string]
 	[, prefixifempty string]
 	[, postfix string]
 	[, postfixifempty string]
 	[, created string] -- in the format YYYYMMDDhhmmss
 	[, modified string] -- in the format YYYYMMDDhhmmss
 	[, rules string]
 	[, functionvariables string]
 	[, valuehashes string]
 	[, apply_infos int] -- Apply info1 and 2? 0 or 1.
 	[, static_link int] -- Fixed product ID? 0 or 1.
 	[, state int] -- Status of placeholder, see here (since v4.2 R32030).
>
Take care to insert at least one letter between the opening and the closing tag.
An example of a text placeholder including a string ID you will find here.
Giving the placeholders definition isn't necessary. This values are able to determine from the data pool by the given placeholder ID. But if you give the values inside the start tag, this requests can omitted and the speed of document building can be forced up up to 40%. The following values (after the trailing key word definition) in this order and by blanks seperated only) are expected :
- classid
- relatedto
- load
- store
- sync
- lov
- charStyle
- colorid
- syncstate
- loadConstraint
- Ask the data pool
select * from placeholder where id = [your ID]; - Create a placeholder of the given type in your document and get its values from the panel Placeholder Options.
[Since Version 2.1, R 703, 6. May 2008] Set the content of the placeholder properties Infos1 and Infos2. If the placeholder definition is read from the datapool (and not given by a definition attribute), this values overriding the the Infos1 and Infos2 attributes given in the datapool.
Dince version 4.1, R10822, 9. April 2016 You may define the values of function variables
inside a w2 tag by using the keyword functionvariables. The definitions are give in one string consisting of triples of sub-strings.
Every triple consists of a name, the value and the action type:
'"Name1" "Value1" "ActionType1" "Name2" "Value2" "ActionType2" ...'
Triples are delimited by blanks. The following action types are defined:
| Value | Action |
| 1 | Load script |
| 2 | Save script |
| 3 | Sync script |
| 4 | Build script |
Tis is the definition of a placeholder with the function variable myA set to "a2" and myB set to "prolet":
<w2: 20, 0, 0, 0, '',
 	functionvariables '"myA" "a2" "1" "myB" "prolet" "1"'
>dummy
<w2:>
[Since Version 4.1, R21700] w2-Tags may define layout rules.
A complete list of all built-in text layout rules you can find here.
Layout rules defined by the keyword
rules
The rules definitions are the same like in other placeholders,
see here for more information.
Take care to escape all quotas inside your definitions!
Define the text layout rule "Apply paragraph style" with style "blue"
rules '-2 2 ''blue'' '''' ''no'' '''''
[Since Version 4.1, R21700] Using the =-tool of the ToDos panel
you can fix the sync state of any placeholder. usng the keyword
valuehashes
you can set such a fix even on a placeholders creation. You will need a hash code of the
fixed value. To retreive the valid hashcode, please export an according placeholder to TaggedText and
copy/paste the hashcode from the export.
Here's an example:
valuehashes 'd41d8cd98f00b204e9800998ecf8427ec7cc14b03ef32c175907b93021dee7e0'
You may define pre and post fixes of a placeholder inside its w2 definition by using the keywords
prefix
prefixifempty
postfix
postfixifempty
inside the w2 tags. Values must be given as strings always.
This is the definition of a placeholder with a prefix:
<w2:
 	20,
 	0, 0, 0, '',
 	prefix '# pStyle "NITRO"',
 	prefixifempty '# pStyle "GLYZERIN"'
>
dummy
<w2:>
As you probaly know already, TaggedText and InDesign® is a very sensitive couple. One of the main reasons for wrong imports (or even crashes) are wrong line delimiters before paragraphs. To minimize import errors, the priint:comet InDesign® Plug-Ins are fixing this line delimiters right before the import: At first we remove all \r and \r\n from the text. In a second step we insert \r\n before every <ParaStyle:...>. Unfortunately, there are two cases where we can not decide if that's right:
The first case occurs when a paragraph delimiter at the end of a paragraph still belongs to a placeholder:

To recreate this, the following TaggedText is necessary:
<w2:definition>abc\r\n
<w2:><ParaStyle:...
The plug-ins auto-correctur will remove \r\n right behind abc and insert a new \r\n\ before <ParaStyle and the paragraph delimiter will not become a part of the placeholder around abc.
Here's a screen shot of the situation:
To recreate this, the following TaggedText is necessary::
abc<w2:definition>\r\n
<w2:><ParaStyle:><w2:definition>
The solution is the same one in both situations: You have to tell the import, where to put the paragraph delimiter. The way you can do this is inserting the WERK II tag <w2para:> at the right position in the tagged text. The import then will (after it fixed the paragraph line delimiters) look for all pairs of <w2para:> and their occording <ParaStyle:> and will move the line delimiter from the ParaStyle to the w2para. The <w2para:> is removed. If a <w2para:> has no according ParaStyle, it is removed silently (without adding a \r\n).
Case 1: Include paragraph delimiter
<w2:definition>abc <w2para:><w2:><ParaStyle:...
Case 2: Include previous paragraph delimiter
abc<w2:definition> <w2para:><w2:>ParaStyle:><w2:definition>
The tag defines a prefix/postfix for a placeholder: If the tag is placed directly before a w2 tag and has the value type 1, a prefix is defined. Directly behind a w2 tag and with type 2 a postfix is created. In addition you may define the color to mark the text in the document. Use the keyword color with an ID of one the colors defined in your data pool here. Value 0 stands for the default color.
Here's an example of a prefix text:
<outw2: type 1, color 0><My prefix<outw2:><w2:...
Create a cross reference definition in the document, see also insert_crossref.
<w2cross:
    name
    classid
    id id2 id3 'stringid'
    linklen
    borderVisible
    borderWidth
    borderHilite
    borderStyle
    col1 col2 col3 col4
    deleteBefore
>
All values up from id2 are optionally. The following values are allowed
| Name | Description | Default |
| name | Hyperlink name, used in the Hyperlink panel. If empty, the label Cross reference is used. | "" |
| classid | Class-ID of the following object | - |
| id id2 id3 | Cross reference ID | 0 0 0 |
| id id2 id3 | Cross reference StringID | '' |
| linklen | Length of the cross reference definition. To avoid InDesign® crashes, 0 is strogly recommended here! But if you want ... | 0 |
| borderVisible | Hyperlink visible in document? (0|1) | 0 |
| borderWidth | 1|2|3 | 1 |
| borderHilite | One of the keywords Outline, Inset, Invert oder Invisible. | Outline |
| borderStyle | One of the keywords Dashed oder Solid. | Dashed |
| col1, col2, col3, col4 | Color parts in the range of 0.0 - 100.0 or -1.0. If three values are defined, a RGB color is used, if four, a CMYK color is used (but CMYK doesn't work for now). | -1.0 -1.0 -1.0 -1.0 |
| deleteBefore | Delete any reference with equal name and/or id existing directly before the insertion point? (0|1) | 1 |
A valid example for a w2cross tag may be this:
<w2cross:
    ''
    3
    14 1 2008 'Paul'
    0
    1
    1
    Outline
    Dashed
    100.0 50.0 0.0 -1.0
    1
>
Create an inline frame at the current text position. A complete definition of the in: tag follows. (For a better readability, int values are prefixed with an i and floats are prefixed with an f.)
Do not use the in-tag inside nested tables or in cells behind cells with inner tables! Please use the w2inline tag instead.
Sytanx of in: tag
<in:
-- frame size in points
-- (ignored in case of page items!)
fwidth, fheight -- int values allowed since v4.3 R36043
[, -- This whole block is optional.
-- frame placeholder
-- (s.a. definition attribut)
iplid, id1, id2, id3 [, sRecordStringID] [, iPosNUMBER [, fBoundingVALUE]]
-- Image by path or URL
| "path" [, iPosNUMBER, [, fBoundingVALUE]]
]
{, -- Any number of comma-separated pairs of keyword and value(s)
-- Remove text placeholders
cleartag
-- Use page item
| ID iid -- any data source, attribute and table must have values
attribute name
| table name
| pageitemID iid -- valid template
| classID iclassid
| apply_infos int -- (since v4.0.5 R20300, 4. Okt. 2017) set infos1 and infos2, addition of the following values:
0 : no
1 : frames with placeholders only
2 : all frames
4 : text placeholders in frames
-- Frame appearance
| fitframe -- fit frame to content with fixed width of single line texts
| fitframe_hw -- fit frame to content
| columns iNums fGutter
| oval
| polygon iSides
| star iEdges iInset_len
| spline points -- see description of the spline definition in frame::create
| color "name"
| color iR iG iB
| opacity fTint iMode
| stroke "color" fWidth -- Name of stroke color and stroke width in points
| stroke iR iG iB fWidth -- RGB values of stroke color and stroke width in points
| stroke_type iLinetype iAlignment fMiter -- [since v3.3.1 R4300] stroke type, alignement and miter
| stroke_gap "color" fTint -- [since v3.3.1 R4300] Name and tint of gap color
| stroke_gap iR iG iB -- [since v3.3.1 R4300] RGB values of gap color
| stroke_tint fTint -- [since v3.3.1 R4300] Tint of stroke, used only for named stroke colors
| shadow "name" fOpac iMode fdDX fDY fBlur
| shadow iR iG iB fOpac iMode fDX fDY fBlur
| vignette iCorner fWidth iType fouter_opacity finner_opacity -- see here to learn more
| wrap (±iMode | ignore) [fLeft fTopfRight fBottom]
| objectstyle 'object_path' -- [since v3.4 R5126] object style of inline, see here to learn more
| embed_image 0 | 1
-- Image Geometry -- [since v4.1 R23700]
Operations are done in order of the given priorities
Position
| i_pos_prio iprio -- 0-4
| i_pos_x fpos
| i_pos_y fpos
Size
| i_size_prio iprio -- 0-4
| i_size_width fpts -- If the height is missing, the height will be calculated automatically.
| i_size_height fpts -- If the width is missing, the width will be calculated automatically.
| i_size_refx fpts -- optional, but if set, i_size_refy must also be defined
| i_size_refy fpts -- optional, but if set, i_size_refx must also be defined
| i_size_refpoint
topleft | topcenter | topright |
centerleft | center | centerright |
bottomleft | bottomcenter | bottomright
Scale
| i_scale_prio iprio -- 0-4
| i_scale_width fvalue -- 1.0 corresponds to 100%. If the height scaling is missing, it will be calculated automatically.
| i_scale_height fvalue -- 1.0 corresponds to 100% If the width scaling is missing, it will be calculated automatically.
| i_scale_refx fpts -- optional, but if set, i_scale_refy must also be defined
| i_scale_refy fpts -- optional, but if set, i_scale_refx must also be defined
| i_scale_refpoint
topleft | topcenter | topright |
centerleft | center | centerright |
bottomleft | bottomcenter | bottomright
Rotation
| i_rotate_prio iprio -- 0-4
| i_rotate fvalue
| i_rotate_refx fpt
| i_rotate_refy fpt
| i_rotate_refpoint
topleft | topcenter | topright |
centerleft | center | centerright |
bottomleft | bottomcenter | bottomright
Skew
| i_skew_prio iprio -- 0-4
| i_skew fvalue
| i_skew_refx fpt
| i_skew_refy fpt
| i_skew_refpoint
topleft | topcenter | topright |
centerleft | center | centerright |
bottomleft | bottomcenter | bottomright
Final Alignment
| i_final_align
fillframe | -- InDesign®-Menü 'ill frame proportionally'
fitcontent | -- InDesign®-Methode 'Fit content proportionally'
fitin | -- InDesign®-Methode 'Fit content to frame'
fitframe | -- InDesign®-Methode 'Fit frame to content'
center_ID | -- InDesign®-Methode 'Center content in frame'
fitimage ipalignment fsize fmaxScale | -- frame::fit_image with Comet method
topleft | topcenter | topright |
centerleft | center | centerright |
bottomleft | bottomcenter | bottomright
-- Anchored object
| type inline | above_line | anchored
Settings for type inline
| yoffset fOffset -- Offset from base line in points, default 0.0
Settings for type above_line
| align left | center | right | text | towards_spine | away_from_spine
| above fDist -- Distance before in points, default 0.0
| below fDist -- Distance below in points, default 0.0
Settings for type anchored
| spine yes | no | 0 | 1
| object_reference
topleft | topcenter | topright |
centerleft | center | centerright |
bottomleft | bottomcenter | bottomright
| anchor_reference
topleft | topcenter | topright |
centerleft | center} | centerright |
bottomleft | bottomcenter | bottomright
| anchor_relative_x column | frame | margin | page | anchor
| anchor_offset_x fDist -- X-offset in points, default 0.0
| anchor_relative_y
column | frame | margin | page|
baseline|
X_height | cap_height | ascent | leading|
em_box_top | em_box_middle | em_box_bttom
| anchor_offset_y fDist -- Y-offset in points, default 0.0
| keep yes | no | 0 | 1
| lock yes | no | 0 | 1
-- Vertical text position
| vjust top| center| bottom| system
-- placeholder definition
| definition
iclassid
irelatedto
iload
istore
isync
ilov
icharStyle
icolorid
isyncstate
iloadConstraint
-- use of image clip paths and alpha channels
| clippath "name" -- see frame::image
| clipindex iindex
| clipflags iClipflags
| cliptoframe
| cliptolerance fValue Ignored since v4.0.5 R18123.
| clipminpath fValue Ignored since v4.0.5 R18123.
| clipinset fValue
| alphachannel "name" -- see frame::image
| alphaindex iindex
| alphatreshold iivalue
-- Built-in 'Frame Fitting Options' of InDesign®, since v4.0.5 R21000
-- Spacing and crop in points and related to the original size (100%) of the image.
-- In the image frame, the values are multiplied by the current scalings.
| fitting
int Reference point 0-8, see here
int Fitting method 0-3, see here
float >0.0 : left crop, <0.0 : left distance
float >0.0 : top crop, <0.0 : top distance
float >0.0 : right crop, <0.0 : right distance
float >0.0 : bottom crop, <0.0 : bottom distance
int Automatic fitting? 0 | 1
int Apply now? 0 | 1
| infos1 sInfos1String
| infos2 sInfos2String
| infos1 sInfos1String
| infos2 sInfos2String
-- iPos ∈ {-9, 9, 10-16}
-- iR, iG, iB ∈ {0, 255}
-- iMode ∈ {0-16}
-- iCorner ∈ {0-2}
-- iType ∈ {0-3}
-- iClipflags ∈ {0-7}
}
> Closing parenthesis of the in tag
Frames can created using defined page items. For this case you define the page items source using the attributes table,attribut and ID. By using the values table = pageitems and attribut = data you can use the page items from the panel Page items.
[Since R1582, 7. Okt. 2009] With pageitemID you can adress a template directly without filling table and attribut. These attributes are ignored in this case as well as all placeholder related attributes (definition, infos1, infos2) and all frame propoerties (fitframe - objectstyle).
With classID you can control, which placeholders of the frame are linked against the given object id1, id2, id3. If classID is missing, all placeholders are linked. The current plug-ins version supports only one ore every class, lists of classes are not supported till now.
Inlines are inserted as to be a part of the current placeholder normally. To remove the placeholder from the text positions taken by the inline frame, set the flag cleartag. Be aware to create tow placeholders by this flag, one before, and one after the inline frame. Because of this, you should use cleartag only at the beginning or at the end of the text.
After all this definitions, some examples may help you to create some placeholder tags.
Create an empty frame with a give size :
<in:11.1, 22.2></in>
To link this frame with placeholder 503 and the object [4, 0, 0], you can use the this instruction :
<in:11.1, 22.2, 503, 4, 0, 0></in>
If the above used placeholder 503 is an image placeholder, you may wish, that the image will fit to the current table cell :
<in:11.1, 22.2, 503, 4, 0, 0, 16></in>
Define where the text should appear in the text box. Choose one of the following : top, center, bottom or system. To horizontal move text, set a corresponding paragraph style inside the inline frame or use an alignment.
<in:11.1, 22.2, vjust center>%!TT<pTextAlignment:Center>Center<pTextAlignment:></in>
The script shows the usage of anchored frames prpoerties. Set type to an appropriate value.
int main ()
{
    char 	tagged[20000];
    int		r;
    int		type		= 2;

    strcpy (tagged, "%!TTHier kommt ein schwebender Rahmen. ");

    strcat (tagged, "%lt;in: 50.0, 70.0");
    strcat (tagged, ", color 255 0 0");
    if (type == 0)
    {
        strcat (tagged, ", type inline");
        strcat (tagged, ", yoffset 12.3");
    }
    else if (type == 1)
    {
        strcat (tagged, ", type above_line");
        strcat (tagged, ", align torwards_spine");
        strcat (tagged, ", above 11.1");
        strcat (tagged, ", below 22.2");
    }
    else if (type == 2)
    {
        strcat (tagged, ", type anchored");
        strcat (tagged, ", spine yes");
        strcat (tagged, ", object_reference center");
        strcat (tagged, ", anchor_reference centerleft");
        strcat (tagged, ", anchor_relative_x frame");
        strcat (tagged, ", anchor_offset_x 33.3");
        strcat (tagged, ", anchor_relative_y baseline");
        strcat (tagged, ", anchor_offset_y 7.7");
        strcat (tagged, ", keep yes");
        strcat (tagged, ", lock yes");
    }
    strcat (tagged, ">");
    strcat (tagged, "</in>");

    strcat (tagged, " Er ist rot.");

    frame::append (gFrame, tagged, 0, 0);

    return 0;
}
The in-Tag doesn't support the key names for positions. In this case you must use either the integer values or you build your tagged text by using sprintf in the following way:
char 		tt [1024];
char 		path [512]
float 		width 	= 60.0
float 		height 	= 60.0;
int 		placement = kPlaceTopCenter;

// Set the image path
//

sprintf (tt, "%%!TT<in:%f, %f, '%s', %d></in>",
 	width, height,
 	path,

 	placement);
\URL[Here you will find an example file, demonstrating all the image positionings.]{../Documents/Bildpositionierung
To run this example, you nee CometXML.pln to be installed. Please open the file 1.indd. In the Comet panel you will
find a popup menu containg the entry image .(If the entry isn't available, change the document a little bit, make an undo and save the document. The entry
should be visible now.) Select one or more empty frames and click the menu entry image. Compare the result with the ready imported frames on the right pages.
The scripts you will find this way : Open the documents XML structure part (Click the little arrows button in the bottom left corner of the document window.) Select
the frame you are interested in and navigate through the XML structure until you find a underlined entry. Open this entry and doubleclick the attribute image.
You are able to place images in any corner and in the middle of every side of a frame. Images are bigger than the current frame are shrinked automatically. Smaller images are left untouched.
In the following tables you will find all values supporting automatic image positioning. In case of a given clipping path, the bounding box of the clipping path is used to be the image frame. Here you can find test files for frame::image:
layoutrule_fitimage_CS55.indd , layoutrule_fitimage_CS6.indd
| kPlaceTopLeft 8192 0x002000 1 |
kPlaceTopCenter 16384 0x004000 2 |
kPlaceTopRight 24576 0x006000 3 |
| kPlaceMiddleLeft 32768 0x008000 4 |
kPlaceCentered 40960 0x00A000 5 |
kPlaceMiddleRight 49152 0x00C000 6 |
| kPlaceBottomLeft 57344 0x00E000 7 |
kPlaceBottomCenter 65536 0x010000 8 |
kPlaceBottomRight 73728 0x012000 9 |
The key names used in Comet versions prior 1.4 R342 (kTopCenter, ...) are still valid. The translation is straight forward, please use kPlaceTopLeft instead of kTopLeft, ... .
Web Images are supporting the alignments 1-9 (topleft, topcenter, topright, ...) and 10 (place like existing) for now only.
If the new image does not exist, any existing image will be preserved in the frame.
You can take advantage of this fact by using (more or less conspicuous) images in the template to indicate missing images here.
[Since v4.1 R21001] Sometimes it is desirable to remove the old image from the frame if the new image does not exist. To do that, simply add the value kPlaceRemoveIfNoExist to the image position:
kPlaceRemoveIfNoExist
= 0x400000
= 4194304
If an image is removed by kPlaceRemoveIfNoExist, the image inserting function (loading placeholder, frame::image, ...) return the error File not found (fnfErr, -43).
Place an image in the lower right corner. If the image file does not exist, the existing frame image is removed.
kPlaceRemoveIfNoExist + kPlaceBottomRight
= 0x400000 + 0x012000 = 0x412000
= 4268032
You may wish to trim the image to frame or vice versa. In every case the image is moved to the left top corner of the frame at first. After this step, the frame or the image (or both) are moved and/or scaled. All the image resizings except kFitContent are taking care of the original image proportions. All values can be addded by one of the placement values, but be aware, not all of the placement are sensefull.
If the image fits the frame in one direction, a placement in this direction has no effect. For example, kFitContentWidth with kPlaceTopCenter has no effect.
| Identifier Value |
Description |
| kImportOnly 10 |
Import the images without any scalings or further movings. |
| kFitFrame 0 |
Fit frame to content. |
| kFitContent 11 |
Fit content to frame Normally this action changes the image proportion. |
| kFitContentWidth 19 |
Fit image to frame width but leave the frame height untouched. |
| kFitFrameHeight 12 |
Fit image to frame width and than fit the frame height. |
| kFitContentHeight 20 |
Fit image to frame height but leave the frame width untouched. |
| kFitFrameWidth 13 |
Fit image to frame height and than fit the frame width. |
| kBestSide 17 |
If the relation between image and frame width is greater than the relation between the heights, the image is sized to the frame with and vice versa. The imge will extend the frame in the other direction in this case! |
| kBestSideCentered 18 |
like kBestSide + kPlaceCentered |
[Since Version 2.1, R1320, 24. April 2009] If the flag kPlaceLikeExisting (=0x00100000=1048576) is set, all current image settings (like roation, skewing, shadows, ...) are left untouched. Only the image is replaced. On empty frames, the remaining flags are used to place the image. If kPlaceLikeExisting is active, clippaths, bounding boxes, fit frames, ... are ignored.
[Since Version 3.2.1, R2330, 5. March 2011 und CS5] Use kPlaceWithFittingOptions (=0x00200000=2097152),
to apply the settings made in menu
Object:Fitting:Frame fitting options...
Supported since CS5. Versions prior CS5 using kPlaceTopLeft instead of kPlaceWithFittingOptions. This setting is used if the frame have not fitting options set too.
Do not add other placement flags if you are using kPlaceWithFittingOptions!
Attention: Due to an InDesign® bug, crop rectangles may change on not-proportional size changes of a frame. Of course we cannot fix this problem at image replace time.
At the very end of the image placing process, you may wish to fit the frame to the image. You can do this by setting the placement info to its negative value. Attention: Its not enough to set one part negative, set the complete value to its negative :
-kPlaceTopLeft + kPlaceLikeExisting
= -8192 + 1048576
= 1040384 > 0!
You can take care of the current cell size while inserting inlines in table cells, but be aware that further insertions may change cell sizes again. The following values are supported only while using the in tag in table::insert_TaggedText.
| Identifier Vallue |
Description |
| 0 | Import with no cell size checkings |
| kConstrainToCell 14 |
Scale image to current cell size |
| kConstrainToCellWidth 15 |
Scale image to row width. Line height may change in this case. |
| kConstrainToCellHeight 16 |
Scale image to line height. Row width may change in this case. |
Set the maximum size of the image. The bigger side of the image is set to the given value, the shorter side is scaled proportional in respect to the image.
- 0.0 : Use the frame as to be the bounding box. Images smaller than the frame are placed in its original size. Use kFitBigContentProp in cscripts.
- >0.0 : The bigger side of the image is set to the given value, the shorter side is scaled proportional in respect to the image. Images smaller than the give value are placed in its original size.
- <0.0 : The bigger side of the image is set to the given value, the shorter side is scaled proportional in respect to the image. Images smaller than the given value are increased.
For the scaling methods kFitContent, ... the image size is ignored for obvious reasons.
Combine the image with its background. See also at frame::opacity, frame::stroke and frame::shadow.
| Name | Value |
| BlendNormal | 0 |
| BlendMultiply | 1 |
| BlendScreen | 2 |
| BlendOverlay | 3 |
| BlendSoftLight | 4 |
| BlendHardLight | 5 |
| BlendColorDodge | 6 |
| BlendColorBurn | 7 |
| BlendDarken | 8 |
| BlendLighten | 9 |
| BlendDifference | 10 |
| BlendExclusion | 11 |
| BlendHue | 12 |
| BlendSaturation | 13 |
| BlendColor | 14 |
| BlendLuminosity | 15 |
| BlendNonZeroOverprint | 16 |
Forming the edges of the frame. See also at frame::vignette.
| Name | Wert |
| Sharp | 0 |
| Soft | 1 |
| Diffusion | 2 |
Define the method of edge drawing by one of the following values :
| Name | Value |
| None | 0 |
| Rectangular | 1 |
| Elliptical | 2 |
| FollowShape | 3 |
Images can be placed using clipping paths defined inside the image. Clipping paths can selected by using the 0-based index of the path or by the name of the path. Names must be given in quotes. To suppress the application of a clipping path, omit the name specification and use index -2.
The clip flags define what the clipping path should do. Values can be added.
| Value | Description |
| 1 | Invert the resulting path by combining with a path equal to the bounds of the image. |
| 2 | {Ignored since v4.0.5 R18123.} Force edge detection to use the high resolution source image (potentially much slower but higher quality. Although the 72 dpi proxy does a pretty good job). |
| 4 | Ignored since v4.0.5 R18123. For edge detection, do we remove the holes or leave them in. |
| 8 | {Ignored since v4.0.5 R18123.} For edge detection, do we only detect edges within the visible portions of the image? That is, do we crop the image to its frame before performing edge detection? |
Set the wrap contour of the inline, see also frame::wrap, frame::wrap_ignore and frame::wrap_invert. With negative values you invert the wrap.
| Value | Description |
| ±0 | no effect on text |
| ±1 | text leads past area of strip |
| ±2 | text continues in netxt frame |
| ±3 | text on both sides of object |
| ±4 | text within holes in object |
| ±5 | text follows the shape (implies both sides) |
| ±6 | text follows the standoff shape (implies both sides) |
| ±7 | text wraps only to the left side of the standoff. |
| ±8 | text wraps only to the right side of the standoff |
[Since v3.4 R5126] The object style is applied AFTER setting all anchor attributes and BEFORE applying any in-tag frame attribute. This means;
-
You can define all anchor related setting inside the object style. This seems to be easier than writing it into the in-tag.
All ofther in-tag settings like color and stroke are overwriting the settings given by the object style.
ATTENTION
Supporting object styles for <in:> tags is a good will feature that has been implemented on customer for free. Of course we do support for this - but as a (chargable) feature request.
Since v4.1 R21000
The tag is the same as the <in:> tag, except that it is integrated into the default
import/export of TaggedText, so it can be used in more deeply nested tables. Creating
inlines with TaggedText is done in two steps: In the first step, some so called
inline placeholders are created. These inline placeholders are then replaced by the corresponding inlines in a second step.
Please note that the second step is only done
if the import is done via one of the priint: comet functionalities (frame::append, placeholder, ...).
The pure InDesign® import only creates the inline placeholders:

To remove any artifacts of such unfinished attempts from your documents please use the Remove Red Dots from ~ menu of panel Placeholder Options.
If your previous implementation works well with <in:> tags, there's no reason to change that. For new implementations, we strongly recommend using the new <w2inline> tag.
The <w2inline> tags syntax is like the syntax of the <in> tag except of the following three differences:
The text between the opening and the closing tag must not be empty.. This text serves as a temporary placeholder for the inline to be created and is replaced by the inline directly after the import is replaced by the inline.
If no placeholder, no image path and no content are specified, the text between the opening and closing tag is inserted as content in the new inline. This inner text may again be TaggedText (with a %!TT prefix) and can also contain W2inlines.
Alternatively, the new inline can also be filled with the (only in w2inline defined) attribute vcontent. If this attribute is defined, the text between the opening and closing tag is ignored.
The end tag is defined only in the TaggedText complient form \span[red]{<w2inline:>. The HTML version </w2inline> is not supported.
The tag is evaluated as an integrated (native) InDesign® text attribute. That means, all < and > within the tag definition must be escaped by \'s (even within strings!). Unescaped < and > within the tags are automatically escaped by us.
But ATTENTION: < and > in StringIDs of <w2:> placeholders in the content of W2inlines must be specially masked (in exactly this notation):
< durch <
> durch >
[Since v4.0.5 R21000 and CC2015] Convert a table cell into a graphic cell and shape the new frame.
This tag is only useable in table cells!
The syntax of the tag graphiccell is the same like the syntax of the in tag, except the following things:
-
Since the frame size results from the cell size, the two introductory size specifications are omitted.
The frame of a graphic cell must always be created. Exiting frames can not be used.
The references to an existing template with ID, table, attribute
and pageitemID therefore have no meaning.
Similarly, cleartag has no meaning.
And of course, the information for the anchored object have no meaning and left unsued.
Text between the opening and the closing graphiccell tags is inserted into the generated frame as TaggedText. Information about image paths are ignored in this case. The necessary trailer %!TT is applied automatically when inserting the text (and should therefore not be in TaggedText).
Insert an image into the new graphic cell and color the background orange.
<graphiccell:
     '$DESKTOP/Images/1.png',
     5,
     color 255 128 0
>
<graphiccell:>
Insert a short red text into the generated graphic frame of the cell. Since only a standard frame is used without further gestures herfe, the text in the introductory tag can be arbitrary (but not empty!).
<graphiccell:ignore>
 	<cColor:red><cTypeface:Bold><cFont:Helvetica>xyz
<graphiccell:>
The frame of the graphics cells is linked against placeholder 70 and loaded with the object [1, 0, 0, '']. In order to adapt the image even when the row height or column width are changed, the frame basically gets a frame fitting option.
<graphiccell:
     70,
     1, 0, 0, '', 5,
     64.0,
     color 255 128 0,
     fitting 4
     1
     -10.0 -12.0 -14.0 -15.0
     1 1
>
<graphiccell:>
Not supported since R 333 (11. April 2007). Use cscript functions die Funktionen frame::inline_, frame::inline_above, frame::anchor und frame::get_anchor oder textmodel::inline_, textmodel::inline_above, textmodel::anchor und textmodel::get_anchor instead.. Releases prior R 333 (11. April 2007) must have the FloatingElements plug-in installed.
With the keyword floating the resulting frame becomes a floating frame. In the table below all propoerties of floating frames are defined :
| Attribute | Value | Description | ||||||||||||||||||||||||||||||
| anchor_len | >0 | Number of text charcters to link with the frame. Floating frames always connected with the text directly follows the end -tag </floating>. If 0 or not given, an invisible character holding the link is inserted in the text. | ||||||||||||||||||||||||||||||
| side | Horizontal frame position
|
|||||||||||||||||||||||||||||||
| base | Vertical frame position
|
|||||||||||||||||||||||||||||||
| xoffset | int oder real | horizontal offset from the pin | ||||||||||||||||||||||||||||||
| yoffset | int oder real | vertical offset from the pin | ||||||||||||||||||||||||||||||
[Ab Release 477, 2. Okt. 2007] Die Tags verbinden das Tabellenmodul mit dem TaggedText. In den TaggedText können Gruppenzuordnungen für Tabellenzeilen, -spalten und -zellen eingefügt werden. Die Tabelle selbst kann mit der ID einer Tabellenvorlage oder eines Tabellenplatzhalters verknüpft werden. Nach dem Einfügen des Textes werden den entsprechenden Tabellen die im TaggedText angegebenen Gruppen zugeordnet. Aus der in der Tabellenvorlage gegebenen (oder über den Tabellenplatzhalter ermittelte) Tabelle werden alle Tabellengestaltungsmethoden in die neu angelegte Tabelle übernommen. Danach werden die Gestaltungregeln in der neuen Tabelle angewendet.
The layout rules are defined in the TableStart tag. The following specifications are possible:
| Name | Value | Description |
| Placeholder | int | ID of a table placeholder. The load action of this placeholder is executed and must set the gobal defined variable gTableID to the ID of a valid table template. |
| Pageitem | int | ID of a valid table template. The value is used only if Placeholder is not defined or 0. |
| ApplyDesign | 0 | 1 |
Should the table design methods of table from the table template be executed? 0 : No, do not apply rules 1 : Yes, apply rules |
Here's an extented TableStart tag
<TableStart:4,4:0:0
 	<tCellDefaultCellType:Text>
 	<Placeholder:128>
 	<Pageitem:0>
 	<ApplyDesign:1>
>
The example shows a very simple placeholder script for determining a table template.
int main ()
{
 	*gTableID = 128;
 	return 0;
}
The cells of a table can be assigned to any number of groups in the table module. In the tags ColStart, RowStart and CellStart an additional Groups tag can be added. The value is expected to be a space-separated list of group name strings. The corresponding cells are then assigned to these groups.
Here are some table tags with group assignments:
<ColStart:
 	<tColAttrWidth:79.75597506234413>
 	<Groups:'Column' 'COLUMN'>
>
<RowStart:
 	<tRowAttrHeight:17>
 	<Groups:'Row' 'ROW'>
>
<CellStart:1,1
 	<Groups:'Last Cell' '25"' '10 \> 9'>
>
[since v4.1 R23334] Table rows may start at certain places like in the next columns, in the next frame and so on ((menu Table -> Cell Options -> Rows and Columns)). Unfortunately, Adobe forgot to integrate that into the TaggedText and when re-importing a TaggedText, all table breaks are lost. The only way to define row breaks is to set them later, for instance by using table::set_row_start.
To support table breaks directly while importing TaggedText, we defined the tag
<tStartOn:value>
The following values are supported for value:
-
off
column
frame
page, Not supported by comet_pdf.
oddpage, Not supported by comet_pdf.
evenpage, Not supported by comet_pdf.
The tStartOn tag must be given inside the <RowStart: ... > tag.
Here's an example for a page break:
<RowStart:<tStartOn:page><tRowAttrHeight:16.7>>
You cannot break single table cells, table breaks are useless in inner tables therfore and we will ignore such table breaks in inner tables.
The tStartOn tag is only supported on import and only by Comet functions. Only Adobe can implement the export and the standard import.
-
Two text placeholders, one without and one with placeholder options.
<w2:12,23,-14,-1>Verknüpfter Text</w2>

<w2:12,23,-14,-1,definition 1 1 2 0 0 0 45 7 1 0>
Verknüpfter Text
</w2>
Ceate an oval frame
<in: 100.0, 100.0, "your/image", 10, 0.0, oval</in>Create a frame placeholder.
<in: 15.071, 15.071, 11,3,0,0,-7,0.0></in>
The following script creates frames and inlines as shown in the screeshot. An image called vn1.JPG should be located on your desktop. Otherwise, the first inline frame remains empty.
// ATTENTION // The example contains HTML-compatible tag definitions that are filtered // out by using the Copy button in the upper right corner of the frame. // To copy the text, please use the good old copy/paste method :-) //
#include "internal/types.h"
int main () { int pg = 1; ItemRef frame = item::alloc (); ItemRef frame2 = item::alloc (); char layerName[256]; char tt[20000]; int result; int i;
// define some colors // color::define ("DOrange", 255, 90, 0); color::define ("Orange", 255, 127, 0); color::define ("HellOrange", 255, 190, 0);
// create the first frame // result = frame::create_textframe ( frame, 10, 10, 200, 200, pg, layer::name (2, layerName)); if (result != 0) { showmessage ("Error %d at first frame.", result); item::release (frame); item::release (frame2); return 1; }
// design first frame // frame::star (frame, 21, 10); frame::color (frame, "Orange"); frame::stroke (frame, "Orange", 1.5); frame::shadow (frame, "DOrange", 50.0, 1, 8.3, 9.3, 3.0);
// create the second frame // result = frame::create_textframe ( frame2, 10, 210, 300, 400, pg, layer::name (2, layerName)); if (result != 0) { showmessage ("Error %d at second frame.", result); item::release (frame); item::release (frame2); return 1; }
// design second frame // frame::color (frame2, "HellOrange"); frame::stroke (frame2, "Orange", 12.3); frame::shadow (frame2, "DOrange", 50.0, 1, 8.3, 9.3, 3.0); frame::vignette (frame2, 3, 10.0, 1, 100.0, 100.0);
// link both frames // frame::link (frame, frame2);
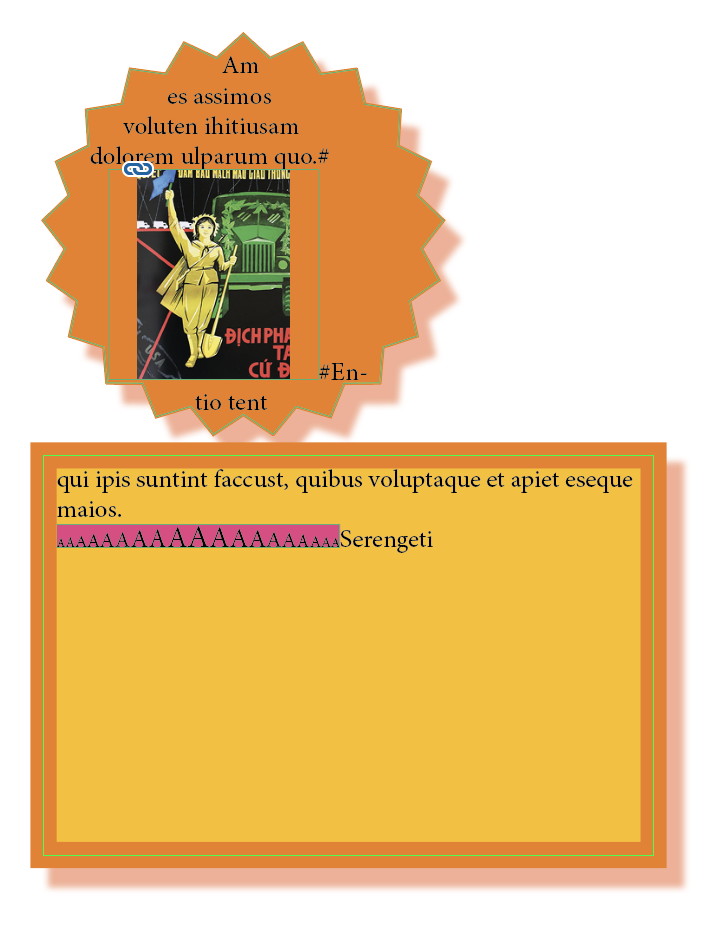
// Insert some text in the first frame. // If the text is too long, it flows into the // second frame automatically. // strcpy (tt, "%!TT<ParaStyle:>"); strcat (tt, "Am es assimos voluten ihitiusam dolorem ulparum quo.#"); strcat (tt, "<in: 100.0, 100.0, '$DESKTOP/vn1.JPG'>Dummy</in>"); strcat (tt, "#Entio tent qui ipis suntint faccust, quibus voluptaque et apiet eseque maios."); strcat (tt, "<ParaStyle:>"); strcat (tt, "<in: 180.0, 60.0, fitframe_hw, color 230 64 130>"); strcat (tt, "%!TT"); for (i = 6; i < 16; i++) sprintf (tt+strlen(tt), "<cSize:%d>A<cSize:>", i); for (i = 14; i >=6; i--) sprintf (tt+strlen(tt), "<cSize:%d>A<cSize:>", i); strcat (tt, "</in>"); strcat (tt, "Serengeti");
frame::insert (frame, tt, 0, true);
// cleaning up // item::release (frame); item::release (frame2);
return 0; }The example shows how to set a placeholder with a string ID. The script replaces the current text selection by "aaa" linked together with the placeholder 20 and the object [305501000, 1299, 1, "MY_ID"].
#include "internal/text.h"
int main () { char tt[10000];
*tt = 0; strcat (tt, "%!TT"); strcat (tt, "<w2:"); strcat (tt, "20, 305501000, 1299, 1"); strcat (tt, "'MY_ID'"); strcat (tt, ">"); strcat (tt, "aaa"); strcat (tt, "</w2>");
textmodel::replace (tt, kSelection);
return 0; }- Since
- Plugin Version 1.0.10
- Version
- 19.02.2026, 07:36 Uhr
- Author
- Matthias Seidel
Alphabetic index HTML hierarchy of classes or Java